
Wireguard + SSH
Last edited on Apr 2, 2024
Table of Contents
Protecting your SSH port is a critical part of any good Linux security policy. While the list of things to do is well documented across the internet, I wanted to give an alternative to the standard SSH protections. Why not only expose the SSH port via a Wireguard Tunnel? The steps are fairly straight forward, especially if you’ve setup a Wireguard server before. However, there are one or two unforeseen pitfalls which could trip up even more experienced users.
Note:
Part way through this article I will be locked out of my server. This is done intentionally for teaching purposes. However, I caution you to READ THE ENTIRE ARTICLE before trying to reproduce the setup.
Overview
This article is intended to be a guide on setting up Wireguard to protect your SSH endpoint, but is not on how to get Wireguard working. For a beginner’s guide to setting up Wireguard in Linux, I wrote an article on the very topic.
A Huge Security Benefit
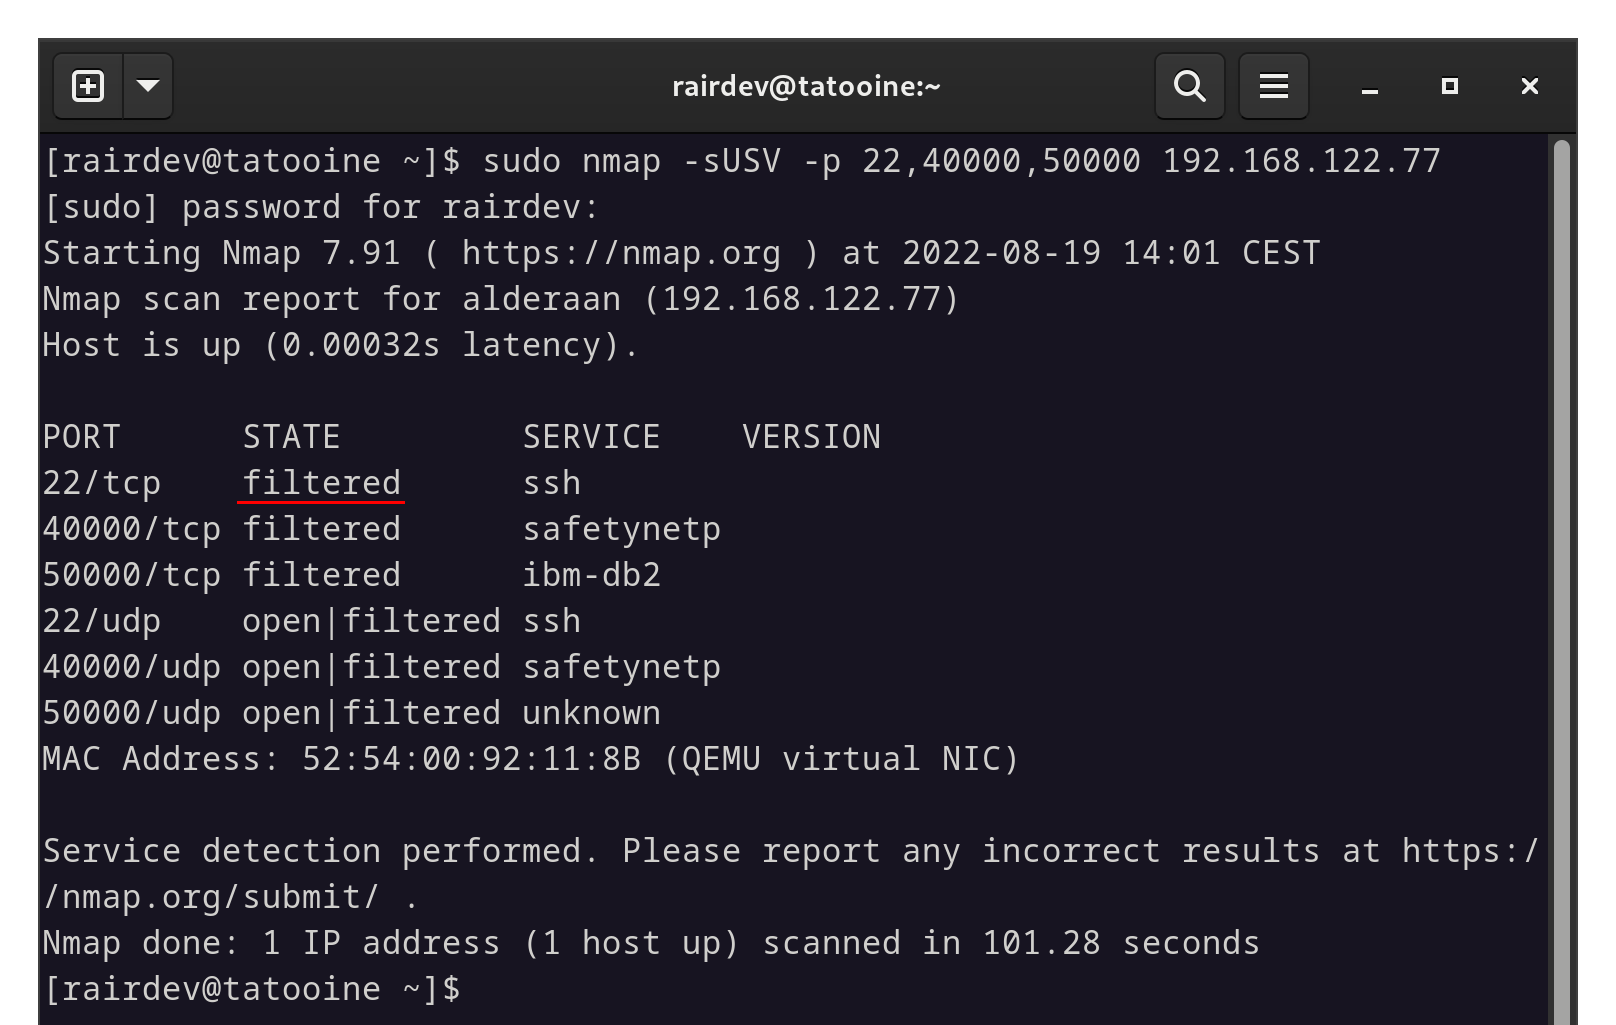
Besides the obvious, one huge benefit of using a Wireguard tunnel is that it is effectively invisible to the outside world. This means that even with the UDP port open, it won’t respond to any pings or requests that don’t provide the correct key. On top of that, you can use any port you’d like. In the example below, I have a Wireguard Peer listening on port 50000:
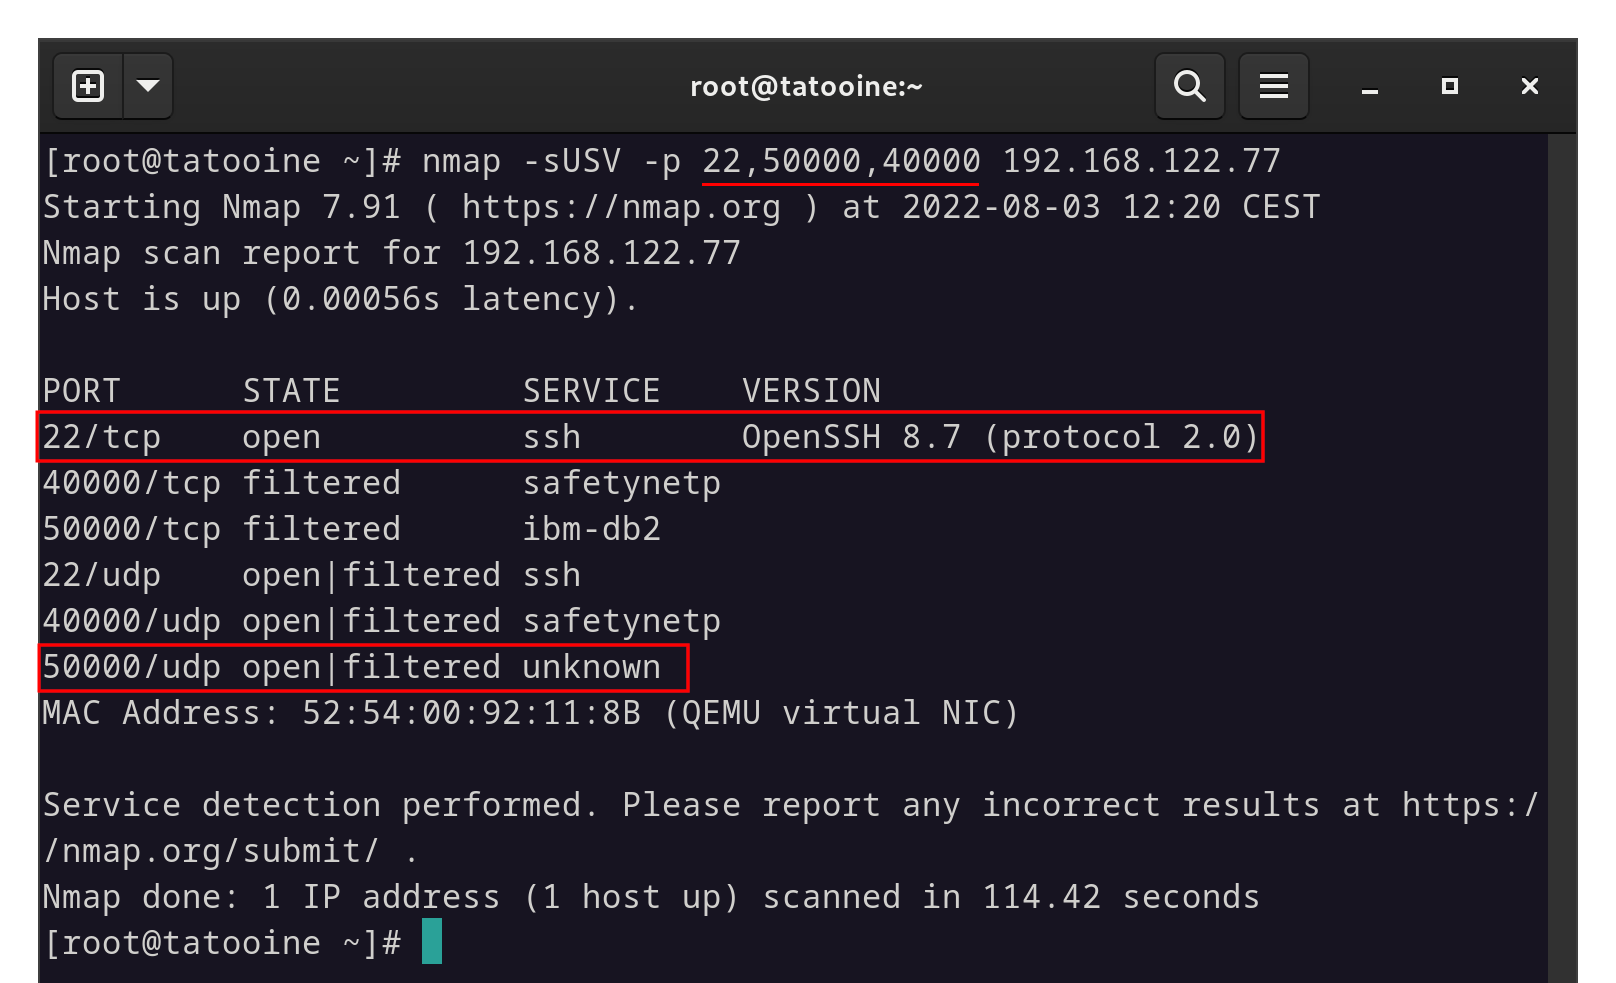
Port scanning does more than give information about open or closed ports.
Note:
Above I am scanning ports 22 (SSH), 40000 (nothing), and 50000 (Wireguard). We can see that the server responds quite generously on our SSH port, but gives no info as to the status of our Wireguard port.
Tools like nmap mean that even strategies like changing to a non-standard SSH port will only protect you for so long.
Prerequisites
- Linux Server - most any distribution with
systemdshould work. - Wireguard up and running
For this scenario I am using a pair of VM’s running AlmaLinux 9, but the same steps would apply to just about any standard Linux distribution.
Setup
To start, I have a server (Alderaan) with the standard SSH port (22) open and exposed. Preferrably, I should be using an SSH key, but for the sake of simplicity in this article I am sticking with simple password authentication.
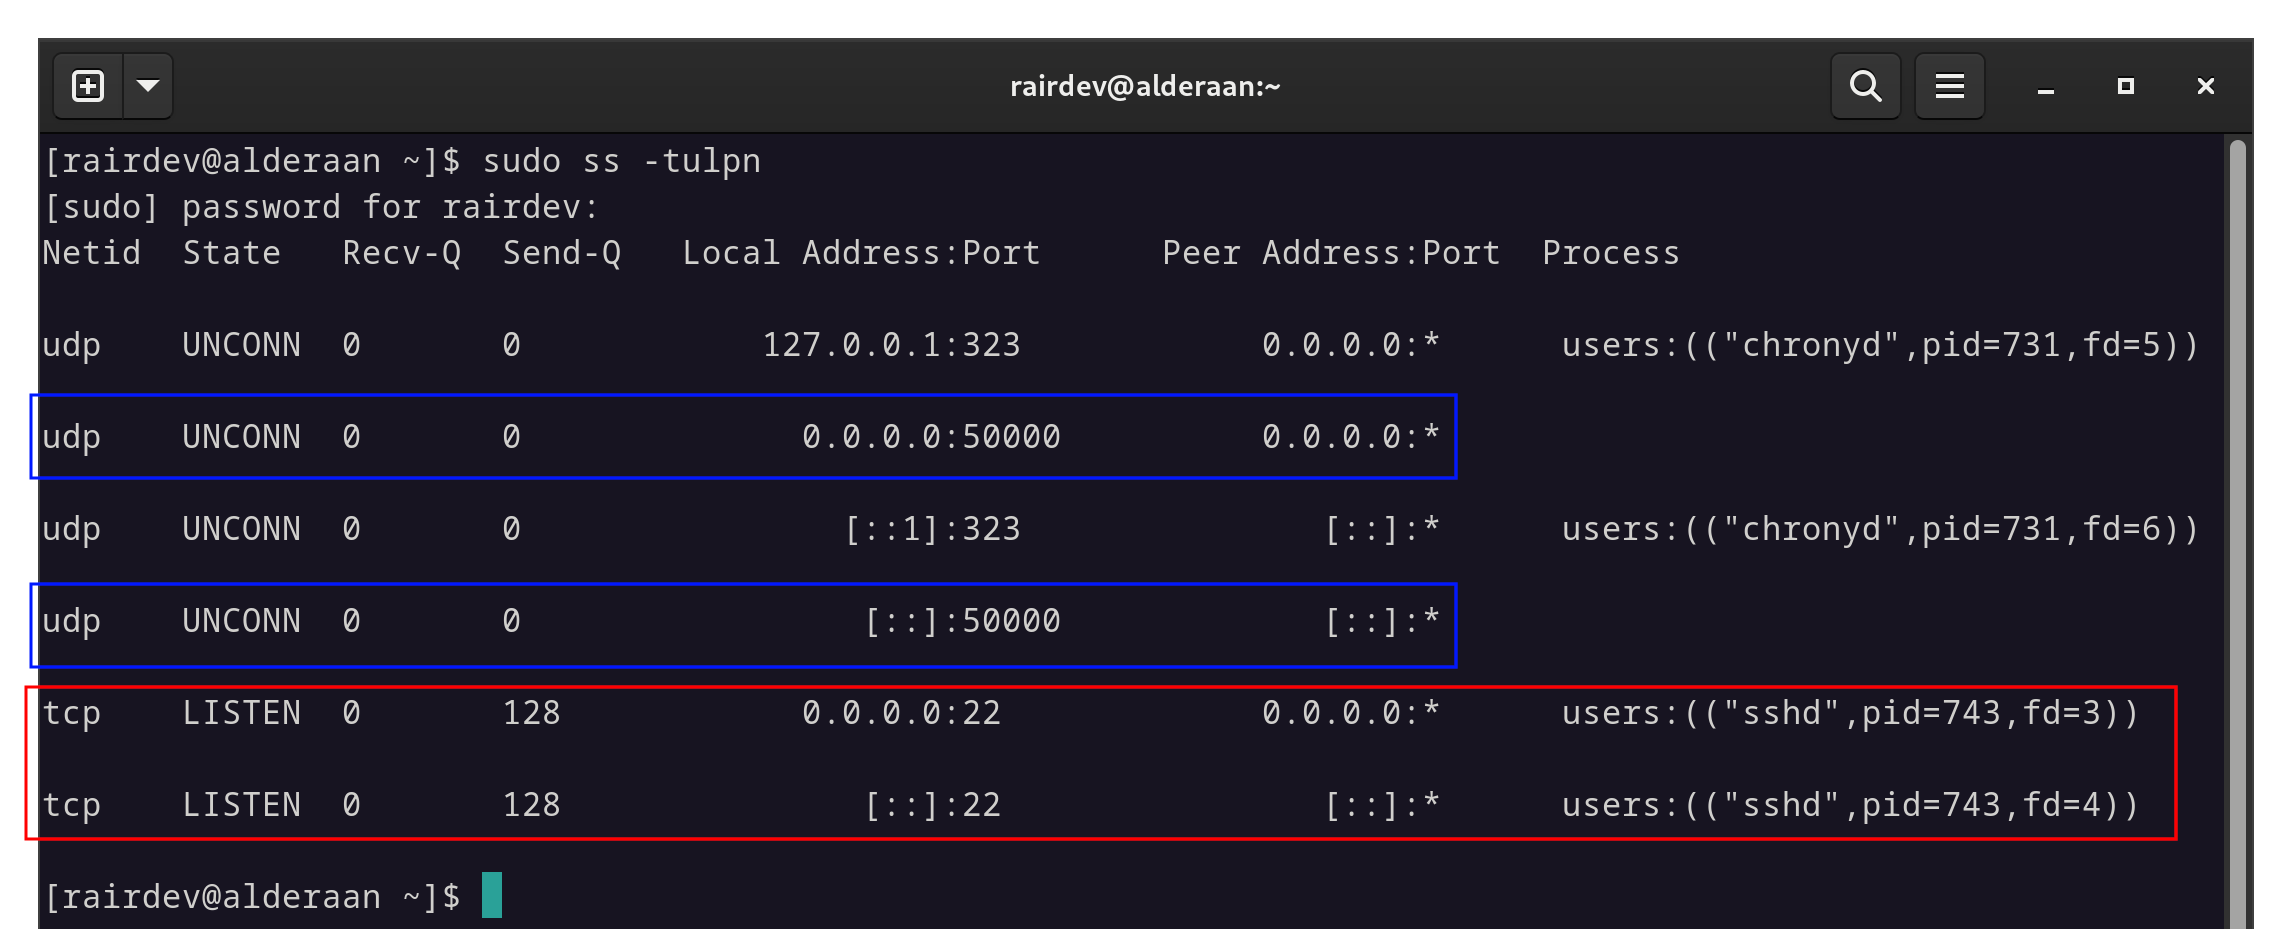
In red we see the open SSH ports, and in blue the open Wireguard ports.
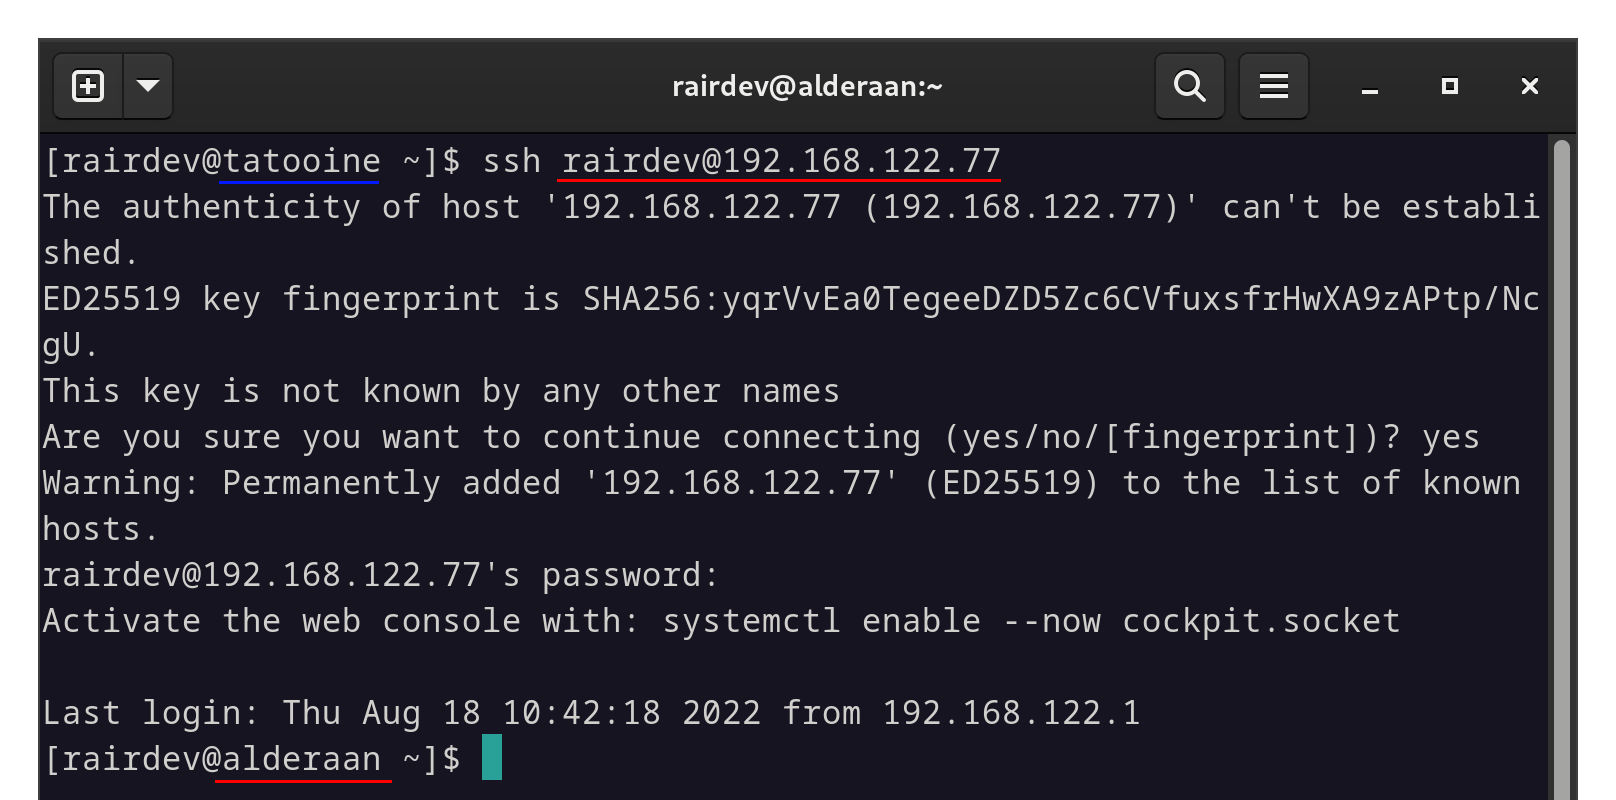
Able to connect via standard SSH port from the intended client (blue).
This represents open ports to the internet. I am also able to access the server from another unintended client on the same network.
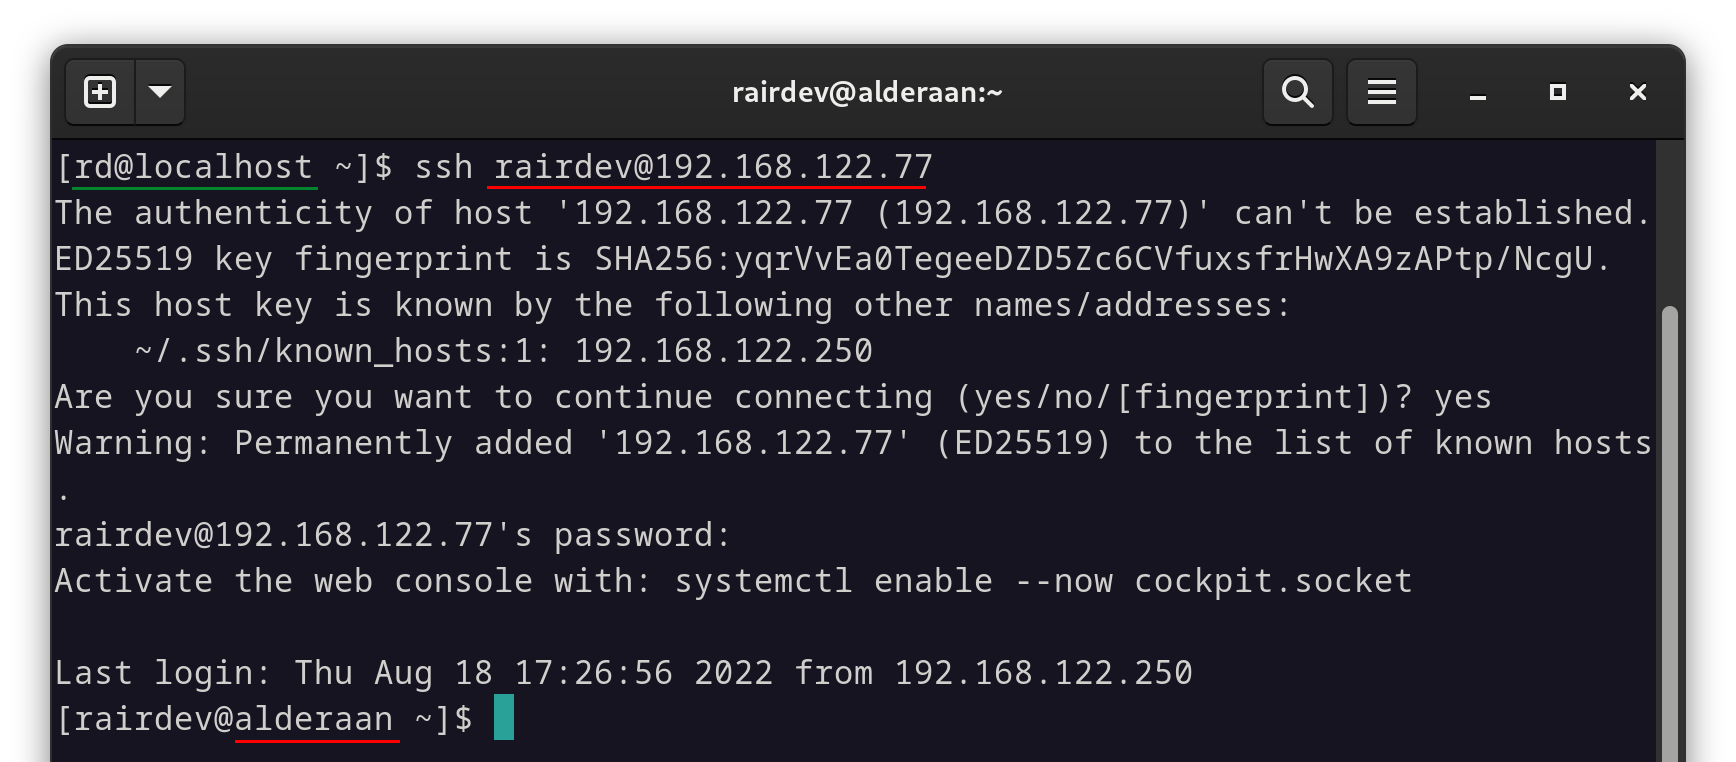
We are also able to connect via standard SSH port from an unintended client (green).
This simulates the vulnerability of the machine. While true, a key authentication along with a service like fail2ban can help mitigate some of this risk, a slight misconfiguration would give an attacker multiple vectors for obtaining access.
And for the sake of completeness, here is my server’s firewall configuration:
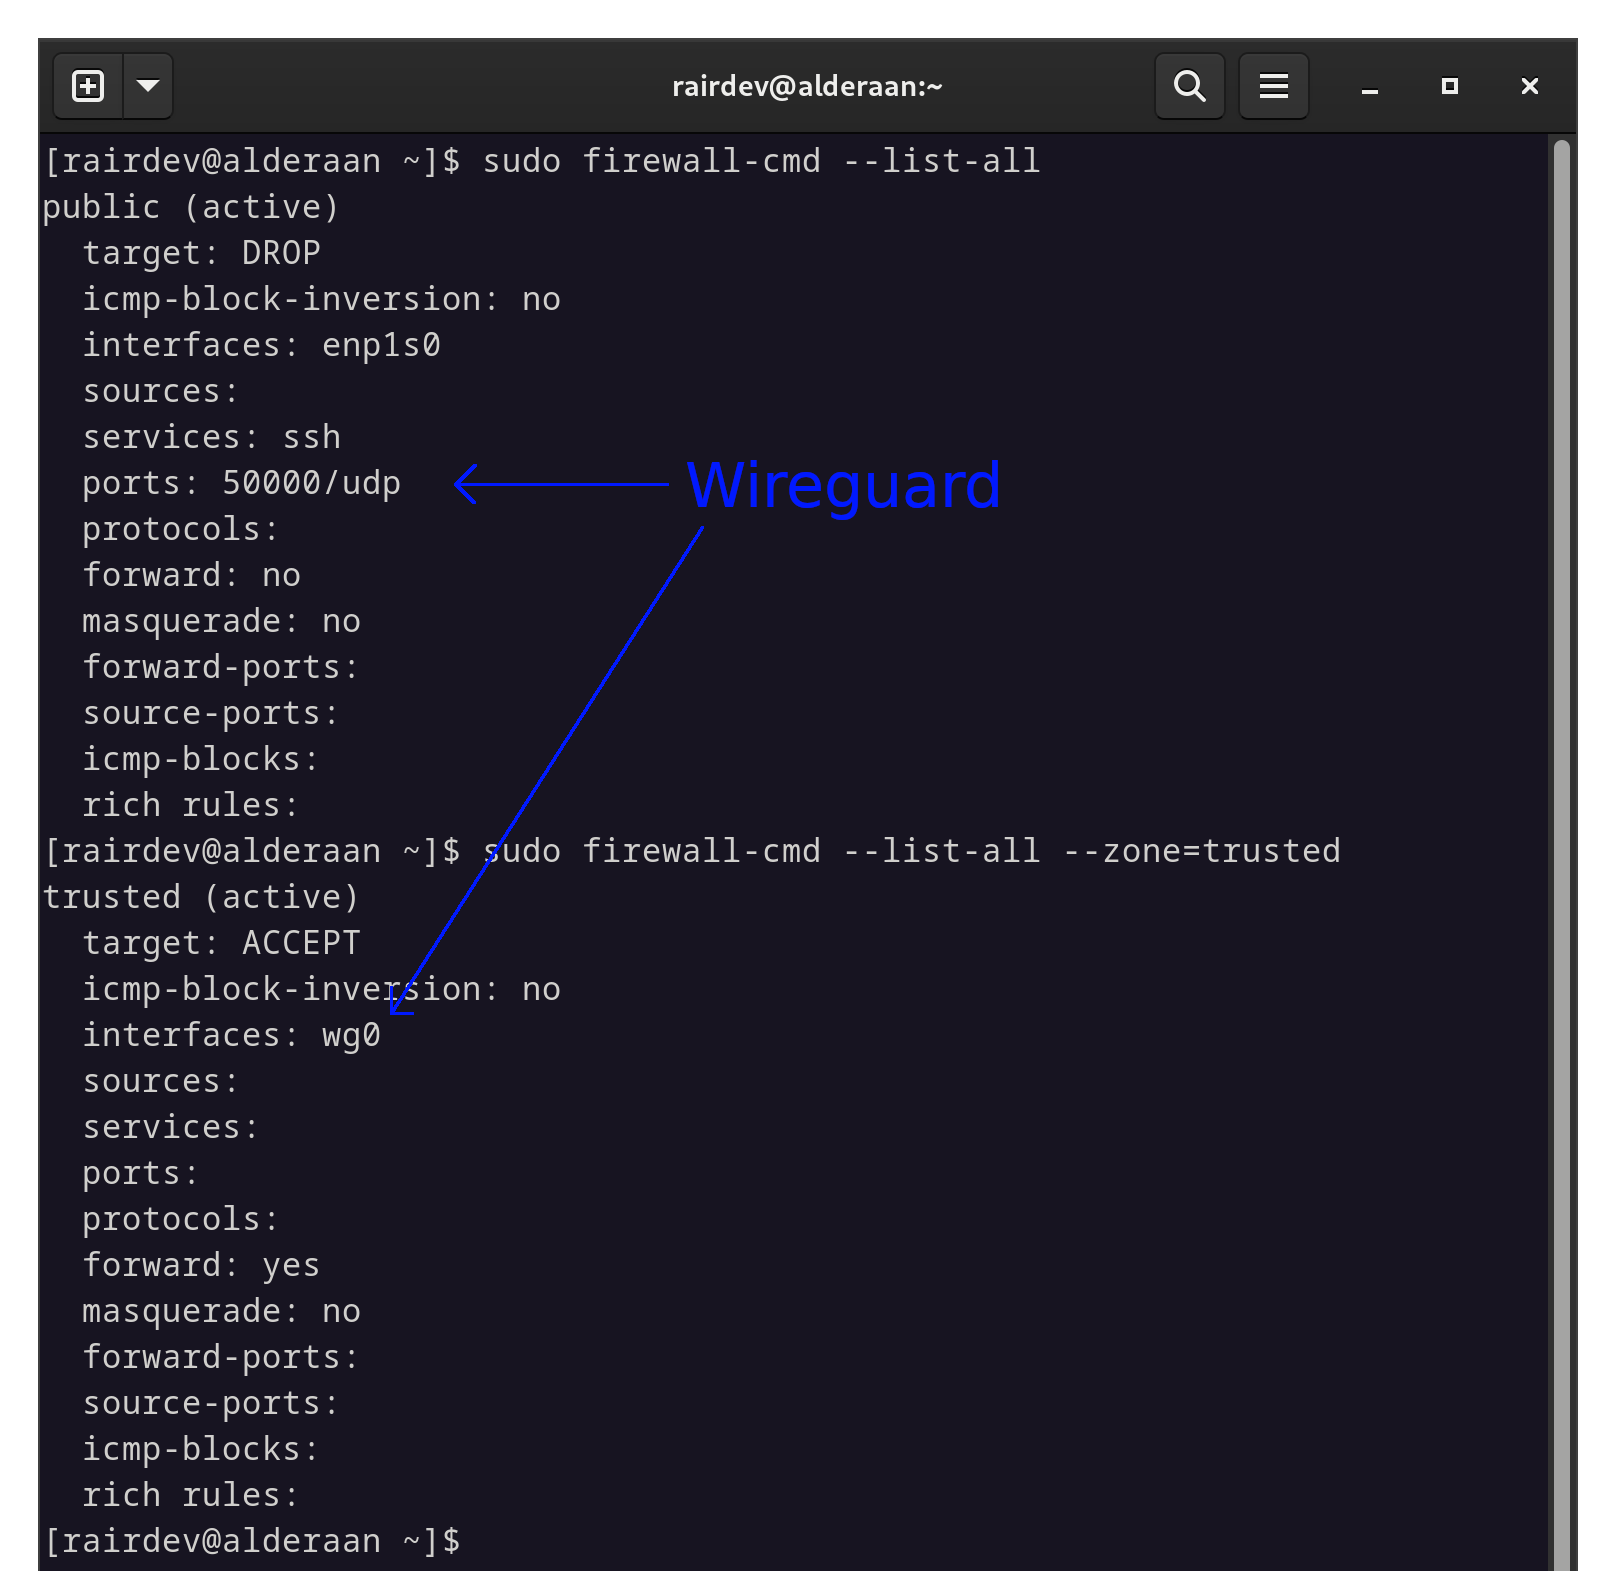
firewalld settings for our test server.
Note:
In mypubliczone I have only the outward-facing interface (enp1s0) listed, currently allowingsshand port 50000 for Wireguard. I have placed the Wireguard interface (wg0) into thetrustedzone for now to make sure it has separate rules from the other interfaces. More on this later, especially for those not familiar withfirewalld.
Start Wireguard
Make sure your Wireguard interface is up, running, and can be connected to.
sudo wg show
If you have no output, make sure the interface is up with either wg-quick or nmcli depending on how you setup Wireguard in the first place.
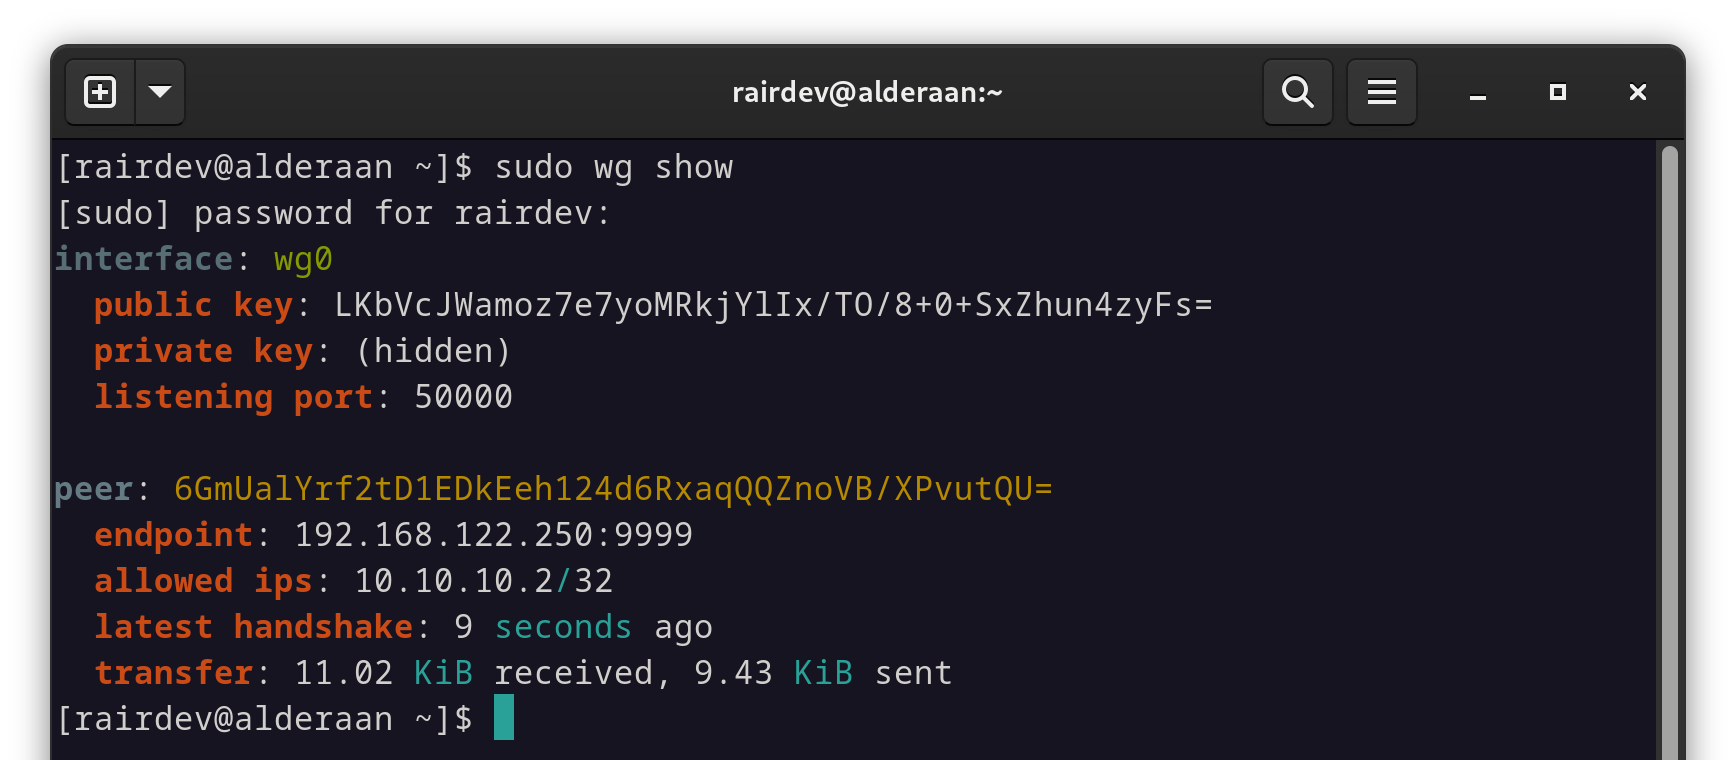
The Wireguard interface is up and connecting to our client machine.
Enable Wireguard on boot
This may be a review for many of you, but just in case, we want to have the interface up and running when we boot the server by creating a systemd service:
sudo systemctl enable wg-quick@wg0
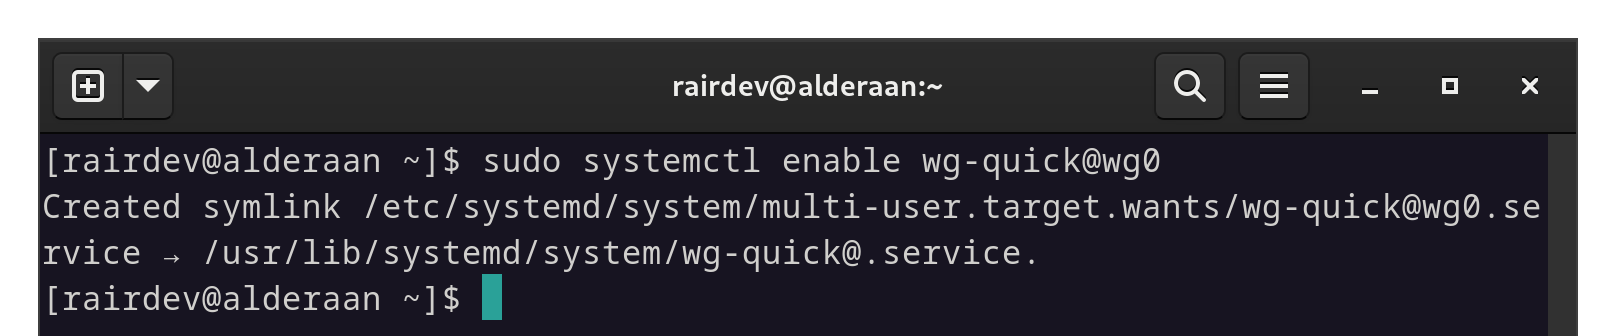
Ensure Wireguard is set to start at boot.
Note:
Take note of the output above. Thesystemdunit file already existed and now a symbolic link has been created in themulti-user.target.wantsdirectory. This will signal tosystemdthat it should be started during the boot process.
Secure SSH port
Now let’s get to the heart of the matter. We want our ssh port only accessible through Wireguard. As stated above, ensure your Wireguard connection is up and accessible or you could risk locking yourself out of your server!
First, we want to identify the IP address assigned to our Wireguard interface.
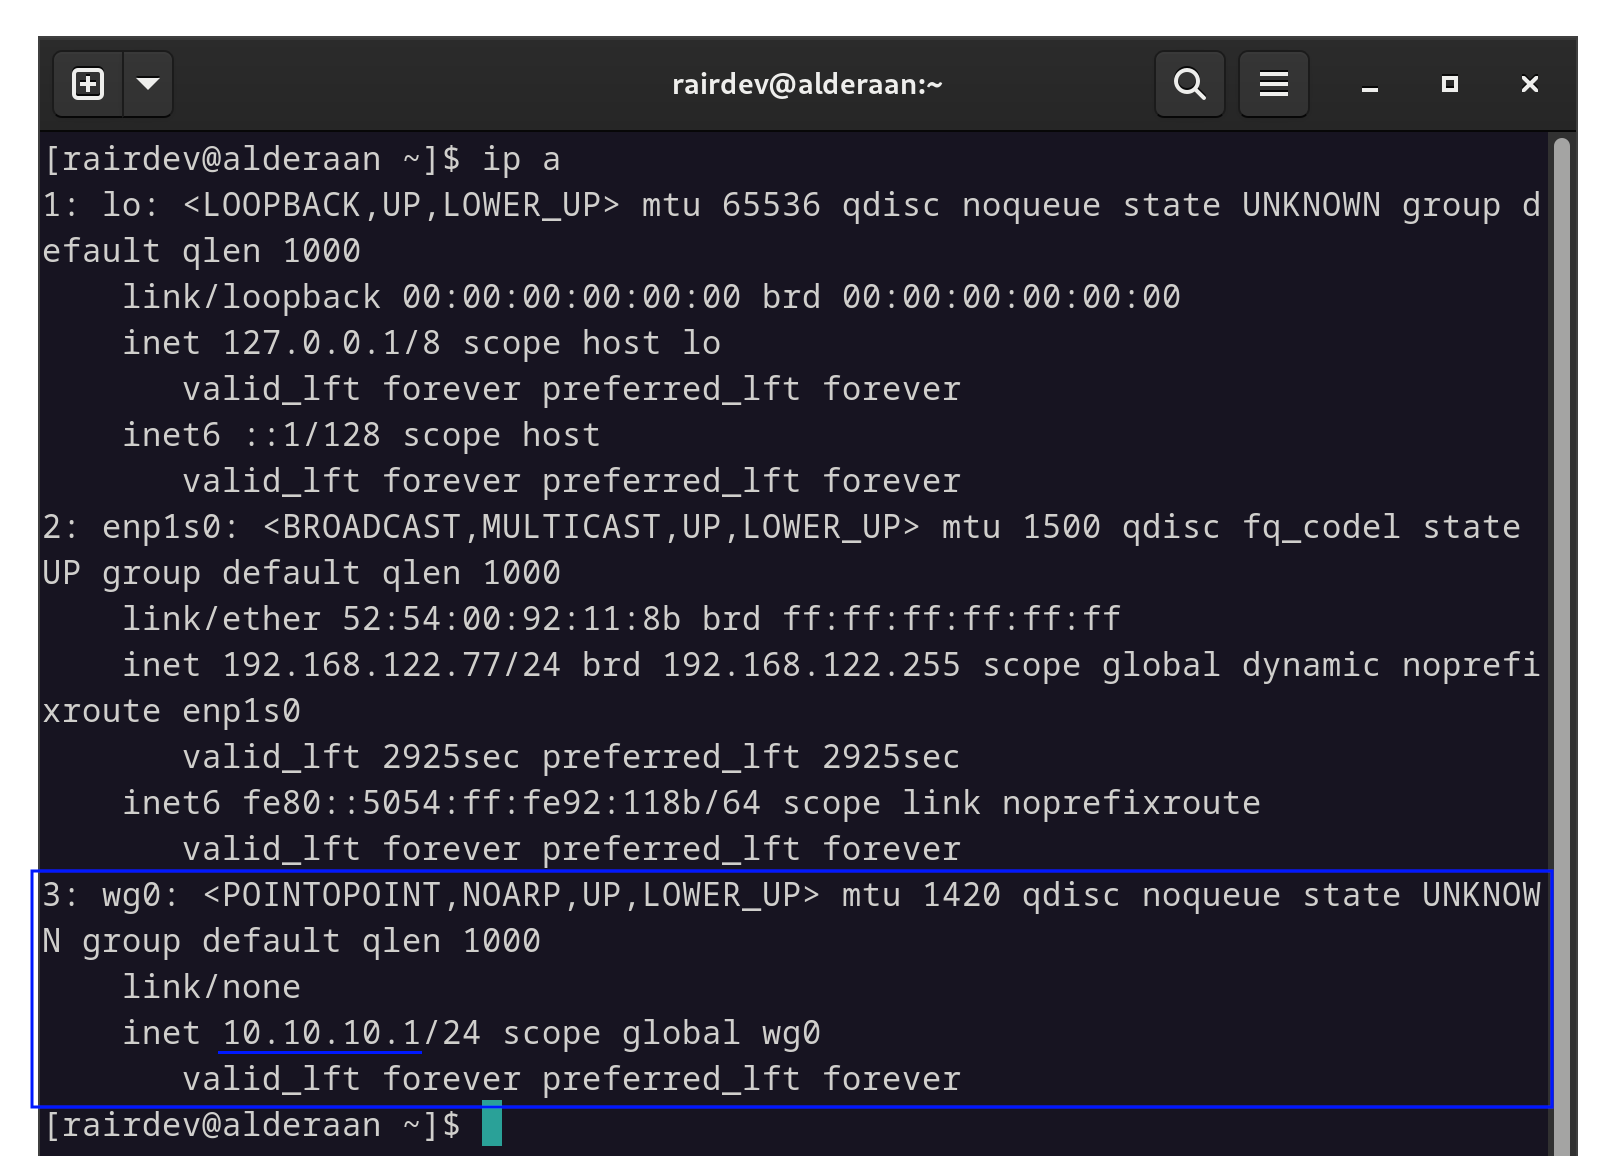
The IP address of our Wireguard interface is highlighted in blue.
Note:
Usingip ais a quick way to list all of our active interface addresses. Here we can findwg0(or whatever you’ve named your interface), and the corresponding IP address(es) assigned to it. In my case, I’m sticking with IPv4:10.10.10.1.
Begin by editing your ssh config file. In my case it’s located in /etc/ssh/sshd_config. You can also create a file under /etc/ssh/sshd_config.d/ so as not to modify the original file.
We are primarily concerned with the ListenAddress lines. Be default, sshd is listening on all interfaces (both IPv4 and IPv6) as shown by the addresses 0.0.0.0 and :: respectively.
I’ll edit the file to listen only on the Wireguard interface via IPv4, and only the local machine for IPv6.
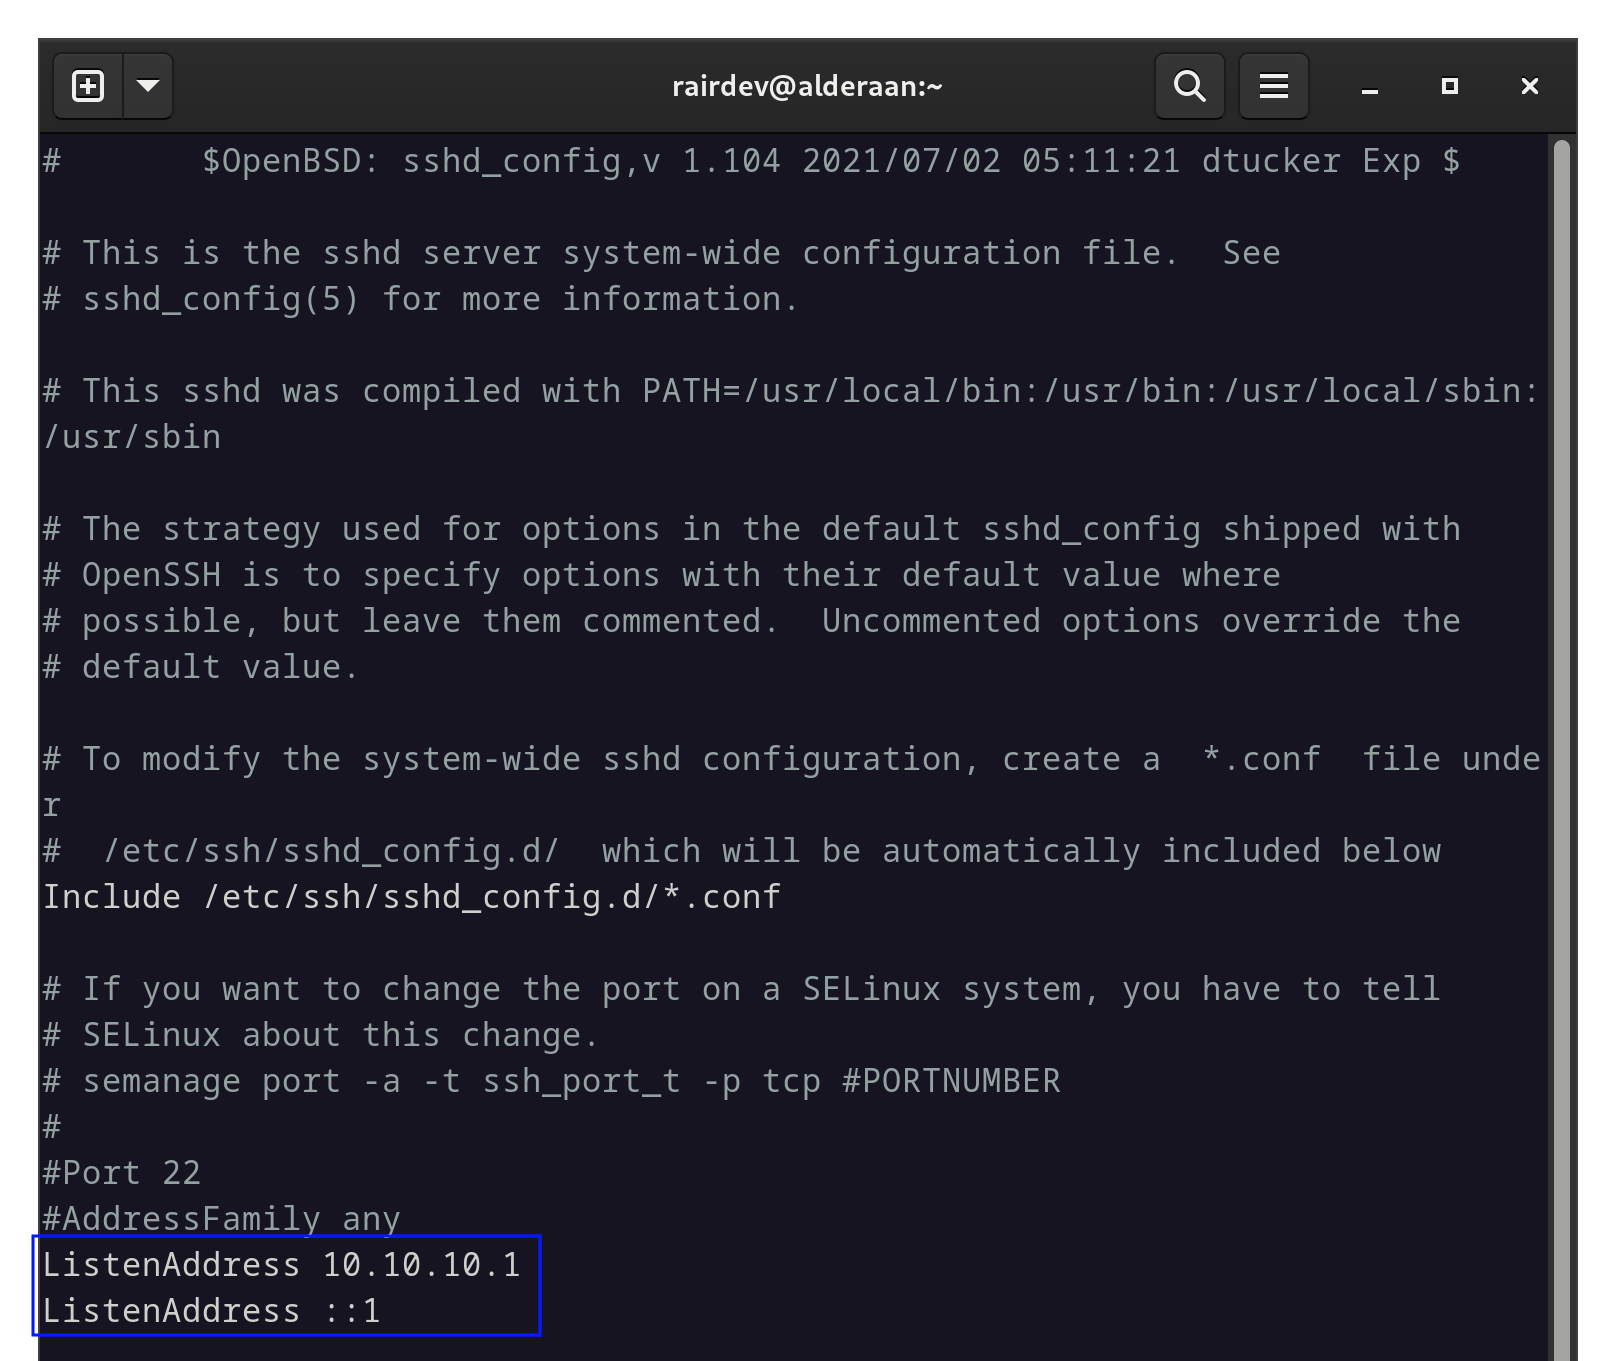
Only two lines need to be uncommented and changed.
Now all that’s left is to restart the sshd service to enact our changes made to the config file.
WARNING:
As stated at the beginning of this article, we are entering a territory that could lock you out of your server! Please, read to the end to understand the consequences of our actions and what considerations we need to accout for!
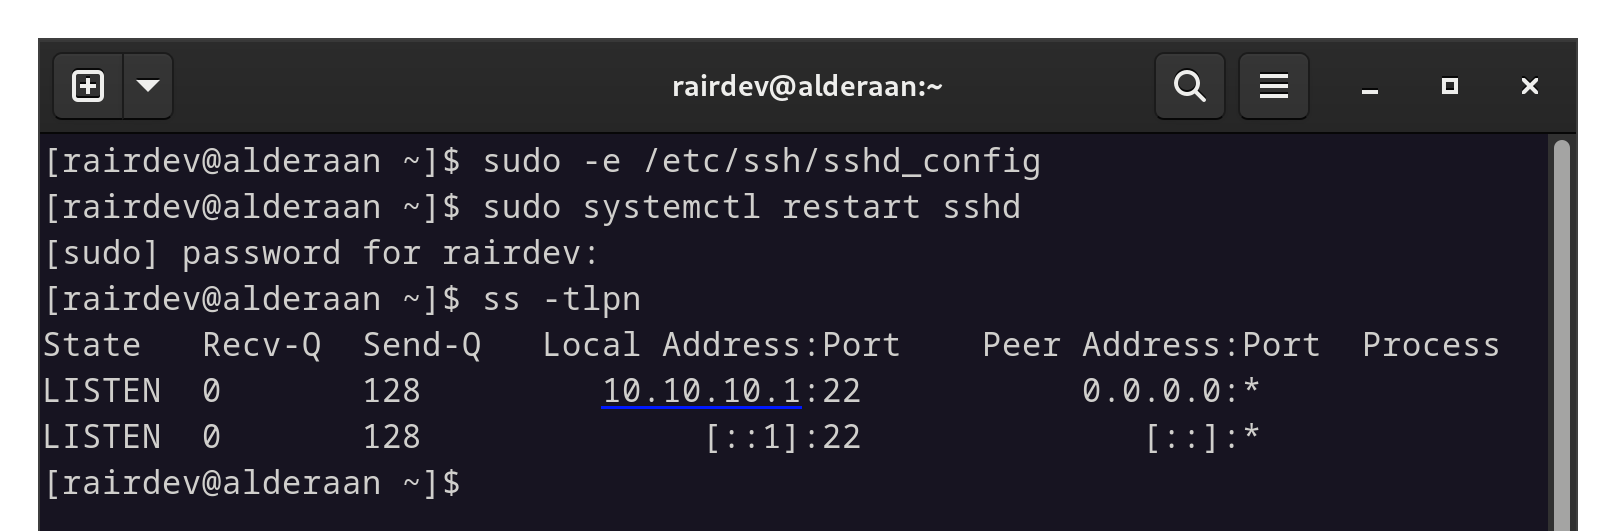
Restarting sshd applies the changes.
Note:
If you compare to the earlier screenshot, we can see thatsshdis now only listening on the Wireguard address.
Test SSH over Wireguard
From our client machine (Tatooine), we will attempt to connect to our server (Alderaan) via ssh over Wireguard.
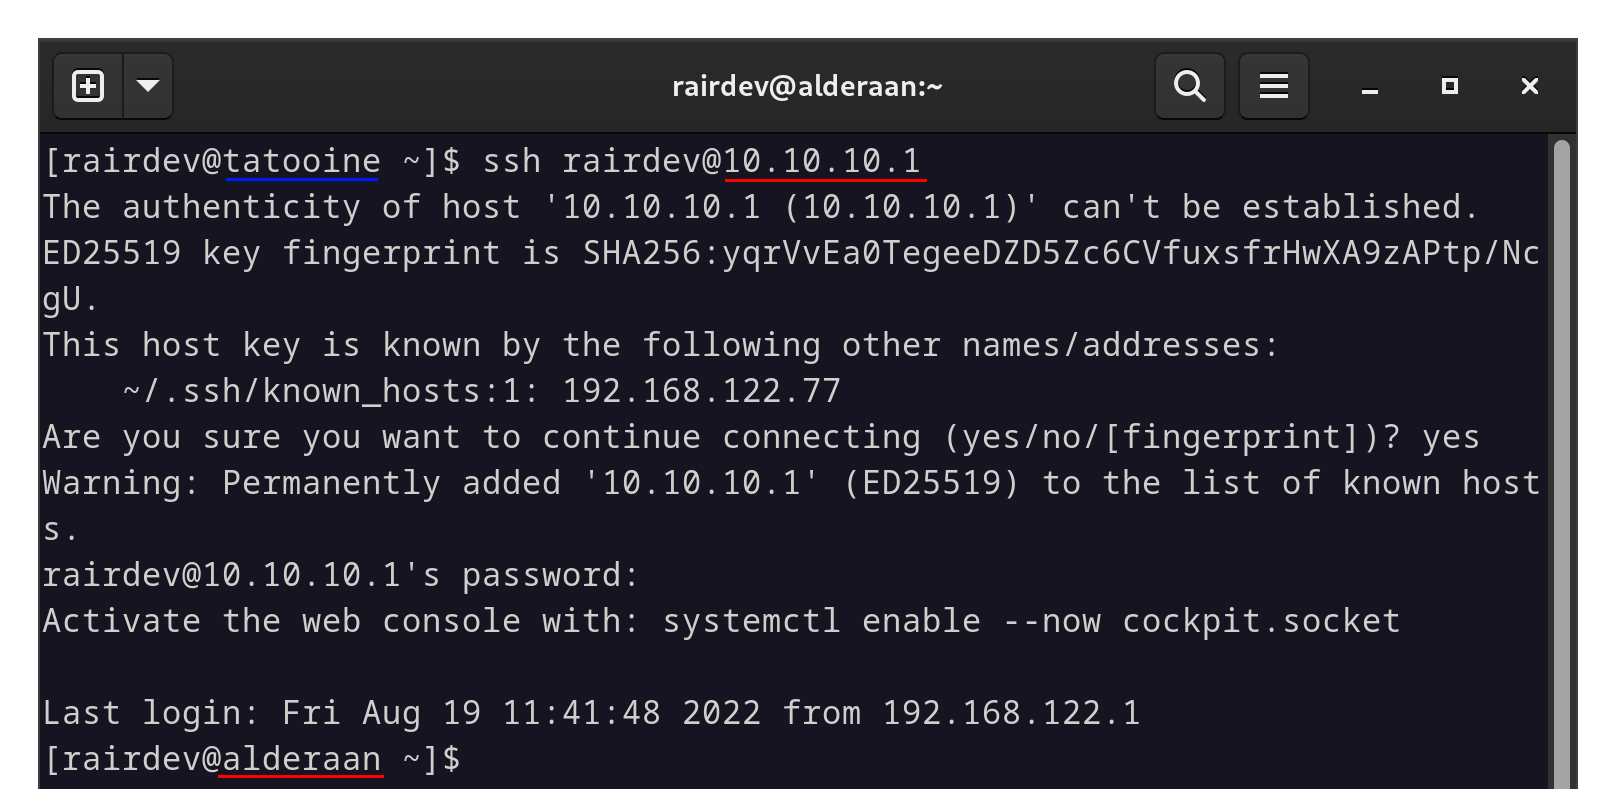
We must use the IP adresses from the Wireguard network.
Note:
We can see that the same key fingerprint exists for the old IP address we connected from. No problem, that’s a good sign.
If you’re unable to connect, verify your firewall settings. For example, my Wireguard interface is in the trusted zone with target: ACCEPT. This indicates that all incoming connections in this zone will be accepted. If the target is default, DROP, or REJECT, we won’t be able to connect. We will need to add ssh as an allowed service (or the port you have sshd listening on) in the zone containing your Wireguard interface.
Speaking of firewalls, now’s a good opportunity to close our firewall’s old ssh port in our outward-facing zone.
sudo firewall-cmd --permanent --remove-service ssh
sudo firewall-cmd --reload
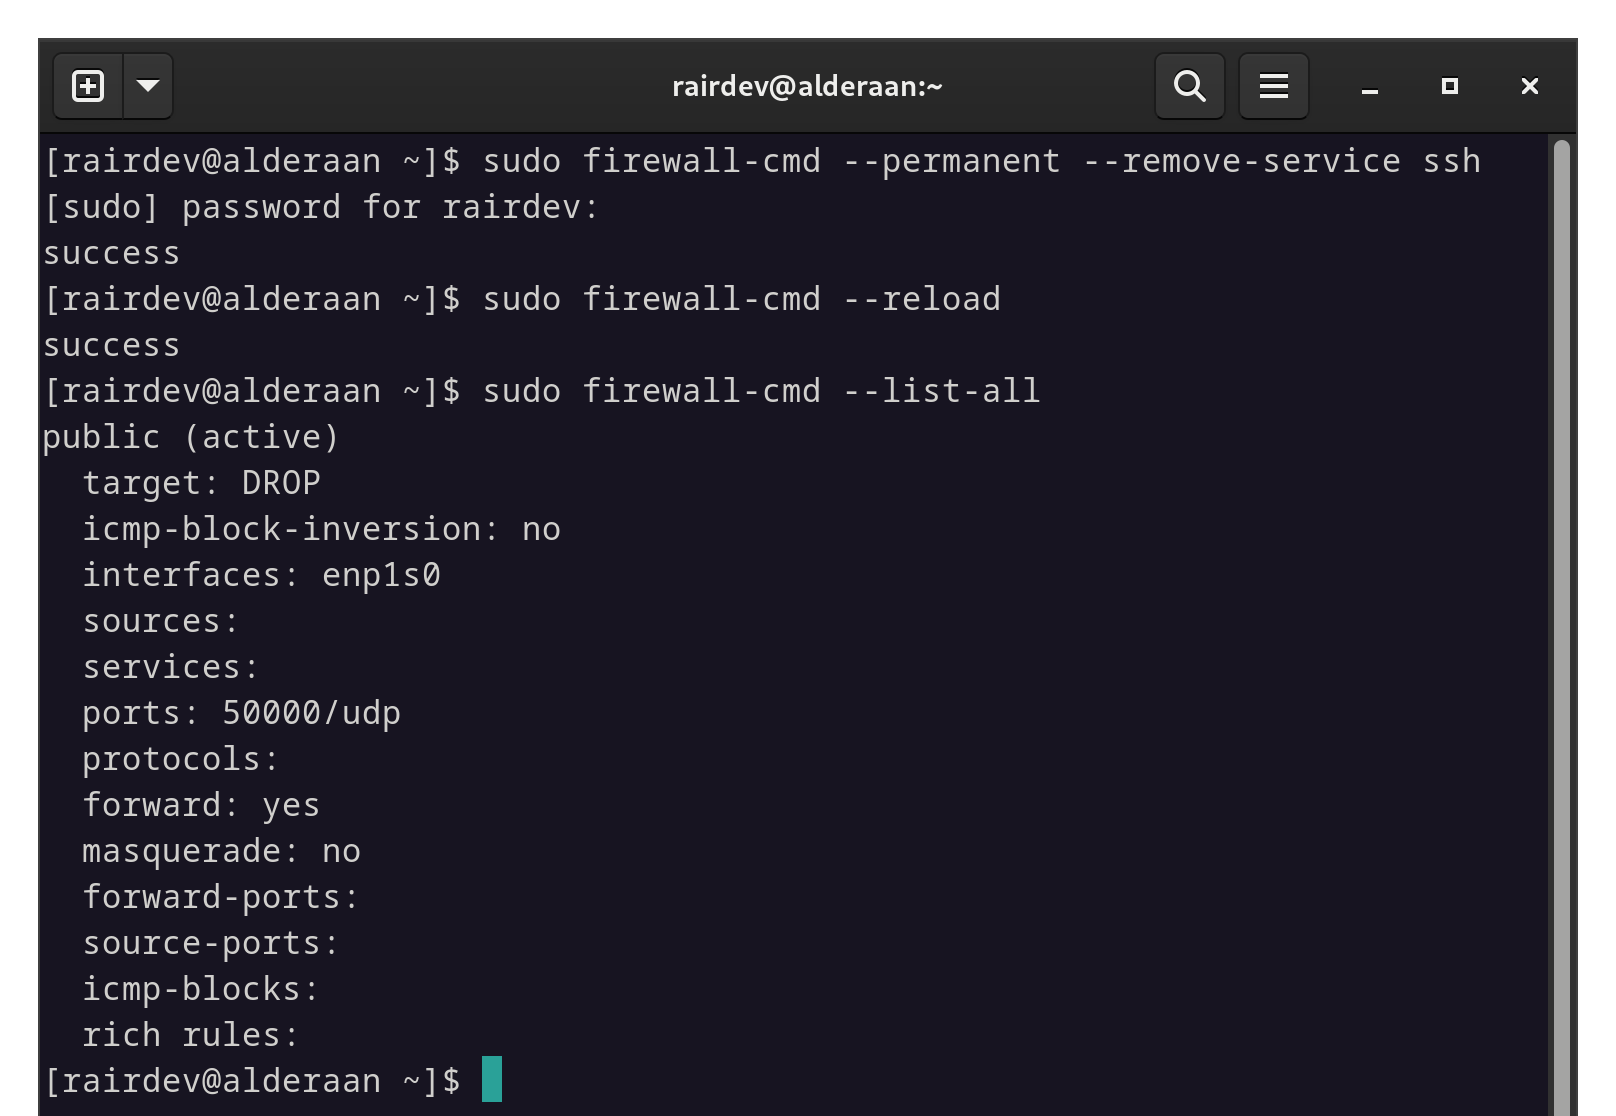
Closing the SSH port in our firewall for the outward-facing interface.
Verify SSH unreachable outside Wireguard
I want to quickly check that I can’t reach (or even see) our server’s ssh port from outside.

Using the same method as before, we are refused an SSH connection via the IP address.
And for good measure let’s have a check with nmap again:
nmap finds no open ports this time.
Note:
For those wondering why the results showopen|filteredin the UDP section, UDP works differently than TCP. According to thenmapdocumentation, this represents “No response received (even after retransmissions)”.
Excellent, so if we compare the results to our first scan above, we can see that our Wireguard port (50000) is reporting as closed, and nothing else shows as open from outside.
I guess that means we’re done right? RIGHT? Well this would be a pretty boring article if something didn’t go wrong…
The Big Snag
So to review, we’ve successfully hidden ssh behind a Wireguard connection and ensured it works.
Let’s give our system a quick dnf upgrade and reboot the system…
WARNING:
I’ve warned you enough at this point, but if you haven’t been paying attention, SPOILER ALERT: We’re about to be locked out of our server!
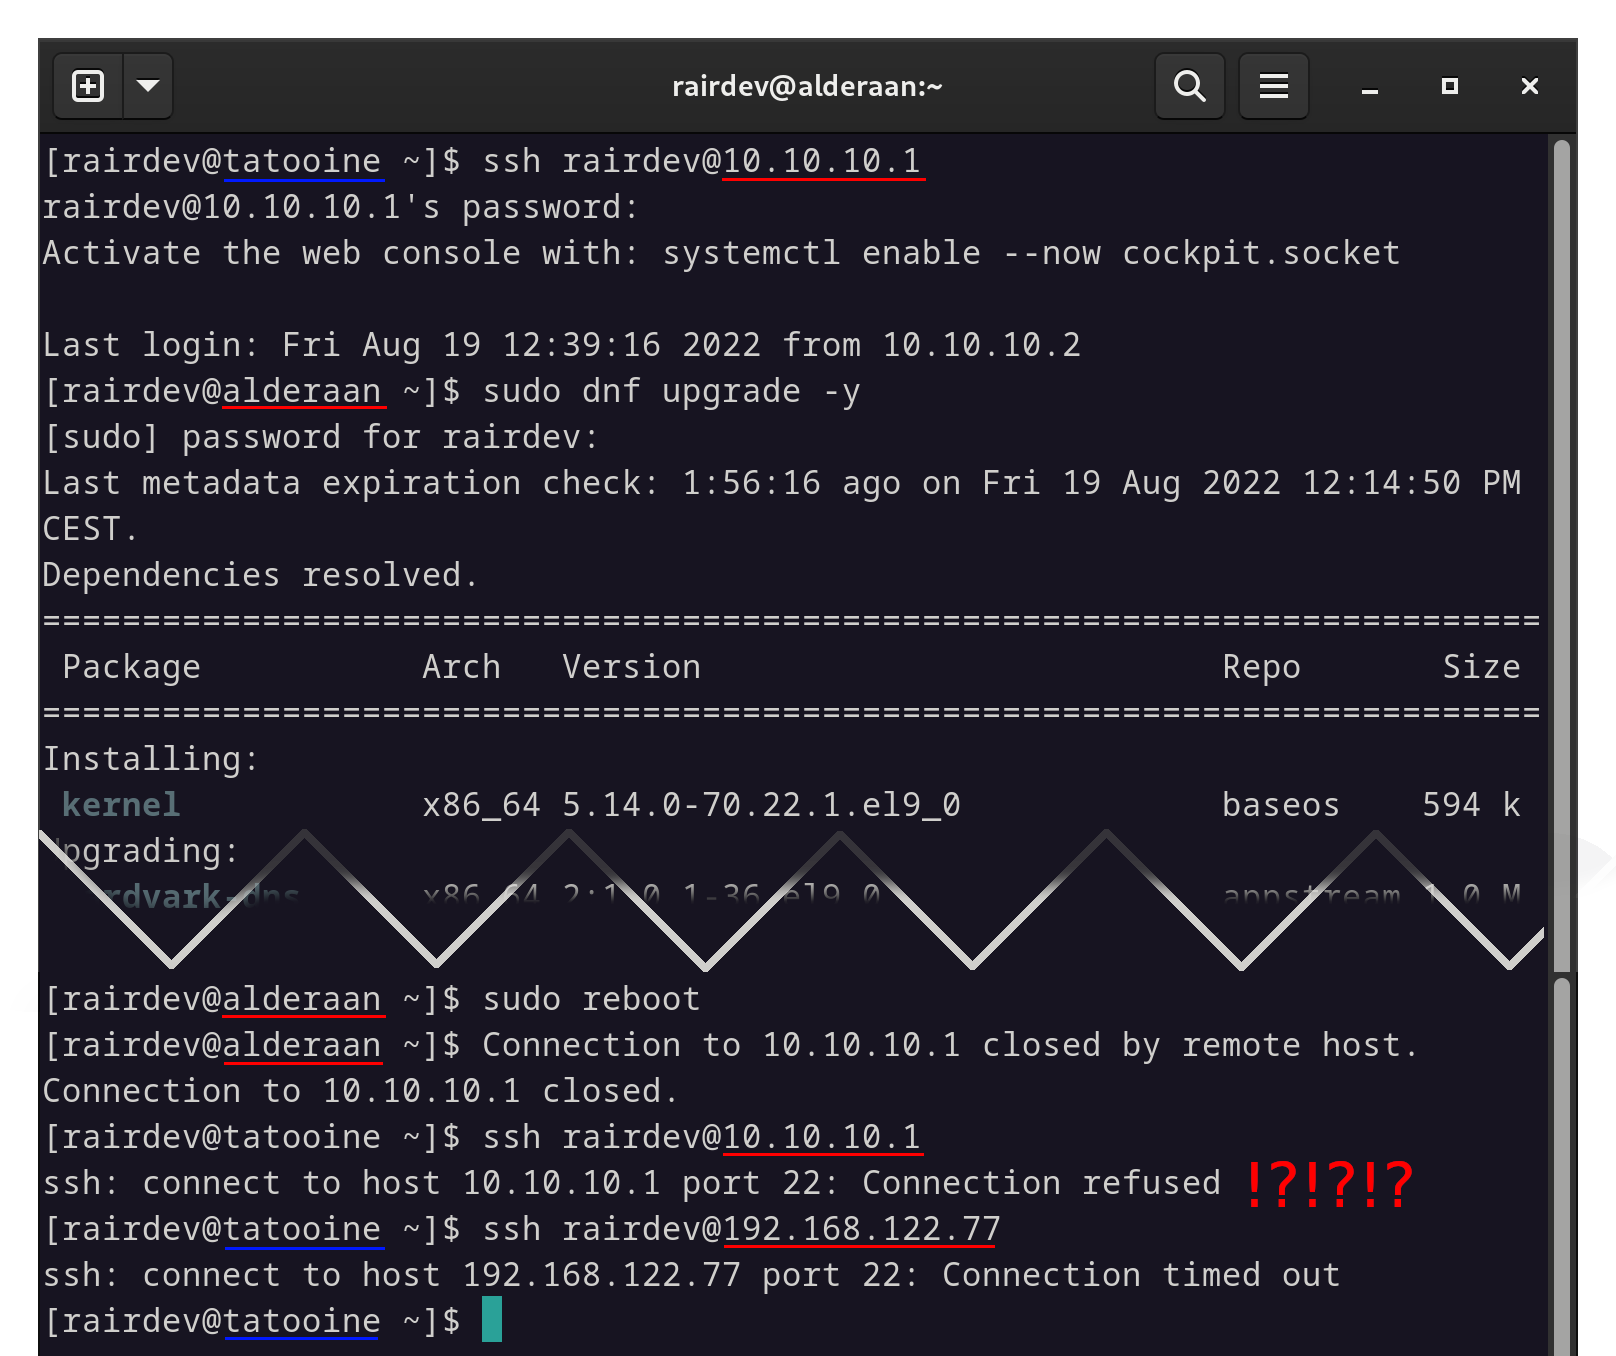
Connecting, updating, and rebooting went fine…
Ummmm WHAT?? How can I access it now?
Investigation
Fortunately, this is just a VM and I can still access it via the virtual terminal. Let’s see what happened.
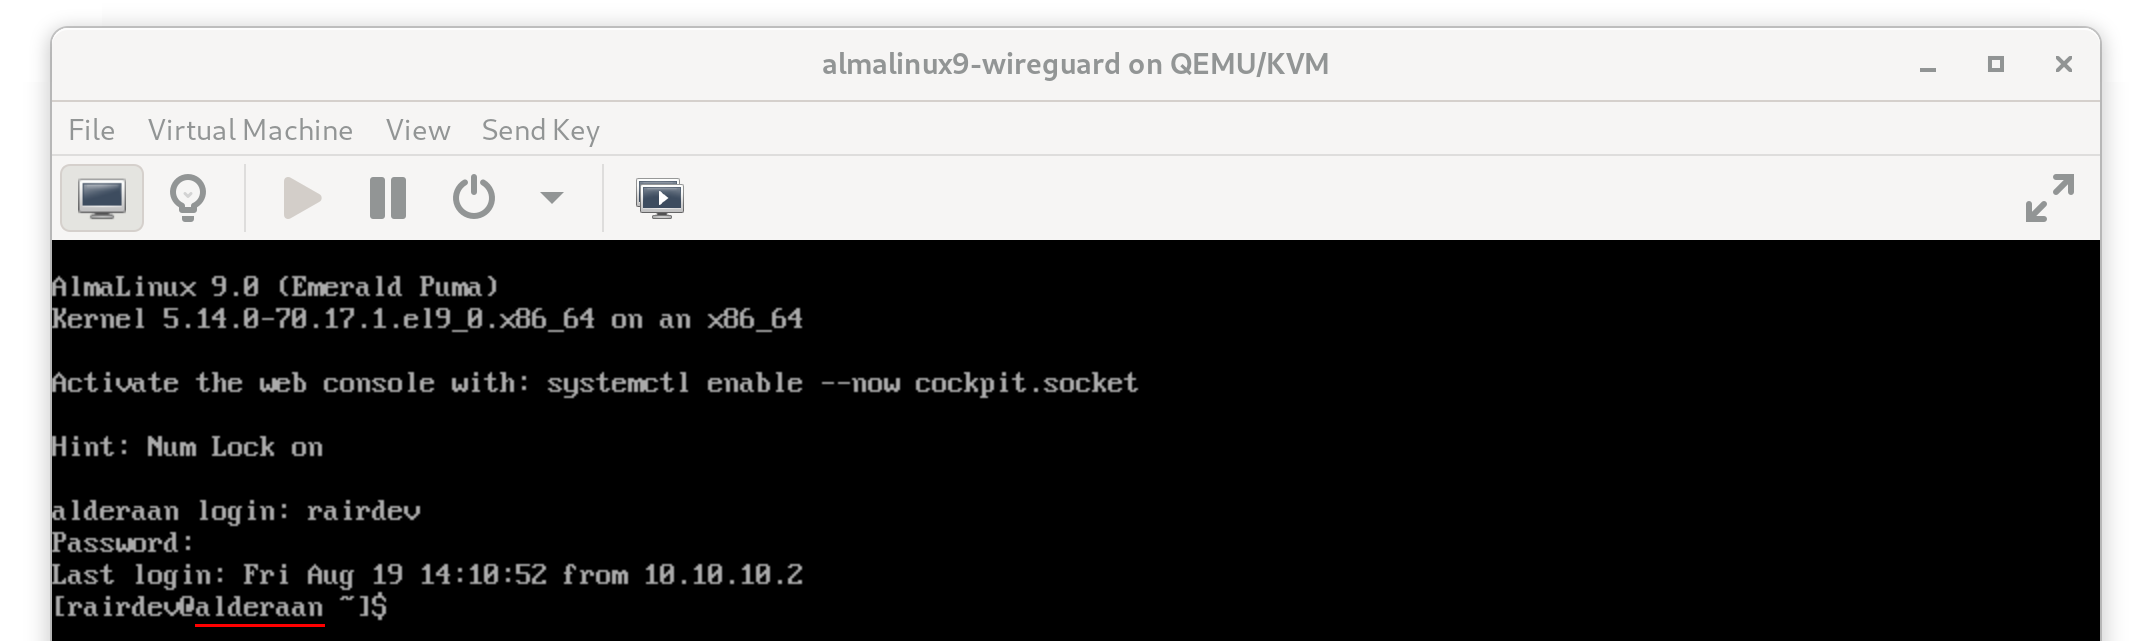
The advantage of testing on VM’s or having physical access to your server!
Maybe the Wireguard interface isn’t up?
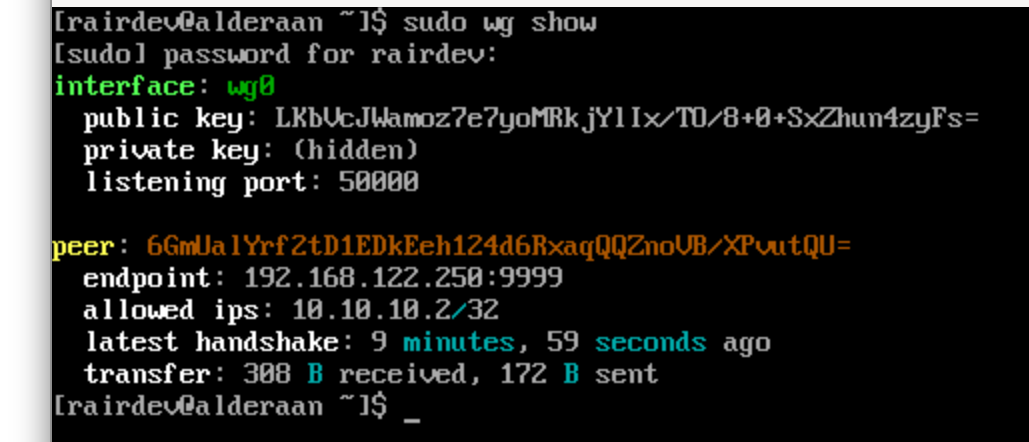
Wireguard interface is up and has connected to the Peer.
Nope, Wireguard appears to be running just fine and even responded to pings. What about sshd?
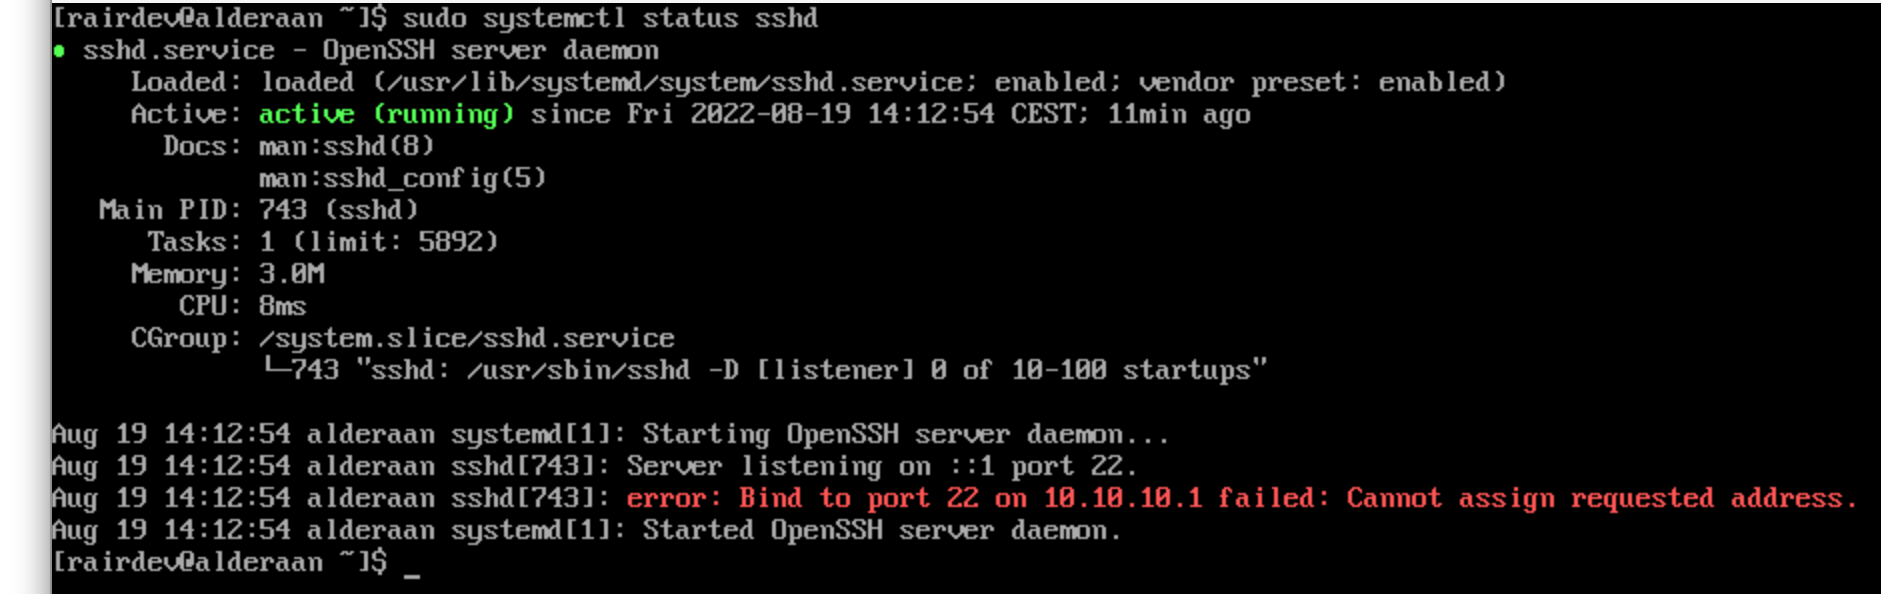
sshd is running but failed to bind to the address and port.
Ahh now we are getting somewhere. It appears that sshd cannot bind to port 22 on our Wireguard IP address. My first thought was it must be a permission issue (SELinux? cue eyeroll).
Therefore, if I try and restart the service it should fail again.
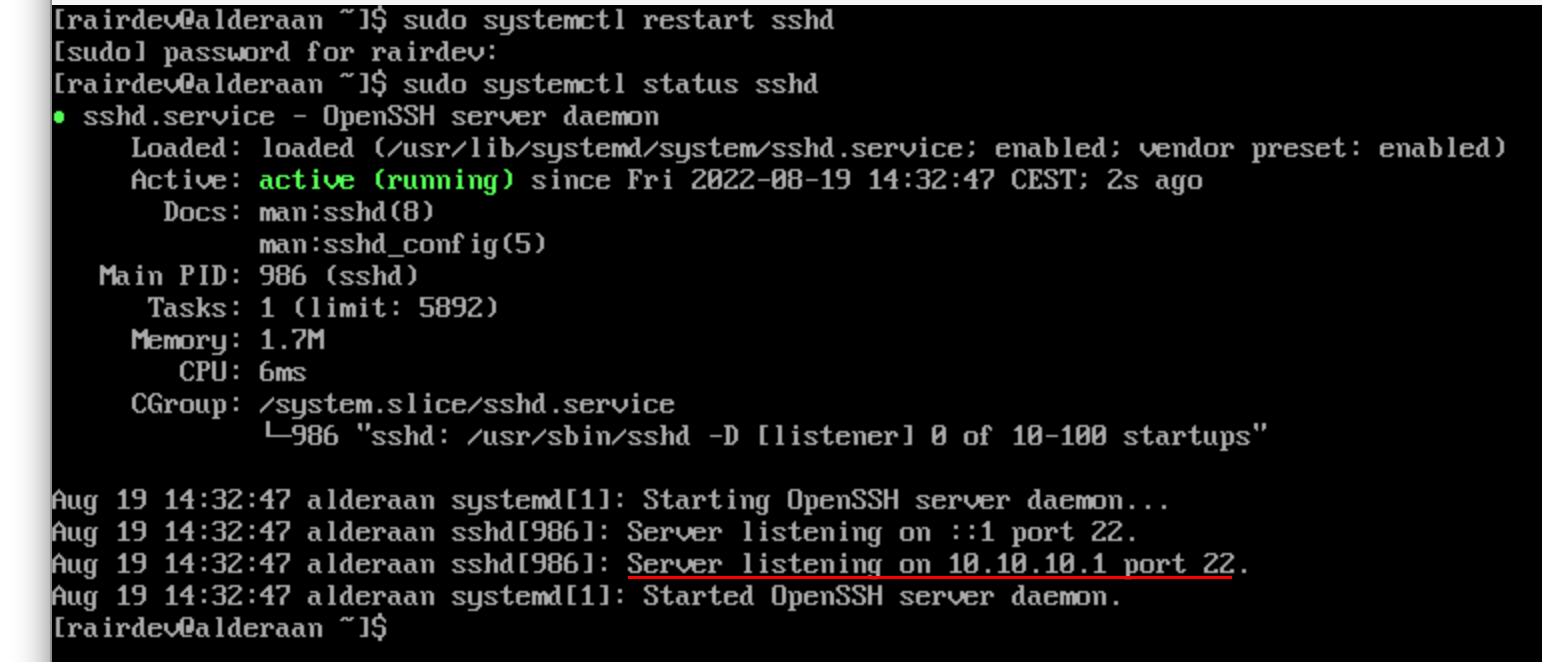
Restarting sshd successfully binds the port to Wireguard.
That worked… OK. Let’s make sure we can ssh into the server again.

Back to a working SSH, PHEW!
Success. So the problem isn’t with permissions. Then why wouldn’t the daemon be able to bind to the interface? Perhaps it wasn’t available WHEN it attempted to bind the port.
Let’s look at journalctl and dmesg:
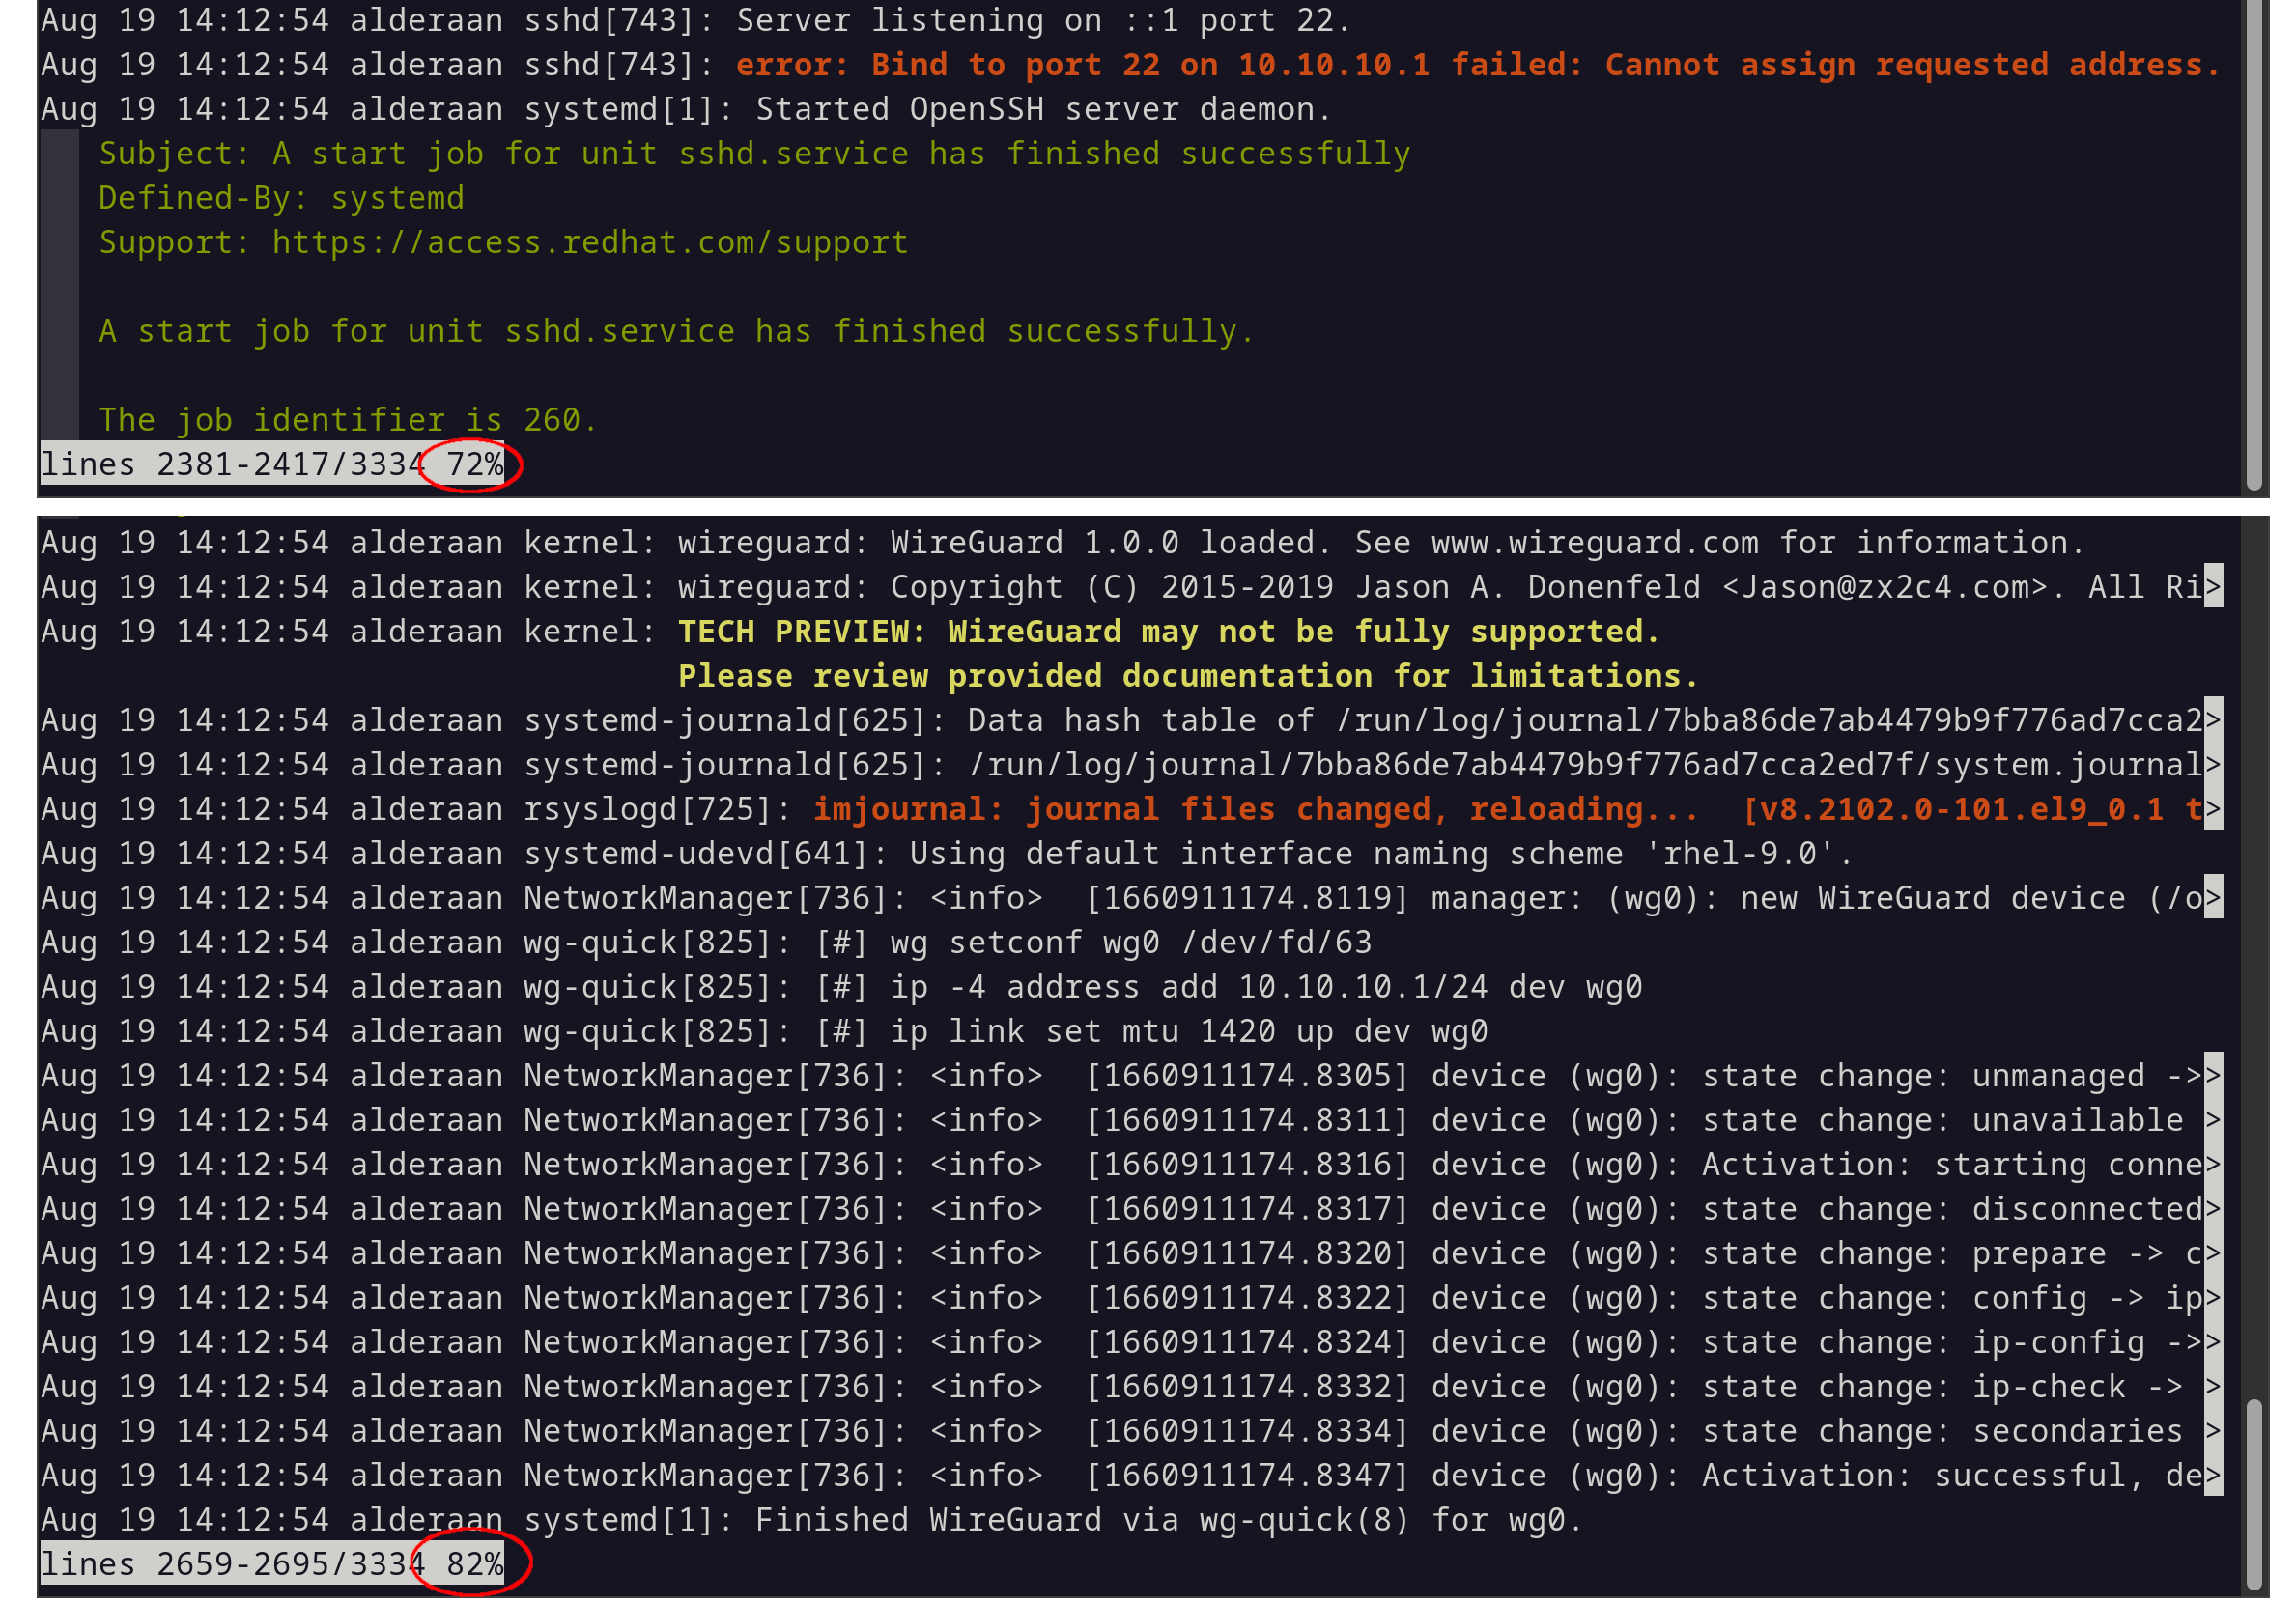
sshd starts before wireguard in the boot process.
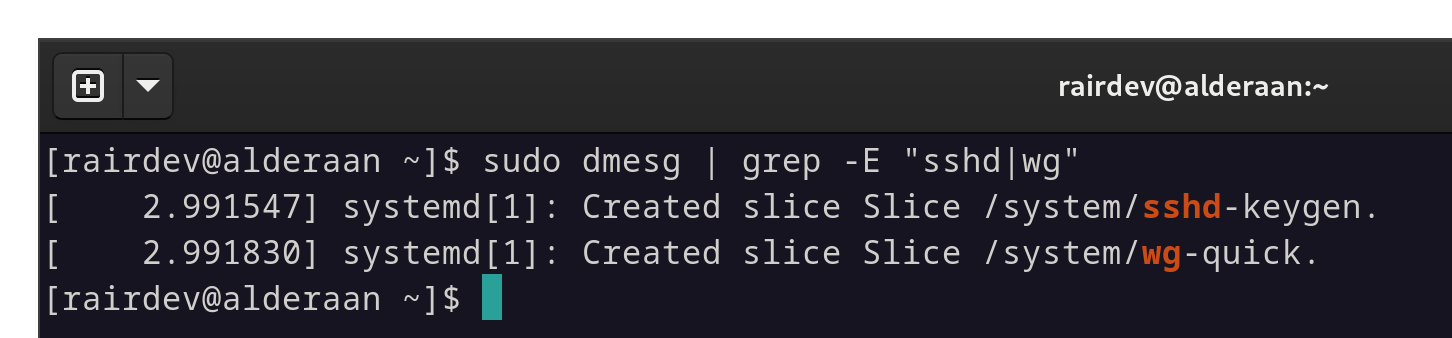
Same as above, sshd starts before wireguard is available.
These may be hard to decipher, but the key is to see that sshd is starting before Wireguard. Because of that, the Wireguard interface and address don’t exist at the time sshd is attempting to use the port! So if we start Wireguard before sshd we shouldn’t run into this issue. Let’s see about fixing that.
The Fix - systemd
Fortunately, systemd is quite intelligent and we can easily change the order in which services start.
Let’s look quickly at the sshd service file. Mine is located at /usr/lib/systemd/system/sshd.service
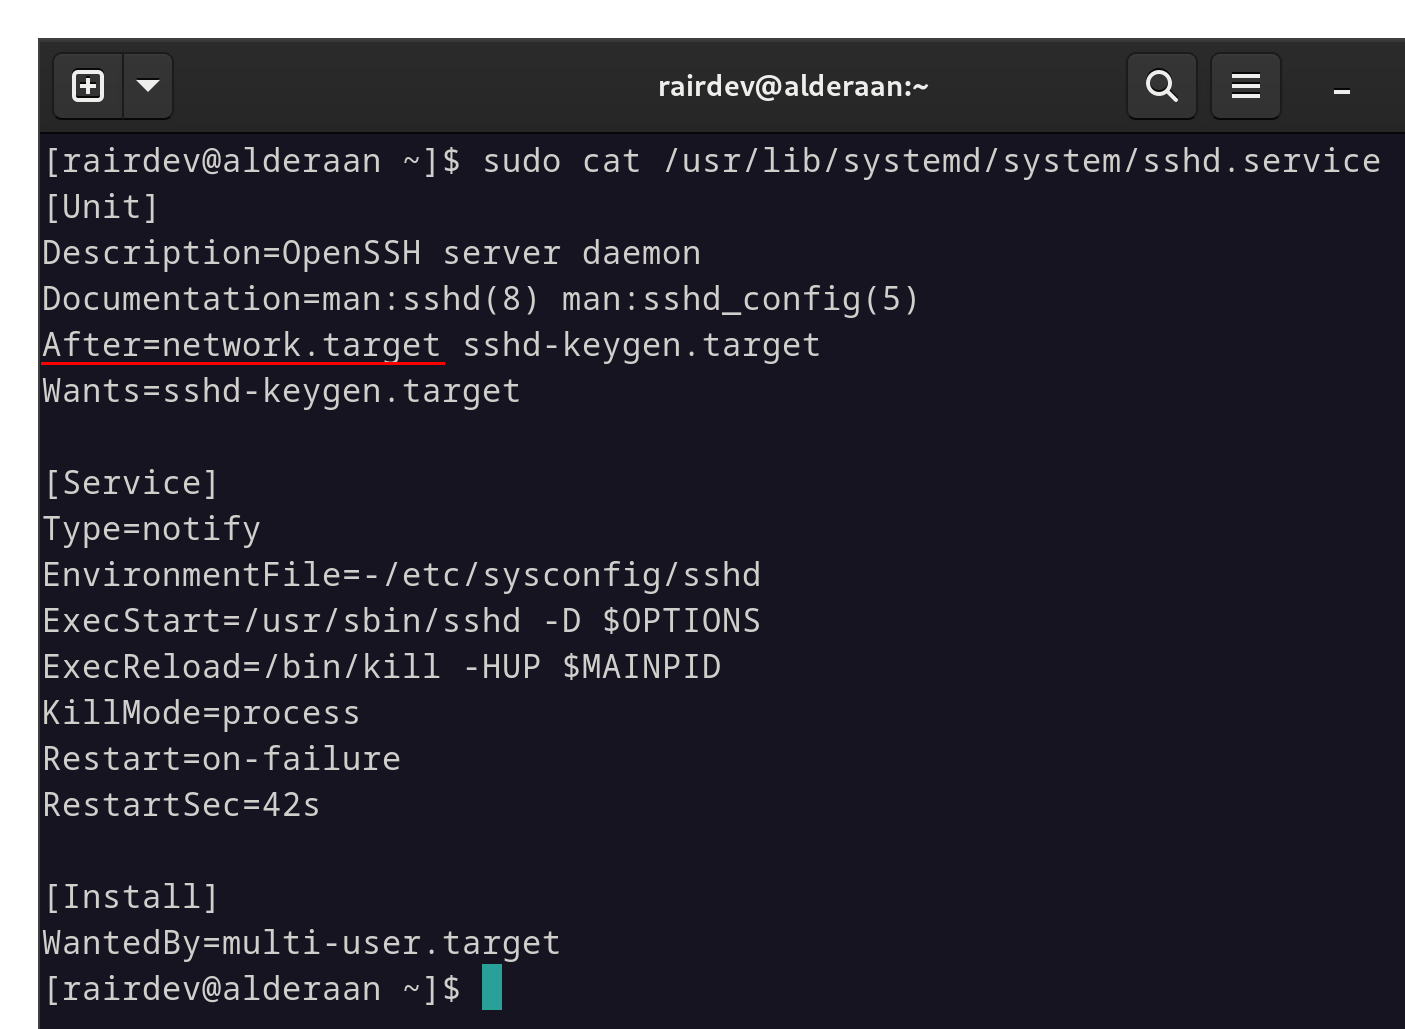
The sshd systemd service file reveals a few interesting details.
Without going into too much depth on the subject, note the line that says After. So sshd will start after network.target has finished.
Personally, I don’t want to mess with sshd’s service file, so I will modify the Wireguard service file instead.
Recall the service file we activated at the beginning of this article. We will find the file under /usr/lib/systemd/system/wg-quick@.service. Let’s open it and see what we can find.
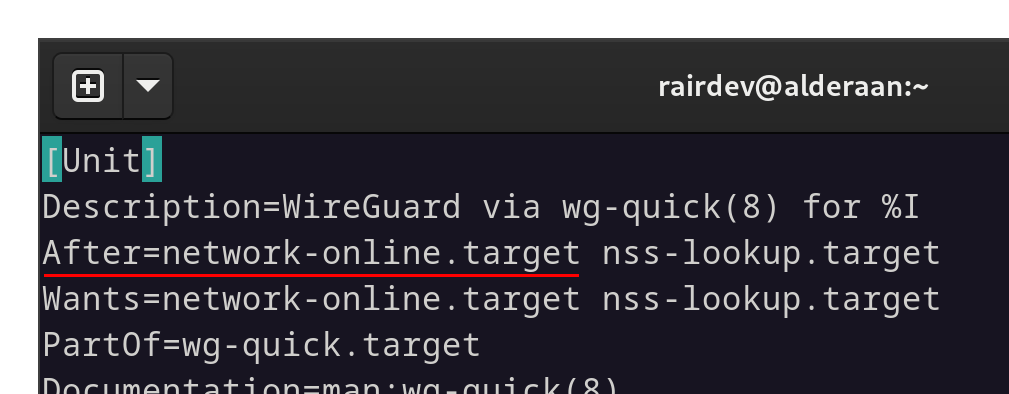
Compared to the sshd service file, we can infer boot order.
Here we can see a similar After notation. However, this time it is to start after the network-online.target. This target occurs after the network.target for sshd, therefore putting it later in the startup order.
The simple solution is to add a Before clause. (Edit Apr. 2, 2024 - Thank you sid_cypher for the tip) Instead of directly editing the systemd unit file itself, we can use a simple override file. This is because an update to Wireguard could overwrite our changes and put us back into the previous predicament. To do that, we can simply use systemctl edit:
sudo systemctl edit wg-quick@.service
### Editing /etc/systemd/system/wg-quick@.service.d/override.conf
### Anything between here and the comment below will become the new contents of the file

[Unit]
Before=sshd.service

### Lines below this comment will be discarded

### /usr/lib/systemd/system/wg-quick@.service
# [Unit]
# Description=WireGuard via wg-quick(8) for %I
...
For a more in depth analysis of the use of Before/After, have a look at the link from the beginning of this section. The short version is that our Wireguard service will now start and complete BEFORE sshd will even begin its startup process.
Save and exit.
This should take effect immediately after saving. For insurance, you can simply call a systemctl daemon-reload to ensure the changes have been picked up.
Testing v2.0
Alright let’s reboot again and see if it works as expected this time!!

Fixed! Working as expected.
SUCCESS!!!! This time the Wireguard interface successfully came up before sshd tried to bind to the port. Feel free to recheck the steps listed in the investigation section above to verify the change in dmesg and journalctl.
Conclusion
Protecting your servers is a necessity, and security through obscurity is not an effective method of securing ssh against even simple tools like nmap. Putting your server’s critical connection points behind a VPN is not a new concept and is useful in many ways.
Tools like Wireguard mean you can protect your most important services in a matter of minutes. However, there are often some bumps along the way like the issue with systemd I described above.
I hope you found this article helpful. Any comments, questions, or suggestions are welcome in the comment section below!