
Nextcloud + Cron
Table of Contents
When installing a fresh instance of Nextcloud, it is important to correctly set your cron option in the Administrator settings or suffer a seriously hamstrung installation. Without a properly running cron job, Nextcloud won’t be running efficiently and will feel more and more sluggish over time. This is a quick guide on setting up cron. I am writing this from the standpoint of Debian/Ubuntu but it could easily be substituted for another OS.
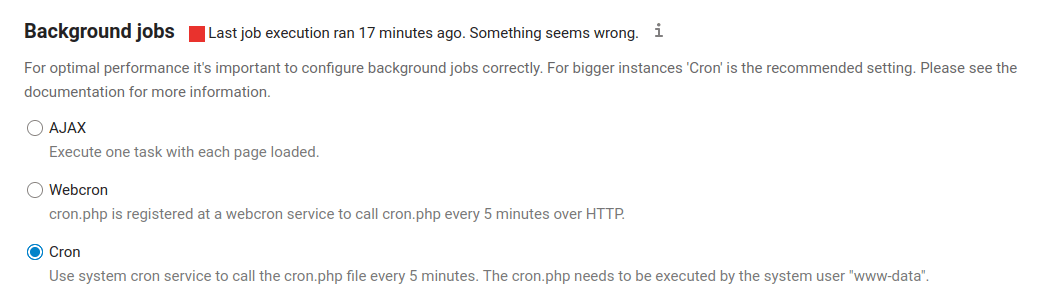
Cron reporting that ‘Something seems wrong’

Thank you for visiting my site and checking out this post! I hope you find it helpful. You may have noticed I don’t have any advertisements running (I hate how invasive online advertising has become). This also means no passive income to keep the site running. Please consider donating a small amount to say thank you and help me cover the costs.
What is cron anyways?
Cron is a simple time-based job scheduler, available on most Linux and Unix-like operating systems. In simpler terms, it runs small jobs on its own without the need for the user or administrator to do anything. According to the Nextcloud documentation, cron is run to:
“…automatically to take care of typical housekeeping operations, such as garbage collecting of temporary files or checking for newly updated files…"
— https://docs.nextcloud.com/server/21/admin_manual/configuration_server/background_jobs_configuration.html
Needless to say this is an important piece and easy to setup.
Cron 3-ways
By default, Nextcloud runs these regular jobs using AJAX, which runs a single job every time a web page is loaded. You can imagine how quickly these little jobs might add up. This is especially true if you are using the desktop and mobile clients and rarely visiting the website. Let’s change that up to run Nextcloud cron from our machine using the local cron - cron inception!
Bare Metal
If you installed Nextcloud directly on your server (bare metal setup), enabling cron is a breeze! Head to your terminal and use crontab to create and install the job for us:
$ sudo crontab -u www-data -e
Note:
We need to run it as the webserver user (normallywww-data, or whichever user “owns” your Nextcloud application directory), so we use the-uswitch followed by the user name, and finally the-eswitch to open a text editor. Choose your preferred editor, for beginners look towardsnano.
The syntax for cron jobs begins with the schedule itself, followed by the command to be run. This is outside the context of this post, and there is lots of documentation on cron. So add the following to the bottom to tell the www-user to run cron every 5 mintes:
*/5 * * * * php -f /var/www/nextcloud/cron.php
Note:
Replace the/var/www/nextcloudstring with the location of your Nextcloud installation if different.
Save & exit. Verify everything is set properly with the -l (list) switch:
$ sudo crontab -u www-data -l
Head back to your Nextcloud Administrator “Basic Settings” page. You may have to wait a few minutes for cron to run for the first time. The 3rd option should be automatically selected as Nextcloud has detected use of the cron.php script. If all is working well, you should see a green dot appear and a time when the last job was run at the top of the page.
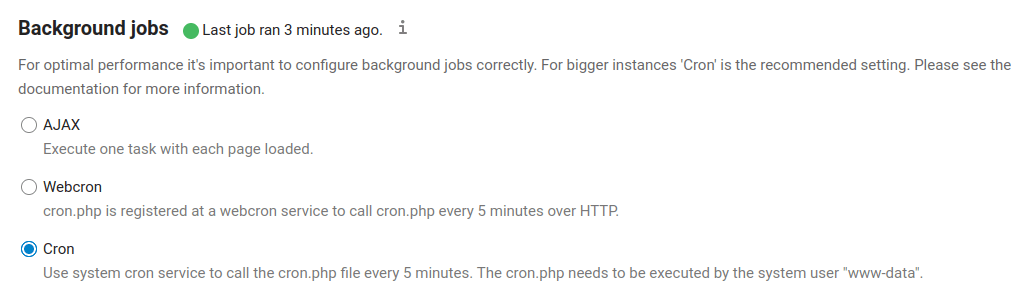
Cron running correctly.
Bare Metal Alternative - Systemd
Another alternative that is a bit more advanced is using a systemd timer. Considering the absolute ease of cron I won’t be going into detail, but the gist is that you create two files defining the job and timer, and have it run with the systemd daemon. More information on this strategy is in the Nextcloud documentation.
Docker
Running Nextcloud in Docker has some huge benefits, and running cron can be done fairly easily. The primary difference is that the cron.php file is now located inside the container, and needs to be called from within.
There are 3 ways to get around this. I will cover them in what I believe to be the simplest way up to the more challenging.
Easy Difficulty
If you have a user who has privileges to run docker, it can be as simple as the above example. Many do not recommend adding your user to the docker group as it can be a security concern. Depending on your setup and threat model, I doubt this is much concern for most. One way to mitigate this (somewhat) is to create a new system user with limited permission:
$ sudo adduser dockeruser --system --ingroup docker --no-create-home
The above command is creating a new user (dockeruser) in the system group which denies it the ability to have a login. Next we copy the syntax from above, but execute it within the container:
$ sudo crontab -u dockeruser -e
And add the following to the bottom:
*/5 * * * * docker exec -t -u www-data nextcloud php -f /var/www/html/cron.php
Replace “nextcloud” with the name of your Nextcloud container. The name can be found with docker ps.Here we are using the docker exec command which allows us to run commands in the container. We will be running it as the user www-data. The rest should be familiar as above.
Medium Difficulty
If you don’t want host users interfering with docker or giving out extra permissions, you can run another instance of Nextcloud as a “sidecar container” that is dedicated to running cron. I will present this as a secondary container through a docker-compose file, but it could be run via docker run as well. Open your Nextcloud docker-compose file and add the following under services:
services:
...
  cron:
    image: nextcloud:22
    restart: always
    volumes:
      - /your/nextcloud/volume:/var/www/html
      - /your/nextcloud/data:/var/www/html/data
    entrypoint: /cron.sh
    networks:
      - nextcloud
...
Note:
Replace yourversion tagon the Nextcloud image, and thevolumeswith your own mounts. I includednetworksas well just as a reminder to run it on the samedocker networkas your main Nextcloud app.
This might be beneficial in large instances as it won’t interfere with the primary app. It could also be outsourced to another node if using swarm. In many ways this is probably superior to the “Easy” solution above, but it does add another container to be aware of if you have a huge stack already in use.
The good news is that the host resource use appears to be quite low (although I am only running it on a test instance with only a few files and a single user). In my test it was using ~ 1MB of system RAM and negligible CPU.
Advanced Difficulty
The final way is to bake it into the Nextcloud container itself. This can be done with supervisord as shown in the Nextcloud docker examples section. It is outdated, but shows another way to run Nextcloud cron jobs. The reason this is in the advanced range is that it involves creating and modifying a Dockerfile and building a Nextcloud image from it. Some might say this goes against the containerized philosophy by running more than a single service in a container. I will let you decide.
The example from the Nextcloud github gives the following Dockerfile:
FROM nextcloud:apache
RUN apt-get update && apt-get install -y \
    supervisor \
    && rm -rf /var/lib/apt/lists/* \
    && mkdir /var/log/supervisord /var/run/supervisord
COPY supervisord.conf /
ENV NEXTCLOUD_UPDATE=1
CMD ["/usr/bin/supervisord", "-c", "/supervisord.conf"]
Note:
You will also have to copy thesupervisord.conffile from the github repo to configure the job properly.
You will also have to add a line to your Nextcloud service if using docker-compose:
services:
  nextcloud:
    build: .
Here we can remove theimagetag because we will be building it ourselves. The period afterbuild:is critical because it tells Docker that we will be using theDockerfilelocated in the same directory as thedocker-composefile.
The pro’s are that we have one less container to worry about, but when there is an update, you will have to remember to use docker-compose build before we can use docker-compose up. In my simple test, the added load on the container was minimal and worked as well as the other two examples listed above.
Snap
I know this is a popular choice amongst newer users, but I just can’t for the life of me recommend it for long-term use. I tried using it, but because everything is abstracted behind snap commands, I ended up having to learn how Nextcloud works on a bare metal platform anyways. If I get enough feedback, maybe I will try to persist and do an entire write-up on using Nextcloud with snap. But for now I will be avoiding it.
Plus I’m 99% sure that the snap version has cron embedded and enabled by default.
Troubleshooting
These should be pretty bullet-proof ways of adding cron to your Nextcloud, but as I find more issues I will try to update this post. If you have run into a problem and have a solution I will try to add it here.
Start with the logs!
By default you can have a look in the logs if running as a cron job from your machine:
$ sudo grep CRON /var/log/syslog
- Look for anything related to
(CRON) info (No MTA installed, discarding output).
If you are setup using docker:
$ docker logs -f nextcloud
- Replace “nextcloud” with the name of your Nextcloud container.
This allows us to look at (and follow) the logs from a docker container. Once again look for errors.
Does your user have permission to run Docker?
If your user must use sudo before each docker command, you will not be able to use crontab to run docker commands. You must either add yourself to the docker group or create a user who can use docker natively.
Conclusion
Cron jobs are an important component to running a Nextcloud instance efficiently. This, along with many other small tweaks will get your Nextcloud running quickly and help it stay updated. I have provided multiple options for running cron across a few different installation types. There are pro’s and con’s to each, but for most of us any of the options should suffice. I hope this guide has helped you!
If you have another recommendation, more tips, or something to add to the troubleshooting section, please let me know!
Thank you for visiting my site and checking out this post! I hope you found it helpful. If you are feeling generous, please consider a small donation to help keep the server running.