Nextcloud + ClamAV Antivirus
Table of Contents
At this point we all have a good understanding of what a computer virus is (or at least what it can do to your computer). Fortunately for us, there’s a great open source tool called ClamAV which integrates well with Nextcloud. This allows for both background scanning of files, and scanning of all new uploads. The official documentation actually does a pretty good job of covering this topic, but I had a few snags installing ClamAV for Nextcloud and wanted to share them here.

Thank you for visiting my site and checking out this post! I hope you find it helpful. You may have noticed I don’t have any advertisements running (I hate how invasive online advertising has become). This also means no passive income to keep the site running. Please consider donating a small amount to say thank you and help me cover the costs.
Requirements
- A working Nextcloud instance (via Docker or Bare Metal)
- Root access to your server
- Basic familiarity with Linux command line
- Minimum 2GB of RAM (not required but highly recommended)
Overview
The screenshots and commands are from a Ubuntu 20.04 server since it is one of the most commonly deployed, but will work on just about any server. You may notice the requirement of 2GB of RAM. While normally Nextcloud can run on as little as 512MB, the ClamAV scanner loads the virus database into RAM and will occupy 1-1.3GB of RAM! If you are running on a very low RAM machine, there is an alternative which I discuss below, but is generally not recommended as it will severely impact performance.
Like many Nextcloud Apps, the one you install via Nextcloud Hub is only a connector and does not include the actual virus scanning software. That we must setup separately.
Once the ClamAV packages and ClamAV for Nextcloud app is installed, we will use the 4 EICAR test files to make sure the antivirus software is working and behaving as expected. Note that these files are industry-standard test files that contain no actual viruses in them.
Docker vs. Bare Metal
If you’ve seen any of my other posts, you will probably note that I prefer to use Docker when running Nextcloud. This is primarily to handle dependencies that can get out of hand when you want to run multiple micro-services on the same server. The good news is, my preferred way to integrate ClamAV is actually identical no matter how you have Nextcloud installed.
I prefer to install ClamAV directly on the host instead of using a Docker container. This allows me to use ClamAV directly with Nextcloud (in a Docker container or not) and also scan other files on the host. While we can also scan host system files running ClamAV in a Docker container it takes a bit more effort.
I will also show how to run ClamAV in a Docker container if that is the route you wish to pursue.
Preparation
To give you an idea of how the antivirus scanner works, I have created a new Nextcloud environment (v22) and uploaded one of the EICAR test files. The file uploaded just fine:
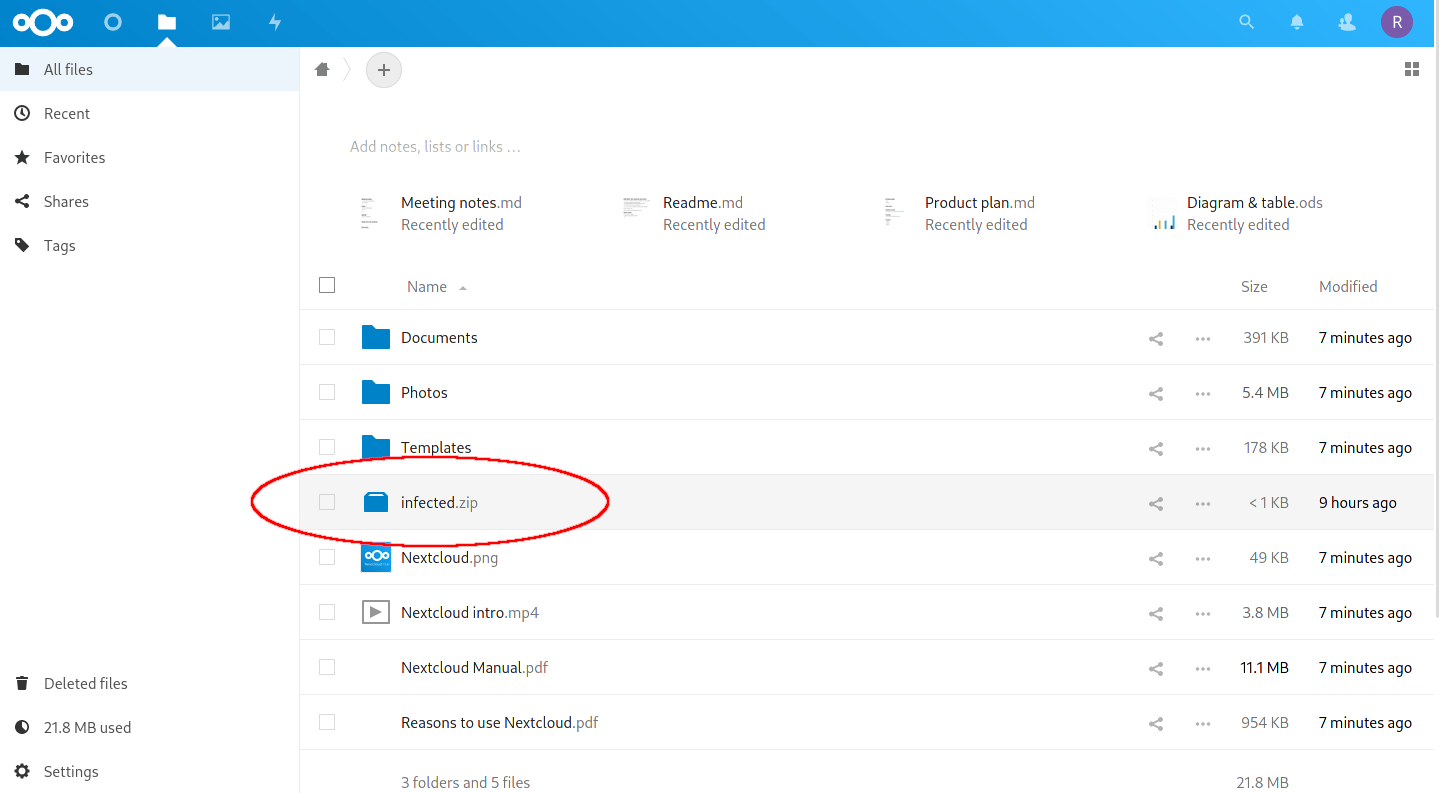
One of the EICAR test files uploaded to my Nextcloud.
Install ClamAV on the Host Machine (Recommended method)
This first approach, I believe, gives the most flexibility to use the antivirus scanner within Docker and outside if you so wish. Let’s begin by grabbing the 3 required packages:
$ sudo apt update
$ sudo apt install clamav clamav-daemon clamav-freshclam
The above will install the 3 key pieces of the ClamAV antivirus software.
- clamav – The base of the program that can be used to scan a file or directory when you want. Use the command
clamscan.- clamav-daemon – The
systemdunit that runs ClamAV in the background. This is what allows Nextcloud to run frequent filesystem scans as well as scanning files when they are uploaded. To use otherwise, use the commandclamdscan.- clamav-freshclam – The
systemdunit that runs the virus definition update in the background. By default it will check for updates every 30 minutes.
Check Virus Database and Daemon Status
Before we jump straight in, we should make sure that the virus database has loaded correctly and that the systemd unit has started correctly.
Virus Database Status
Once installed, be patient as it will likely take a few minutes for the initial virus database to download. You can have a look at the progress with:
$ sudo cat /var/log/clamav/freshclam.log
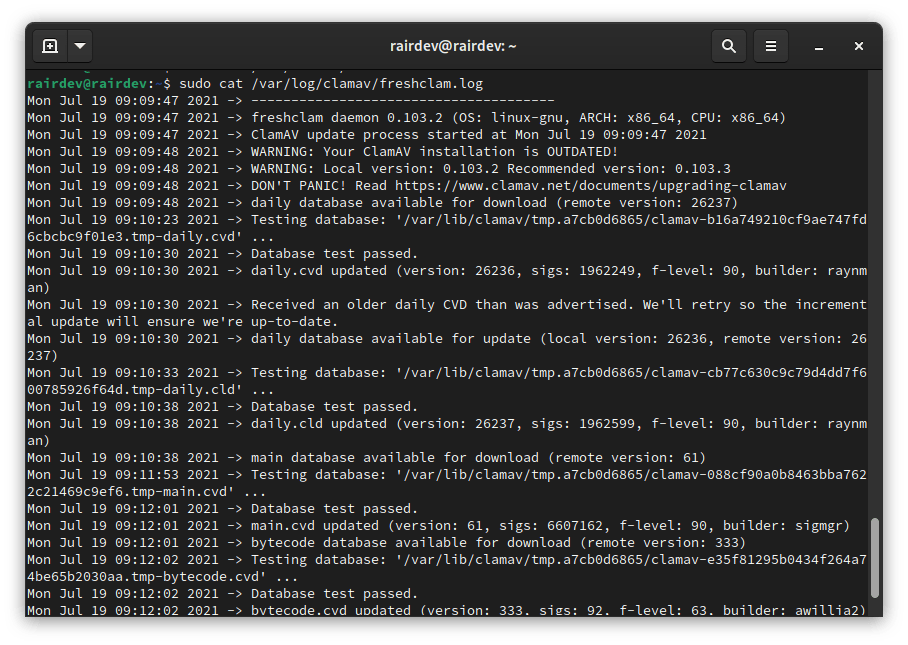
We see freshclam updating our virus definitions.
Background Virus Scanner Service
Let’s see if the clamav-daemon started by using:
$ sudo systemctl status clamav-daemon.service
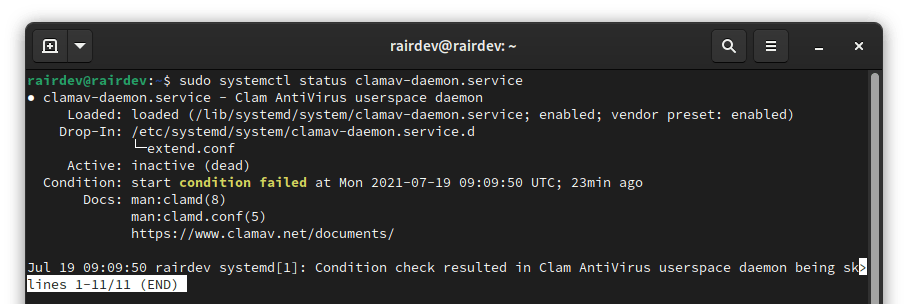
Oops! Failed to start properly.
Uh-oh, looks like mine didn’t start yet! This is likely due to the service trying to start before the clamav-freshclam service had a chance to finish downloading the virus database, resulting in the failure. No worries, let’s restart it.
$ sudo systemctl restart clamav-daemon.service
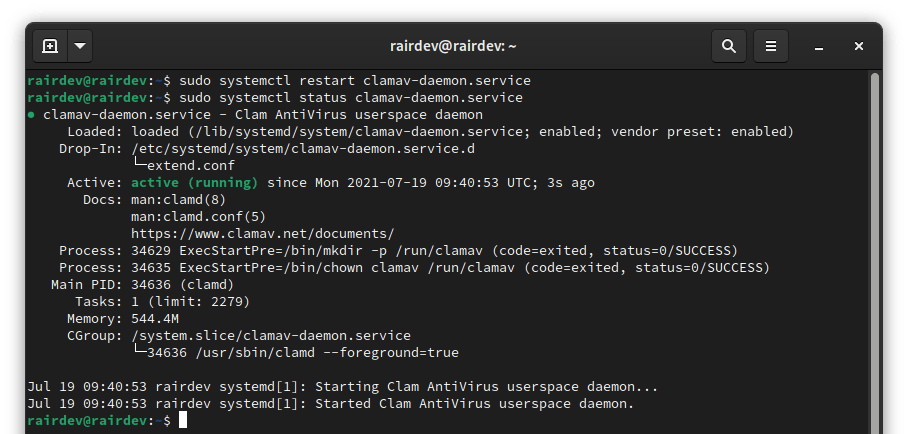
ClamAV daemon is up and running!
I got no output from the above command, but checking the status again gives me a green light this time. Note that if you check a system resource monitor like htop, your memory usage will have increased by ~1GB! Again this is expected as it loads the virus database into memory to speed up scans.
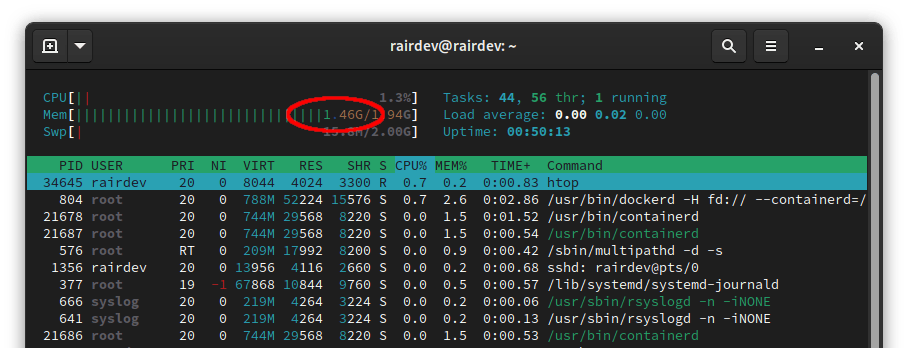
Over half the machine’s memory used (for a good cause)!
Prepare Nextcloud (Docker)
If you have installed Nextcloud via Docker, read on. Otherwise, skip to the section below.
To make ClamAV available to Nextcloud, we must mount the ClamAV ‘socket’ into the Nextcloud container. This will be a volume mount that is declared when the container is started.
Modify your docker-compose file to include the following in your volumes: declaration section:
version: 'X.X'

  services:
    nextcloud:
    ...
      volumes:
        - /run/clamav/clamd.ctl:/run/clamav/clamd.ctl
    ...
Note:
This will mount the socket from the host, directly into the same location in the container.
When starting the container, we must add an additional -v switch to include the socket:
$ sudo docker run ... -v /run/clamav/clamd.ctl:/run/clamav/clamd.ctl ... nextcloud:latest
Note:
This will mount the socket from the host, directly into the same location in the container.
Install Nextcloud ‘Antivirus for files’ App
As a Nextcloud admin, head to your Apps hub and click the magnifying glass in the top corner. Search for “Antivirus” and you should see the correct App show up. As of writing this, it is at version 3.2.1:
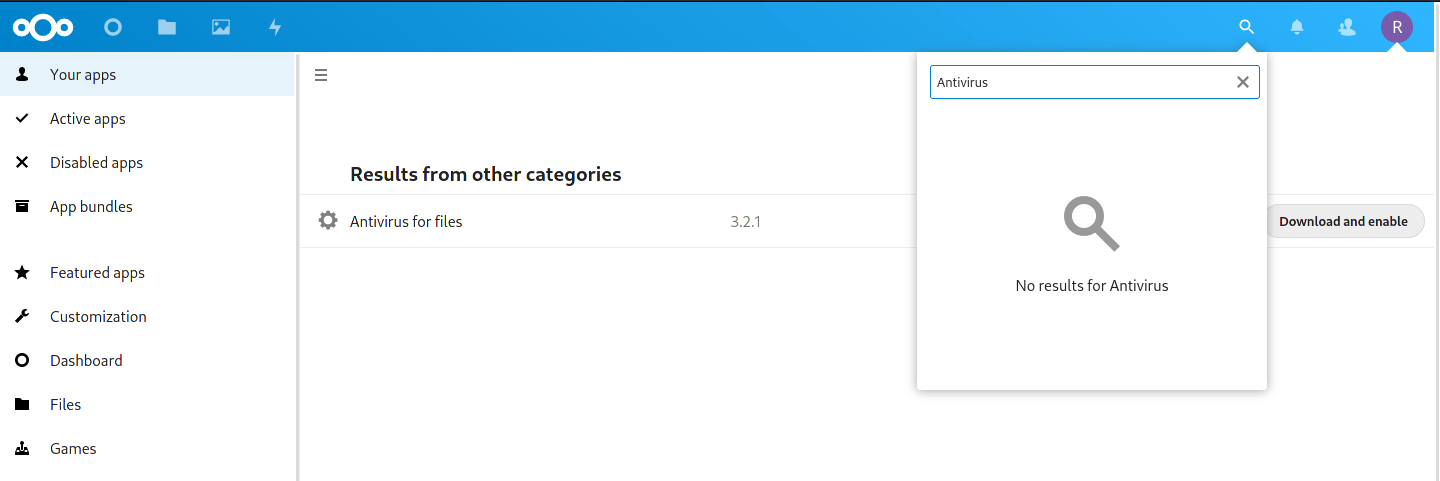
Nextcloud Antivirus connector App.
Click ‘Download and enable‘, followed by your admin password.
Configure Antivirus App for Daemon (Socket) Mode
Head to your ‘Settings‘ panel by clicking your profile picture in the top right corner. Down in the ‘Administration‘ section, you will find a ‘Security‘ category.
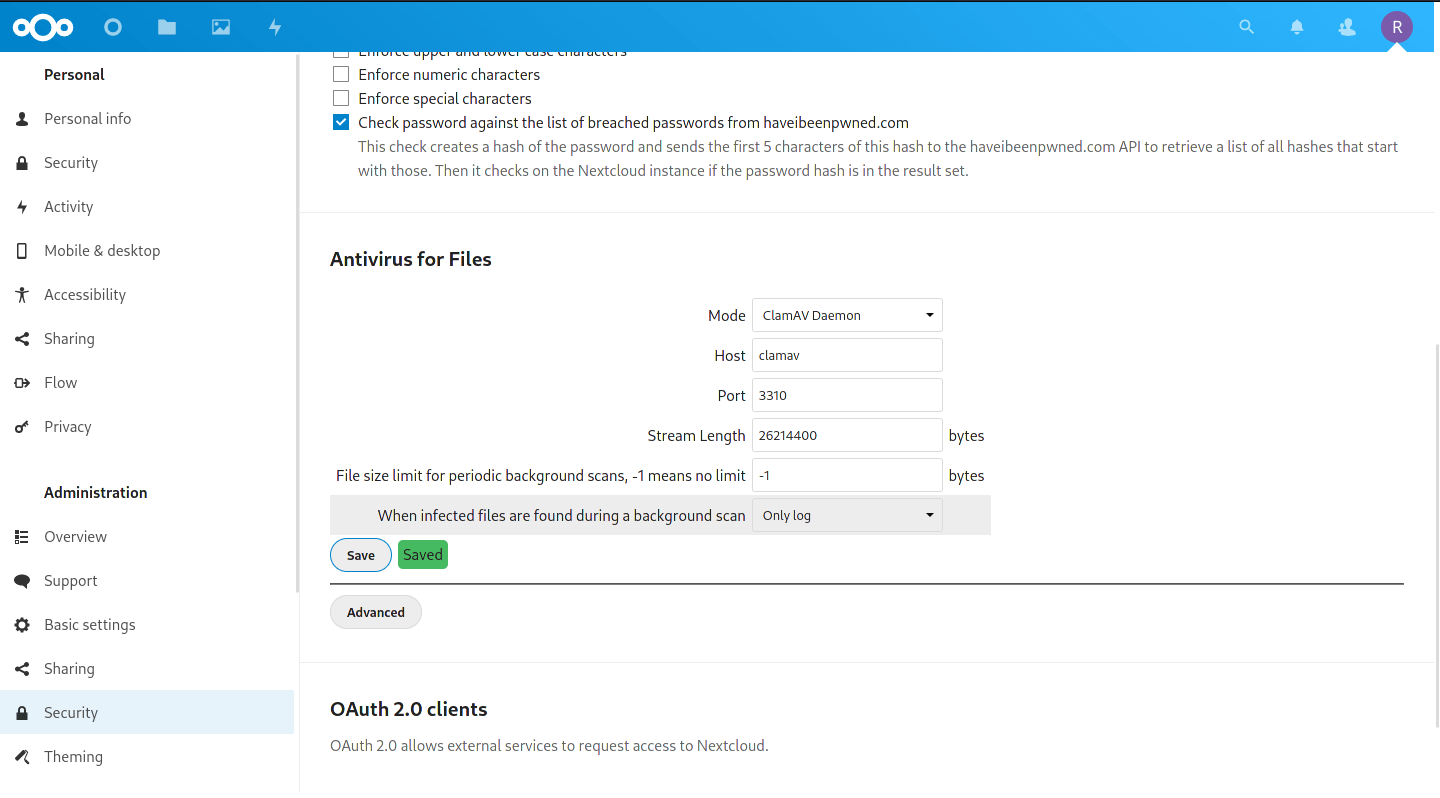
Scroll down to find the ‘Antivirus for Files‘ heading.
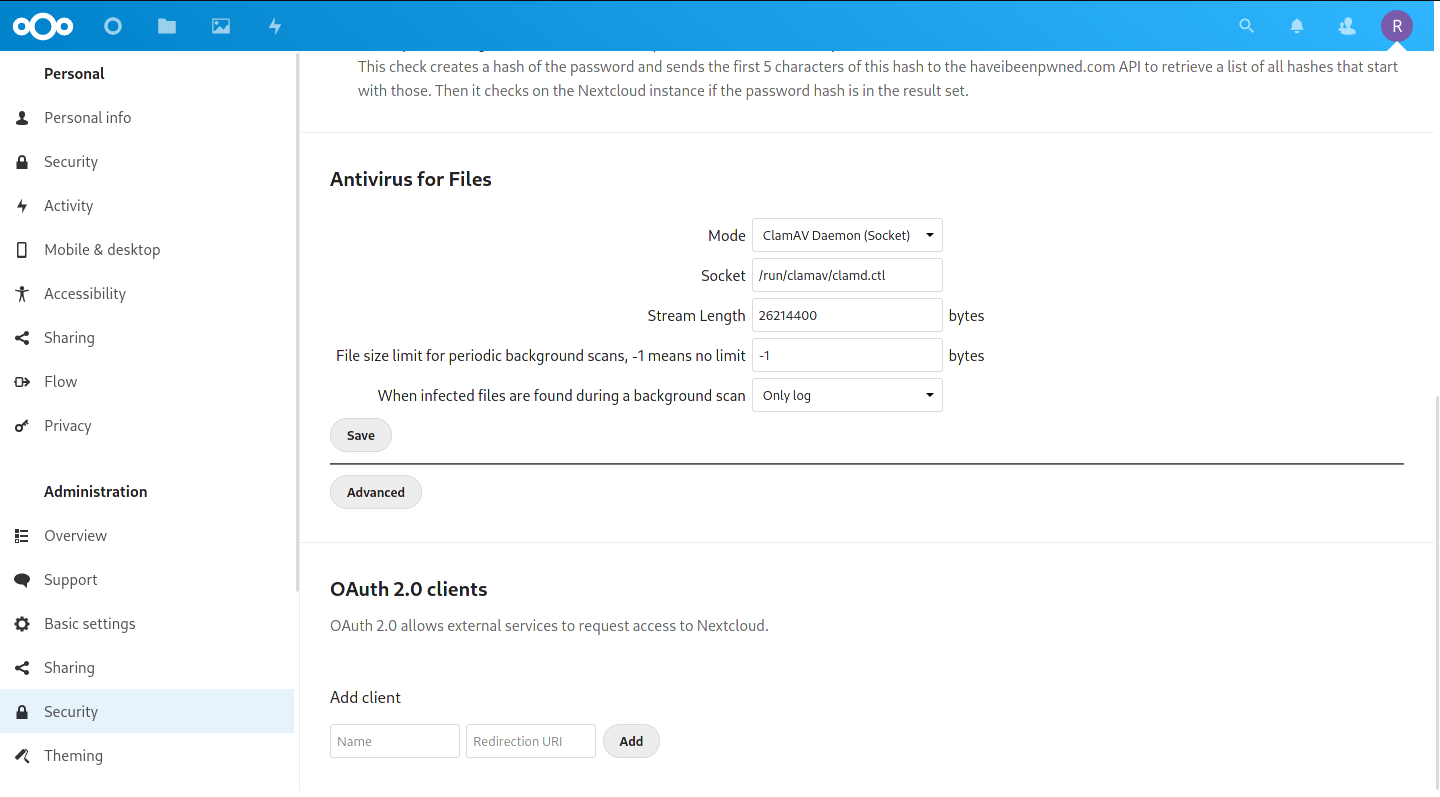
Make sure you are looking at the Administration –> Security.
Complete the following:
- We want to change the ‘Mode‘ to ‘ClamAV Daemon (Socket)‘.
- The ‘Socket path‘ should be automatically populated, but if not, make sure it points to
/var/run/clamav/clamd.ctlor/run/clamav/clamd.ctl. - The default ‘Stream Length‘ setting is of 26214400 bytes is 25MiB, and represents the max file size that will be scanned during uploads. Setting this higher will scan larger uploaded files in real time, but a second modification needs to be made if you want this to be higher (see below).
- The ‘File size limit for periodic background scans‘ will take care of larger files as long as it is set to -1 (no limit). Even set at -1, I still had a few errors. See below for the fix.
- The final setting, ‘When infected files are found during a background scan‘ asks what to do when an infected file is found. For now I would leave it set to ‘Only log‘ as there are occasional false positives. Infected files will show in the
nextcloud.logand in your ‘Activities‘ app. However, if you’d like a push notification sent, you must enable it (see below).
There is also an advanced section, but there really shouldn’t be anything to change there.
Move on to the Test the System section.
Install ClamAV via Docker
Some may prefer this method, but it limits the availability of ClamAV to containers it shares a network with. It also makes it difficult to run ClamAV on the host machine (but not impossible). This was the way I started and it worked great, but I prefer the above option. More info from ClamAV.
Add ClamAV Container to Nextcloud Network
This guide will assume you already have a Nextcloud stack running, and simply wish to add ClamAV to it.:
version: 'X.X'

services:
  nextcloud:
  ...
  # Add the official ClamAV container
  clamav:
    image: clamav/clamav:unstable
    # Specify container name for easier mapping later
    container_name: clamav
    # Map the virus database file so it doesn't have to re-download each time
    volumes:
      - /opt/volumes/clamav:/var/lib/clamav
Note:
This could also be accomplished by creating aclamav-nextcloudnetwork, and attaching both ClamAV and Nextcloud containers to said network.
After modifying your docker-compose file, make sure to start this container with:
$ sudo docker-compose up -d
This guide assumes you are running Nextcloud on a dedicated network named nextcloud. Attach the ClamAV container to that network:
$ sudo docker run -d -v /opt/volumes/clamav:/var/lib/clamav --network=nextcloud --name=clamav clamav/clamav:unstable
Note:
The defaultbridgenetwork does not allow container-to-container communication, so you must create a separate network for them to communicate properly.
Once the container is up and running, it might need a minute or two to fully finish starting up.
Install Nextcloud “Antivirus for files” App
Follow the instructions above, return here once installed.
Configure Antivirus App for Daemon Mode
Head to your ‘Settings‘ panel by clicking your profile picture in the top right corner. Down in the ‘Administration‘ section, you will find a ‘Security‘ section.
Scroll down to find the ‘Antivirus for Files‘ heading.
Note the host is the same as the container_name we used above.
Complete the following:
- We want to change the ‘Mode‘ to ‘ClamAV Daemon‘.
- The ‘Host‘ should be set to the name of your ClamAV container. In this guide, I set the container name explicitly to
clamav. - The ‘Port‘ of the container is by default listening on 3310.
- The default ‘Stream Length‘ setting is of 26214400 bytes is 25MiB, and represents the max file size that will be scanned during uploads. Setting this higher will scan larger uploaded files in real time, but a second modification needs to be made if you want this to be higher (see below).
- The ‘File size limit for periodic background scans‘ will take care of larger files as long as it is set to -1 (no limit). Even set at -1, Nextcloud gave some errors. See the fix below.
- The final setting, ‘When infected files are found during a background scan‘ asks what to do when an infected file is found. For now I would leave it set to ‘Only log‘ as there are occasional false positives. Infected files will show in the Nextcloud.log and in your ‘Activities‘ app. However, if you’d like a push notification sent, you must enable it (see below).
There is also an advanced section, but there really shouldn’t be anything to change there.
Move on to the Test the System section below.
Option for Low-Memory systems
This option will not ultimately lower the requirements for ClamAV. Instead of having the constant overhead of the 1+GB virus definition library loaded into memory, it will only load the definitions on demand. This might seem like a benefit to most, but uploading files and background scans are slow and still require memory.
Warning:
This won’t work for a Dockerized Nextcloud instance. To use the ClamAV scanning program (binary)clamscan, we also need access to the libraries which it depends on. Mounting all of them into your Nextcloud container is not advised/feasible.
Install ClamAV on the Host Machine
Follow the instructions above to install the required ClamAV packages on your host machine. The ClamAV systemd unit does not need to be started.
Install Nextcloud “Antivirus for files” App
Follow the instructions above, return here once installed.
Configure Antivirus App for Executable Mode
Head to your ‘Settings‘ panel by clicking your profile picture in the top right corner. Down in the ‘Administration‘ section, you will find a ‘Security‘ section.
Scroll down to find the ‘Antivirus for Files‘ heading.
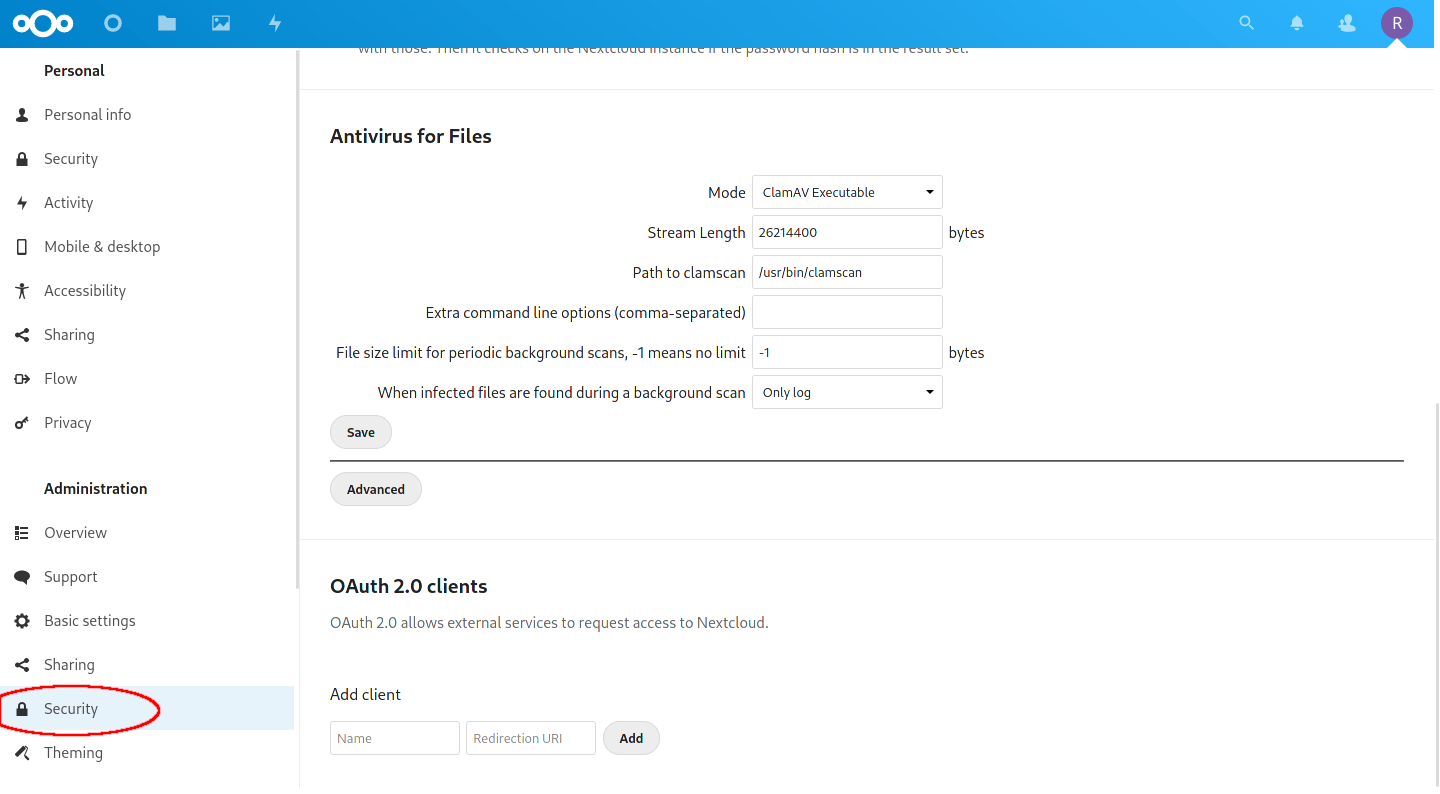
The default settings should suffice..
Complete the following:
- We want to ensure the ‘Mode‘ is set to ‘ClamAV Executable‘.
- The default ‘Stream Length‘ setting is of 26214400 bytes is 25MiB, and represents the max file size that will be scanned during uploads. Setting this higher will scan larger uploaded files in real time, but a second modification needs to be made if you want this to be higher (see below).
- ‘Path to clamscan‘ points to the location of the
clamscanprogram (binary). This can be found by running the commandwhich clamscan. - ‘Extra command line options (comma-separated)‘ allows you to modify the way
clamscanruns. There are many options, refer to the documentation. - The ‘File size limit for periodic background scans‘ will take care of larger files as long as it is set to -1 (no limit). Even set to -1, Nextcloud gave me some errors. See below for the fix.
- The final setting, ‘When infected files are found during a background scan‘ asks what to do when an infected file is found. For now I would leave it set to ‘Only log‘ as there are occasional false positives. Infected files will show in the Nextcloud.log and in your ‘Activities‘ app. However, if you’d like a push notification sent, you must enable it (see below).
There is also an advanced section, but there really shouldn’t be anything to change there.
Test the System
As always, it’s best to test the system to ensure everything is working and any bad files are detected. If you recall from the introduction, I uploaded an EICAR test file (infected.zip) to my Nextcloud. This should be picked up by the background scanning service.
As far as I can tell, it is run in conjunction with cron jobs. So make sure you have cron setup and working correctly. My test instance was initially using AJAX and did not run the background scan to detect the file. It appears that on larger installations, the background scanner picks a handful of files to scan at a time and eventually works its way through your entire Nextcloud file system.
Upload the EICAR Test Files
While waiting for background scans, I decided to try and upload the 4 test files from EICAR (see link in Overview section) to my Nextcloud. I was greeted with a warning message in the top right of the screen, and lots of error messages in the Nextcloud Log.
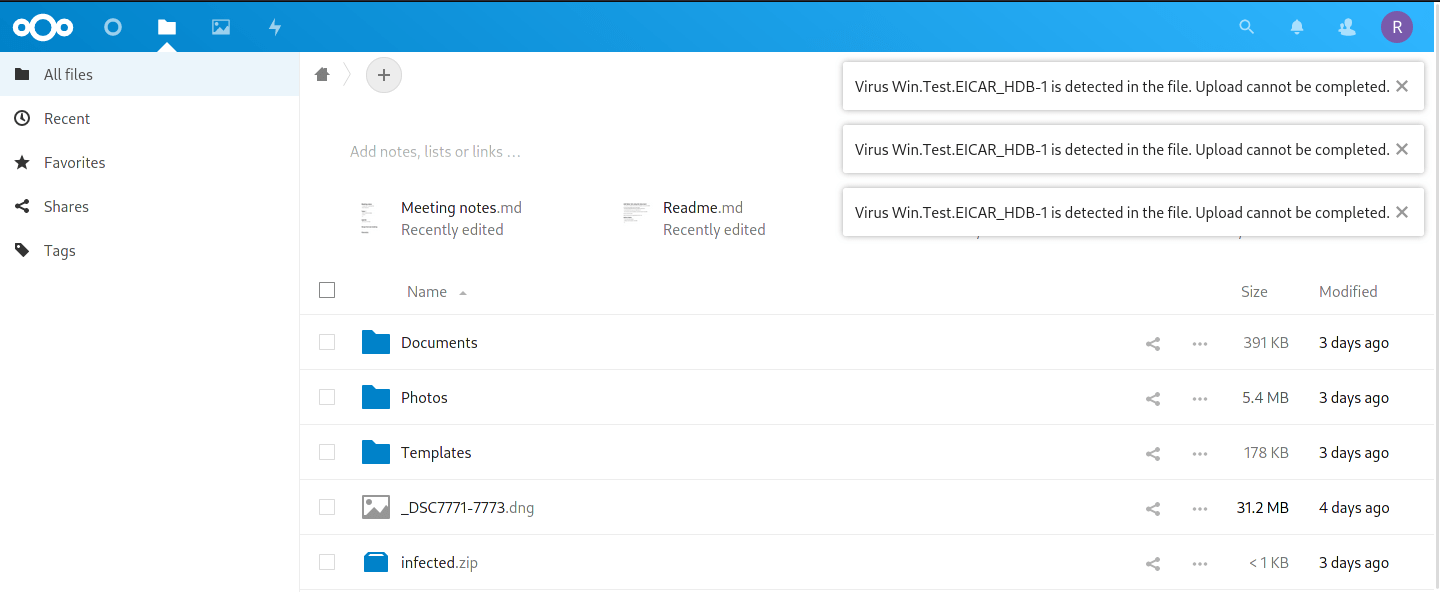
All files were blocked from uploading to Nextcloud.
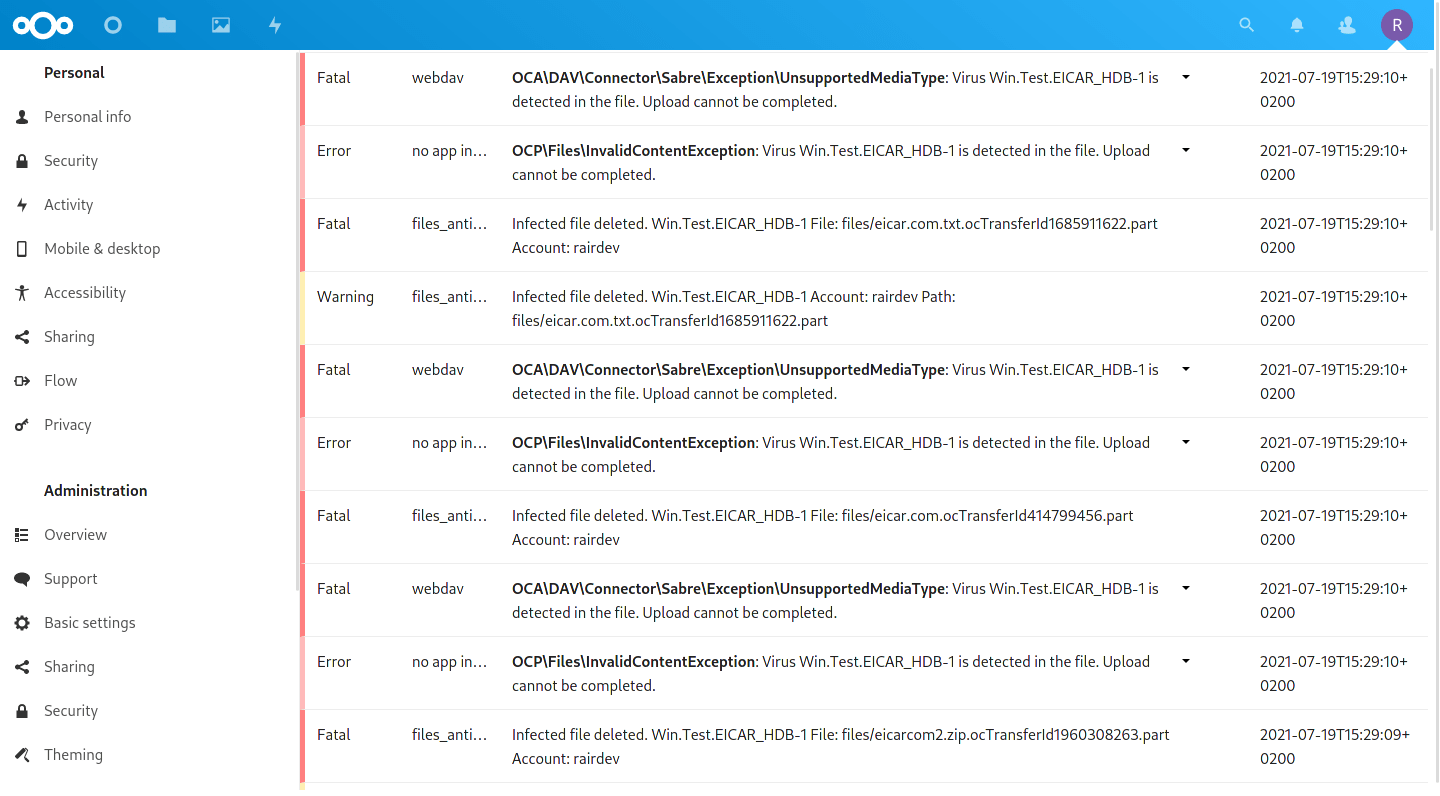
Antivirus hits are easy to spot in the logs.
This looks good, the scanner is effectively checking files as I upload them and ensuring they don’t even make it to Nextcloud.
Check Background Scans
The background scan eventually ran and caught the infected.zip file. I was given a notification in the ‘Activities‘ App. Looking in my ‘Activities‘ App, the ‘Antivirus‘ section at the bottom filters the other activities out.
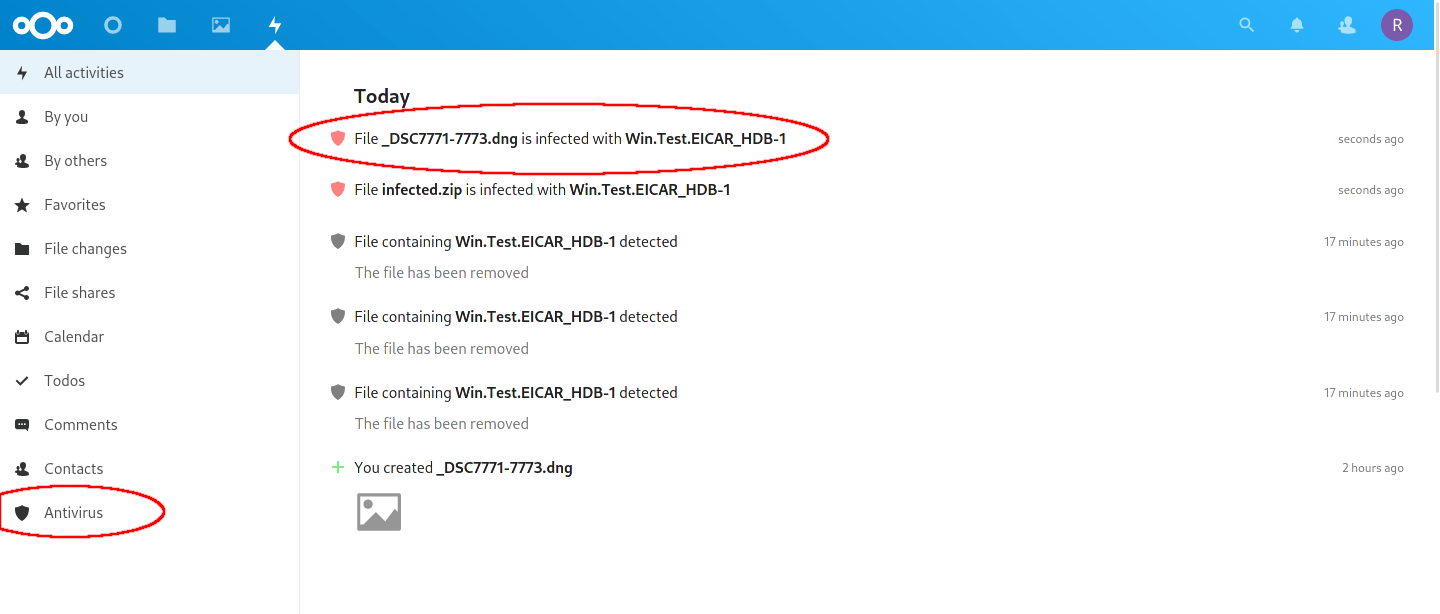
Activities is another easy way to see the status of the Antivirus scanner.
Two things to note:
- The virus was detected and logged, but the file was not deleted. I like to keep it this way, so I can see what is infected and decide what to do with it. Part of the reason is because occasionally there are false positives:
- While testing the size limits of the scanner, I uploaded a large RAW image I was working on. For some reason, the scanner decided it also had the same EICAR test virus in it as well. This is definitely not the case, and upon deleting and uploading again, the file is fine, no false detection.
Bonus Extras
The above should get you started and provide a good amount of protection against viruses and potential threats. But I wanted to share a few tips I learned from using ClamAV with Nextcloud.
Add Push Notifications
By default, there are no push notifications. Head to your ‘Settings‘ –> ‘Administration‘ –> ‘Activity’, and scroll to the bottom under ‘Other Activities‘. You will see a checkbox for push notifications under ‘Antivirus detected a virus‘. Here you can also optionally set email notifications if you have an email service setup.
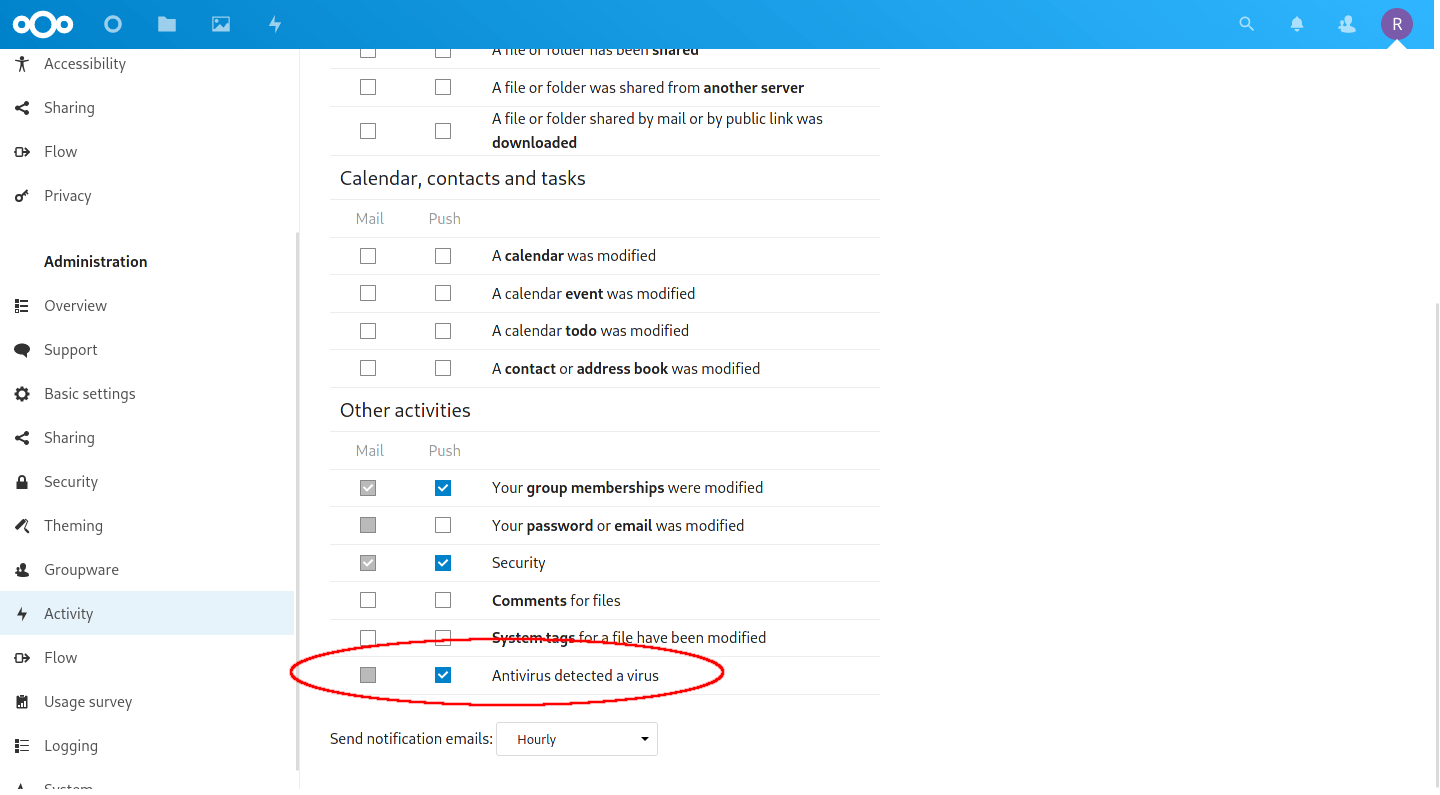
Enable push notifications to see threats immediately.
ClamAV Tweaks
The below settings primarily live in your /etc/clamav/clamd.conf file. Below are a few of my preferred settings, but you can also have a look through all of the options available by using the man clamd.conf command.
Open with your favorite editor and change the following:
Change Socket Permissions
For some reason the default is a world read-write accessible socket. Definitely not a good idea. Let’s change that to remove the permissions for ‘other’ users.
LocalSocketMode 660
Alert When File Too Large
When background scanning, you can use this setting to alert you if a file was not scanned. By default, we set our ‘Stream Length‘ to scan files up to 25MiB in size, and no limit on the background scanner. However many files larger than 25MiB were still skipped.
AlertExceedsMax true
Warning:
This will mark files as detected infections, with theHeuristics.Exceeds.Limitinfection. This is not an infection at all, just warning you that it was not scanned fully. If you see this error constantly, see the tweak below. Once you’ve increased the file scan size, this can safely be set tofalse.
Scanning Larger Files
I would occasionally get an error in my Nextcloud logs that there was a problem with ‘Stream Max Size’. Digging further, I realized that setting things like MaxFileSize, MaxScanSize, etc. did not affect it. This is because of how Nextcloud utilizes the ClamAV daemon by ‘streaming’ a file to it. We instead need to change the StreamMaxLength. See above to know how big to change it to.
StreamMaxLength 200M
I also upped the ‘Stream Length‘ setting in my Antivirus App to a larger size (104857600 bytes or 100 MiB).
Detect Potentially Unwanted Applications (PUA)
See the documentation on this as it appears to be a big topic. I’ve been using it for a while now with not many false positives. The short version is that it is a new library to detect bad programs across a multitude of platforms (Android, Windows, etc.)
DetectPUA true
Log File Max Size
Log files can be super valuable, but can also grow to massive size and take up valuable space on your drives. Best to limit them so they are rotated regularly.
LogFileMaxSize 10M
Restart the ClamAV Daemon
After making any of the changes above, we will need to restart the systemd unit.
$ sudo systemctl restart clamav-daemon.service
$ sudo docker restart clamav
Note:
If you are running the ClamAV docker container, you will need to make sure you bind mount theclamd.conffile locally so not to lose the settings each time the container is updated!
What do I do when an infected file is found?

With many settings enabled, I received lots of false positives.
How do you know the file is really infected? How do we know it isn’t a false-positive?
The answer is difficult. The internet is your friend. You can search for the infection that was found and usually there is an explanation for what was identified. After that, you will have to use your best judgment.
Ask yourself: Where did this file come from? Do I trust the source? How critical is the file? if I were to delete it, can I find another copy elsewhere?
When in doubt, make a backup and delete the file, or scan with another virus scanning software.
Conclusion
Viruses and malware are most commonly distributed via emails and unsolicited links. But occasionally we may receive a file from a friend who unknowingly is passing around an infected file (insert your favorite COVID reference here). Integrating it into Nextcloud is relatively painless and if you have a bit of RAM to spare, can be useful for some added protection.
The ClamAV program is not a full fledged antivirus suite, but does a great job in detecting many threats to our digital lives. It might not be as intuitive as the big names like McAfee, BitDefender, Avira, Malwarebytes, etc. But at least it won’t be pushing you to upgrade to ‘Premium’ constantly.
Thank you for visiting my site and checking out this post! I hope you found it helpful. If you are feeling generous, please consider a small donation to help keep the server running.