
Nextcloud Backup pt. 3
Table of Contents
This article is the final part of a 3-part series on automating a backup for Nextcloud. If you arrived straight here, please make sure to visit the previous articles in the series as I won’t be repeating the general process, but building upon the previous posts.
Previously in this series:

Thank you for visiting my site and checking out this post! I hope you find it helpful. You may have noticed I don’t have any advertisements running (I hate how invasive online advertising has become). This also means no passive income to keep the site running. Please consider donating a small amount to say thank you and help me cover the costs.
Overview
In the last article, we setup a remote Restic repository and simplified our backups with environmental variables. This is all to set us up for the final piece of automatic backups:
- Create a non-root user to execute the backups for some added security
- Automate the backup process with a script +
cron
While these are only two steps, there are complexities involved in each. You will notice that at the end of each section I run a small test to ensure my previous efforts were successful. The more complex we get, the better idea it is to test as we go. Hopefully this will reduce massive debugging headaches later!
Create a Non-Root Restic User
Back to our server with Nextcloud and Restic. In the previous article, we downloaded and installed Restic from the Debian/Ubuntu repositories, but it meant that to read all of the files we wished to backup, it had to be run as root, or a user capable of reading said files. Let’s remedy that.
The first part of this tutorial is taken directly from the examples section in the Restic documentation.
Remove existing Restic install (Optional)
We can remove the installed version of Restic to reduce confusion:
$ sudo apt remove restic
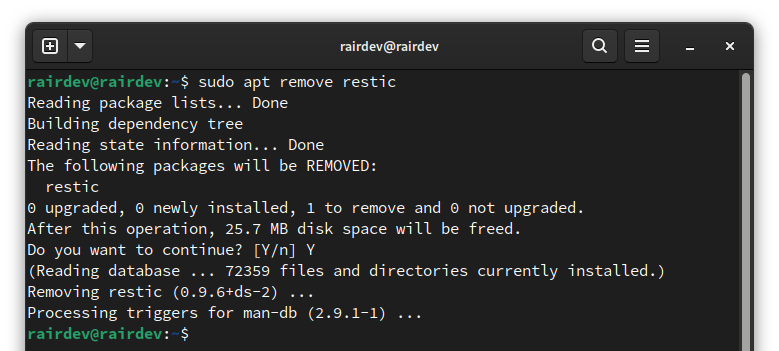
Remove installed versions of Restic.
Create a New System User
The user we create needs to have access to Nextcloud and our database for dumps as shown in the previous article. This usually means adding the user to the correct group.
$ sudo adduser --system --group restic
$ sudo usermod -aG docker restic
Note:
- The first command creates a system user named
resticand creates theresticgroup as well.- The second command ensures the user has access to
dockerto usedocker execcommands.
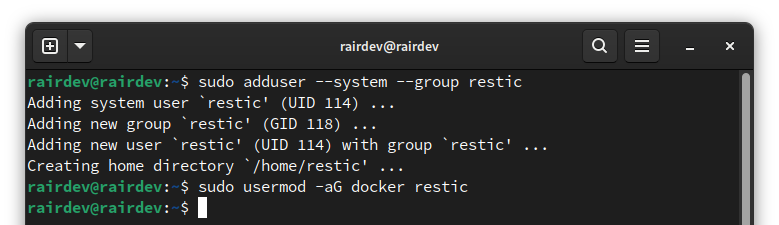
Create a new restic user and add to the docker group.
$ sudo adduser --system --group restic
$ sudo usermod -aG www-data restic
Note:
- The first command creates a system user named
resticand creates theresticgroup as well.- The second command ensures the user has access to files owned by the
www-datagroup. This is the default Apache2 user in Debian/Ubuntu installs, and the one who has access to our Nextcloud files. If you are using a different distribution, the group name might need to be different.
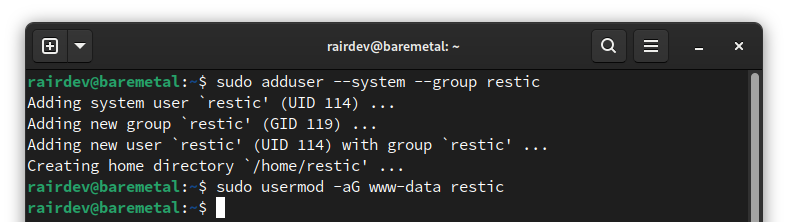
Create a new restic user and add to the www-data group.
Install Restic Program (Binary)
Instead of installing Restic onto the entire system directly from the Debian/Ubuntu repositories, we will instead find the binary directly from the Restic team on Github.
$ sudo mkdir -m 777 ~restic/bin
$ sudo curl -L https://github.com/restic/restic/releases/download/v0.12.1/restic_0.12.1_linux_amd64.bz2 \
  | bunzip2 > /home/restic/bin/restic
Note:
- The first command is creating a new directory to store the Restic binary. Note we are using some bad permissions, but that’s just to correctly copy over the program after downloading.
- The second command pulls the latest (version 0.12.1) version of Restic from GitHub and unzips it into the newly created directory.
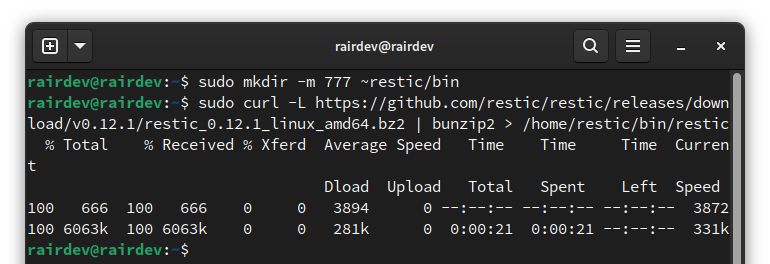
Installing a fresh copy of Restic.
How can I find which version of Restic is the ’latest'?
restic self-update command which will pull the latest release from the Restic team’s GitHub page.Set Strict Permissions
Before we continue we want to fix those loose permissions and instead use strict permissions (limited access) for the Restic binary.
$ sudo chown -R root:restic /home/restic/bin/
$ sudo chmod -R 750 /home/restic/bin/
Note:
- The first command is changing the ownership of the
bindirectory and theresticprogram inside of it.- The second command gives the owner of the file (
root) full access to it (read, write, execute), and the group (restic) read and execute access.
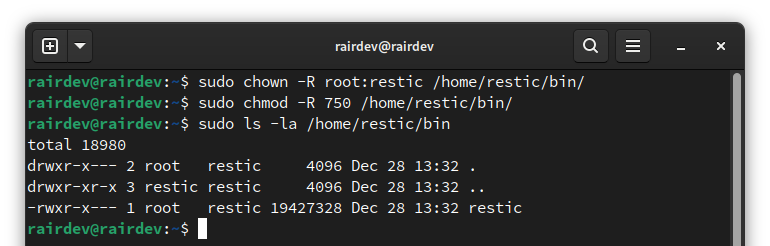
Set strict permissions for Restic.
Test Restic
While we can easily move onto the next step, I prefer to double-check my work as I go. This prevents me from running into issues later and not knowing where they came from.
A simple test is to run Restic’s self-update program and see what version it is on. The key is to run it as the restic user to make sure we have permissions correct.
$ sudo -u restic /home/restic/bin/restic self-update
$ sudo -u restic /home/restic/bin/restic version
Note:
While not commonly used, we can usesudowith the-uswitch to run a command as a specific user!
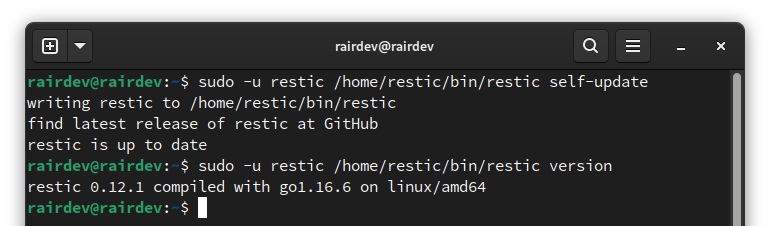
Run a few restic commands to ensure it works.
Success!
Prepare For Automation
If you’ve been following along from the previous articles, we created some helper files to assist in the usage of our Restic backups: an environmental variables file and a set of include/exclude files. Let’s move those so we can access them easily.
Move Restic files from Root to Restic user
$ sudo mv /root/.restic.env /root/restic.include /root/restic.exclude /home/restic/
This single command will move your .restic.env, restic.include and restic.exclude files to the newly created user’s home directory.

Move our Restic helper files to the new user.
Set Permissions
Let’s ensure the restic user has access to the files we just moved.
$ sudo chown root:restic /home/restic/.restic.env /home/restic/restic*
$ sudo chmod 640 /home/restic/.restic.env /home/restic/restic*
Note:
- For a bit of added security, we set the owner of the files to the
rootuser and we only give write permission toroot.- We give the
resticgroup access to the files, but make them read only.You can set your files more permissive, but DO NOT give any access to ‘other’ users (keep the last digit 0 in the above command!)
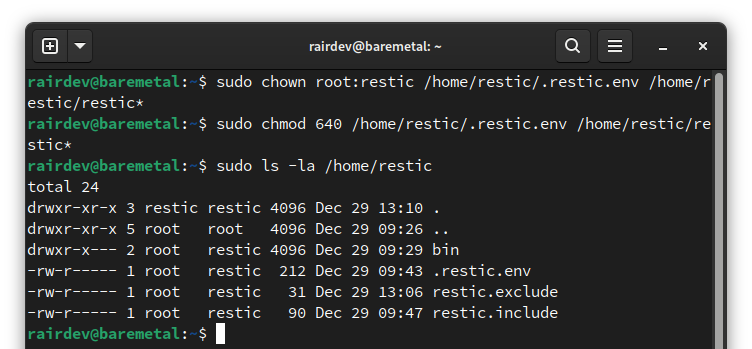
Set our permissions for restic to read the files.
Verify File Access
Once again we will test as we go. A simple test is whether or not the restic user can read the files we just played with:
$ sudo -u restic tail /home/restic/.restic.env /home/restic/restic.*
If everything went according to plan, we should see the output of the files we moved. If you get a permission denied error, head back above and fix the file that the restic user is unable to read.
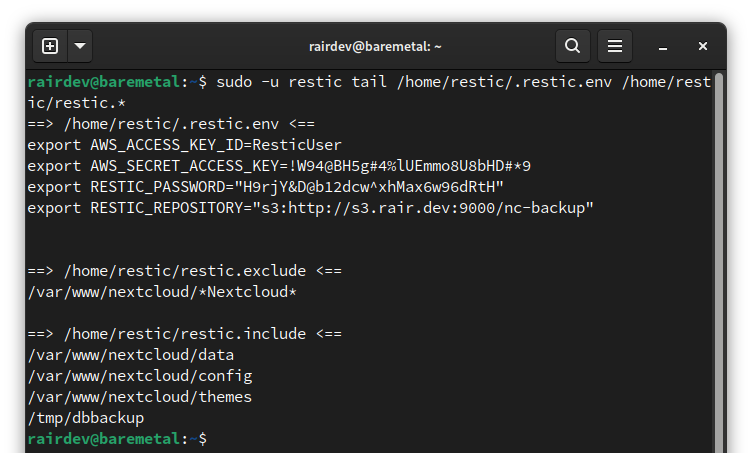
While not strictly necessary, always a good double-check.
Technical Modifications
In this section, we must address issues with running as a non-root user. Unfortunately, there are some things that do require more privileges than the average user. One applies to docker based installs, while the other is for bare metal installations.
DOCKER ONLY - Give Restic Program “Read” Access to the System
By default, the Restic program is only able to read (access) files that belong to the user running the program. This is a bit problematic as the files we want to backup are owned by multiple different system users.
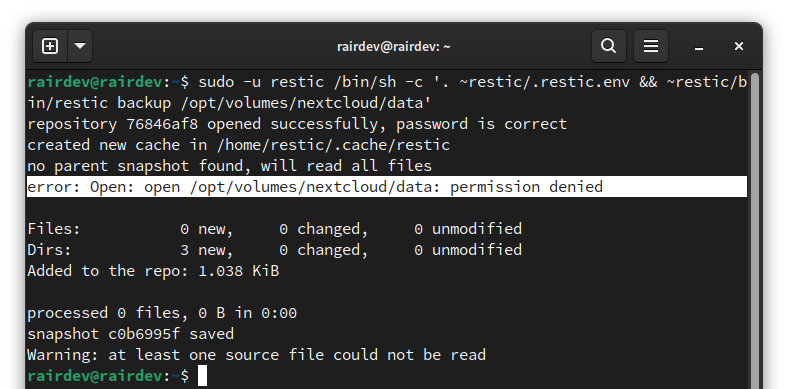
Restic denied access to our Nextcloud data!
Since our restic user will be running the program, it won’t have access to our Nextcloud or database backup files. There are a few approaches to this problem. Without delving into the pro’s and con’s of each, I have decided to go for a simple approach. We can use a special command to allow the restic program to read (and therefore backup) the whole file system.
Warning:
Anyone in theresticgroup would be able to use the Restic program to access any file on the system! This is known as capability elevation and can be a security risk in some systems. You have been warned.
$ sudo setcap cap_dac_read_search=+ep /home/restic/bin/restic
Note:
This setting only applies to this exact program file. If it is deleted, re-installed, or updated, you will need to run the command again to allow access again.
This command gives the restic binary a way to bypass a basic function of Linux security known as discretionary access control (DAC). This allows the program to act like the root user to read any file, and read/execute any directory. It is one reason that we must protect the program with strict permissions.
Test with a Simple Backup
After setting the above, we can either do a full backup (what I attempted in the image above), or just do a quick test run:
$ umask 007
$ touch /tmp/test
$ ls -l /tmp/test
$ sudo -u restic cat /tmp/test
$ sudo -u restic /bin/sh -c '. ~restic/.restic.env && ~restic/bin/restic backup /tmp/test'
$ sudo -u restic /bin/sh -c '. ~restic/.restic.env && ~restic/bin/restic forget ba19dcd6'
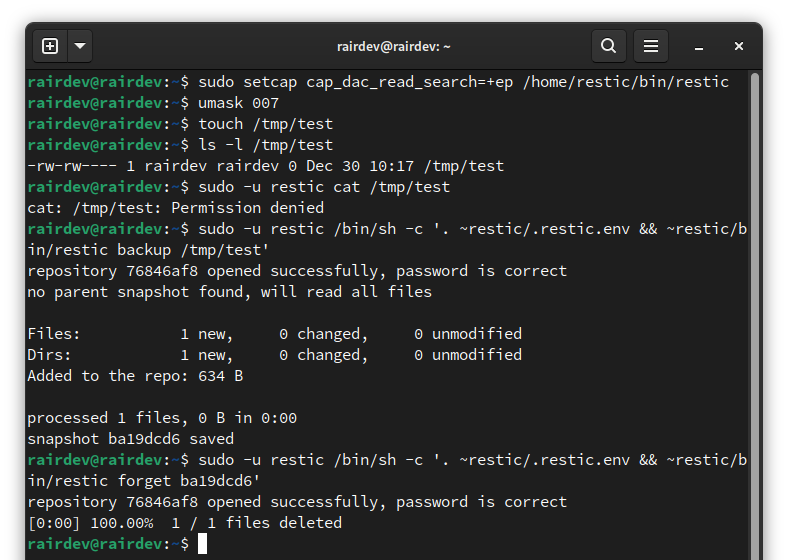
Restic is now capable of reading files the owner cannot access.
This simple test just shows that the restic user does not gain any special capabilities, but only the restic program does.
With these preliminary steps in place, we can move forward to automating the entire backup process! Skip ahead.
BARE METAL ONLY - Allow Restic to Toggle Maintenance Mode
While giving the restic user access to the www-data group will allow us to backup the Nextcloud files, it won’t allow us to execute a critical command. Before creating a database backup, it is important we temporarily put Nextcloud into maintenance mode. This will reduce the chances of a corrupted database and file errors.
While this could be executed other ways, I have gone with a simple approach. We will give our restic user the ability to run the two necessary commands as the www-data user and nothing more.
We begin by adding to our sudoers file. In Ubunutu, we can create a specific file in the /etc/sudoers.d/ directory that will be read when using the sudo command. Other distributions might require direct modification of the /etc/sudoers file.
$ sudo visudo -f /etc/sudoers.d/restic
Note:
Usingvisudoensures the file has no syntax errors before placing it into the correct directory.
To this new file, there’s a specific syntax explained below. Remember that sudo is much more fine grained than ONLY allowing the user to run commands as root.
| |
Note:
- First is the user we want this to apply to -
restic.- Next is the host that this can be run on.
ALLcan be replaced with yourhostname.(www-data)implies that this command can only be run as the indicated user.- The next are the two commands we will need to run to put Nextcloud into and out of maintenance mode. Note that we have to escape the
:by making it\:.
If after saving and closing you get no feedback, everything is OK. Otherwise it will alert you to a syntax error and you can press e to go back and edit the file again.

No errors shown after creating a sudoers file.
Quick Test of occ Command
A quick test to ensure we have everything working correctly is to simply run the two commands we just enabled for our restic user. We can use the same trick as above to run the command as the restic user.
$ sudo -u restic sudo -u www-data /usr/bin/php /var/www/nextcloud/occ maintenance:mode --on
$ sudo -u restic sudo -u www-data /usr/bin/php /var/www/nextcloud/occ maintenance:mode --off
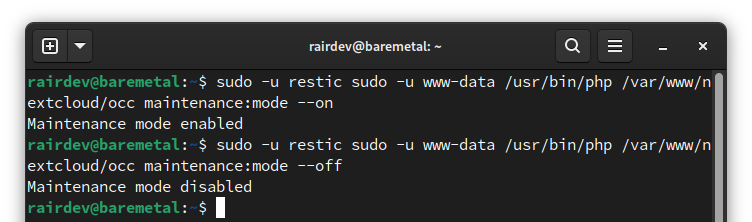
Restic successfully executing our occ commands!
With these preliminary steps in place, we can move forward to automating the entire backup process!
A Look at Scripting
Now that we have everything in place, we are going to get to the heart of the article, which is scripting actions. Once we have a working script, can have it run at regularly scheduled intervals with tools like systemd or cron.
What is scripting?
The first half of the script will take care of our Nextcloud database backup. And, since Nextcloud’s data is stored directly on our filesystem, we will have everything we need to begin the backup with Restic in the second half of the script. To round it out, we will do some cleanup of the Nextcloud database backup file and our Restic repository.
If this all sounds terrifying, I recommend taking some time to learn the basics of bash scripting. It should only take a couple of hours to be familiar with what I am doing in this article. Or, you can contact me directly as I offer 1:1 instruction and can help walk you through the process step-by-step.
Recreating Database Backups
To begin, let’s recreate the steps we went through in the first article of this series.
- I will be writing the Docker portion from the perspective of a user with Nextcloud running in a Docker container and using MariaDB/MySQL in a second container. You may need to adjust your script accordingly.
- I will be writing the Bare Metal portion from the perspective of a user with both Nextcloud and MariaDB/MySQL running on the same server.

Start a new script with your favorite editor.
Open a new document with your favorite editor like nano or vim. I will call it nextcloud-backup.sh and place it in the /home/restic directory. The first line of a bash script will always include a special line which tells your server how we want this script to be run:
| |
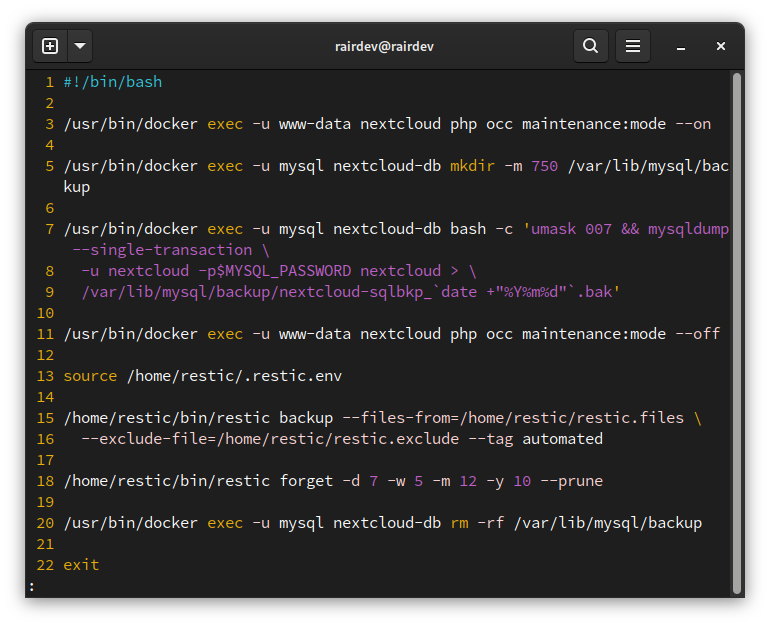
Below this will begin our instructions. They should look familiar if you’ve been following along with my articles. For an explanation of each line, refer to the article linked above.
| |
Note:
- The first and last commands apply to the
nextcloudcontainer.- The middle two commands apply to the Nextcloud database container. Adjust the names to your setup accordingly.
| |
Note:
I used fairly generic names above, you will need to adjust the names/paths to your setup accordingly.
Recreating Restic Backups
For the next part of the script, we will recreate the steps from the second article of this series.
| |
Note:
Remember that the last line will download and repack any changes to optimize your storage. This could incur huge charges if done daily on certain storage providers!
Final Touches
The last piece of the script will just be some tidying up of our file system.
| |
The completed docker script.
| |
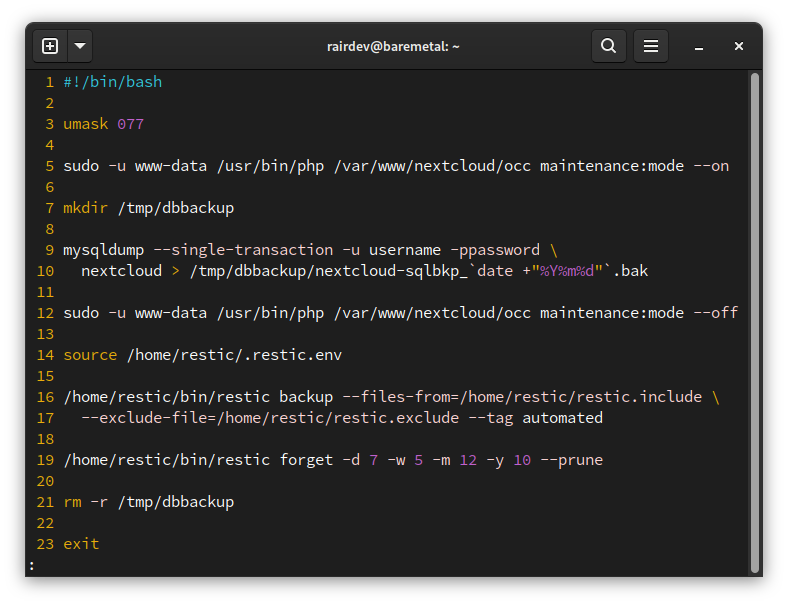
The completed script for a bare metal backup.
And that’s it! You can now save the script and exit.
Permissions…Again!
Before continuing, we will want to make sure it is both secure and executable by our restic user. If you haven’t already done so, move it to the restic user’s home directory.
$ sudo chown root:restic /home/restic/nextcloud-backup.sh
$ sudo chmod 750 /home/restic/nextcloud-backup.sh
Test Run
As we did before, let’s give our script a test run to ensure we didn’t make any typos or include incorrect paths.
$ sudo -u restic /home/restic/nextcloud-backup.sh
If all goes well, you will see some feedback onscreen. If any errors occur, best to revisit the script and fix the issue before proceeding.
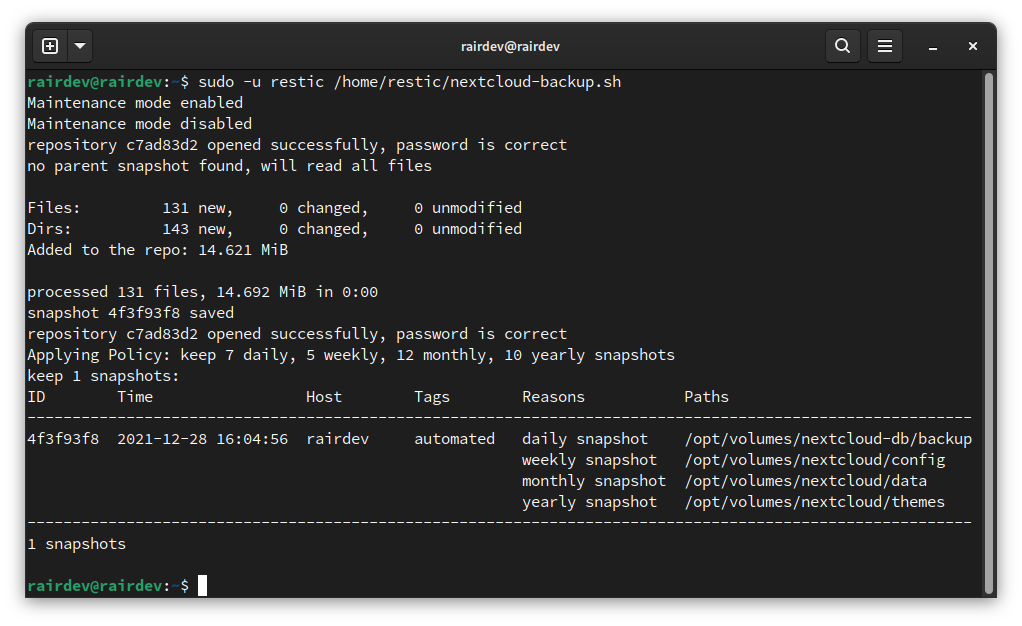
Look carefully to ensure you don’t have any errors.
Run Regularly with a Cron Job
While there are alternatives to using cron like systemd timers, cron is installed on most systems and quite easy to use. Let’s create a new cron job to run our backup nightly at 2AM.
Open crontab Editor for Restic User
$ sudo crontab -u restic -e
Note:
Here we are editing thecronjobs of another user. For more information, the ArchWiki has a great article all aboutcron.
Add the Backup Job
Once in the editor, head to the bottom and add a new line. The line will include the following:
0 2 * * * /home/restic/nextcloud-backup.sh 2>&1 | /usr/bin/logger -t ncbackup
Note:
The syntax is a bit odd, but is explained in the file itself and all over the internet. Basically, we are telling it we want the job to run:
At the 0th minute of the hour
The 2nd hour of the day
Every day of the month
Every month of the year
Every day of the week
Then we tell it where to find the script we want to run.
The final part of the line (
2>&1 | /usr/bin/logger -t ncbackup) passes the output of our script (and any errors) to the system’s logging program with a “tag” attached to each entry.
Save and exit!
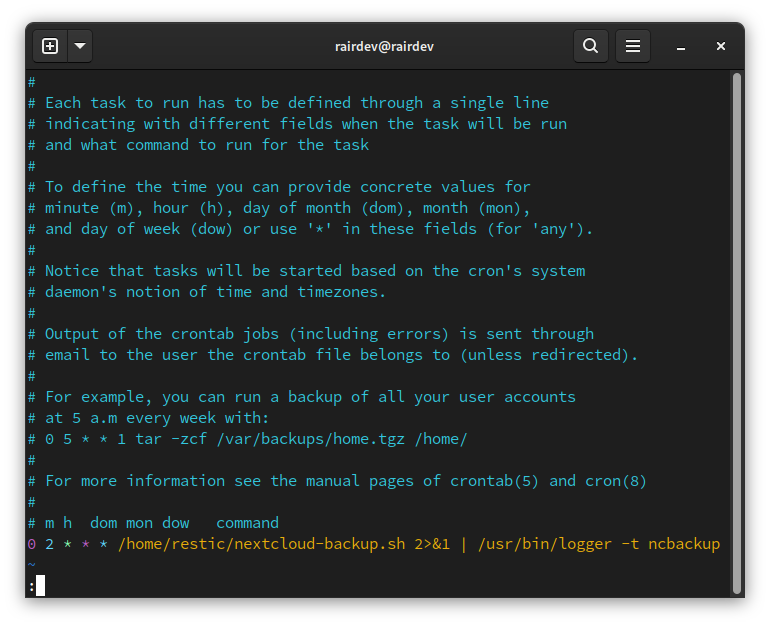
The syntax for cron is a bit odd but very powerful.
Double Check the Job Works
If you are new to cron or don’t trust it, you can run the job in 5 minutes from now and watch to make sure everything runs smoothly. Then edit your crontab again to set it at an appropriate time. Otherwise, check the following morning that everything ran correctly. You can check:
- Your
syslogforcronjobs that have run, usinggrepto search for items tagged withncbackup. - Your
resticrepository to see that a new snapshot was created (when and with a tag) - Verify by mounting your backup and searching through the files
Using 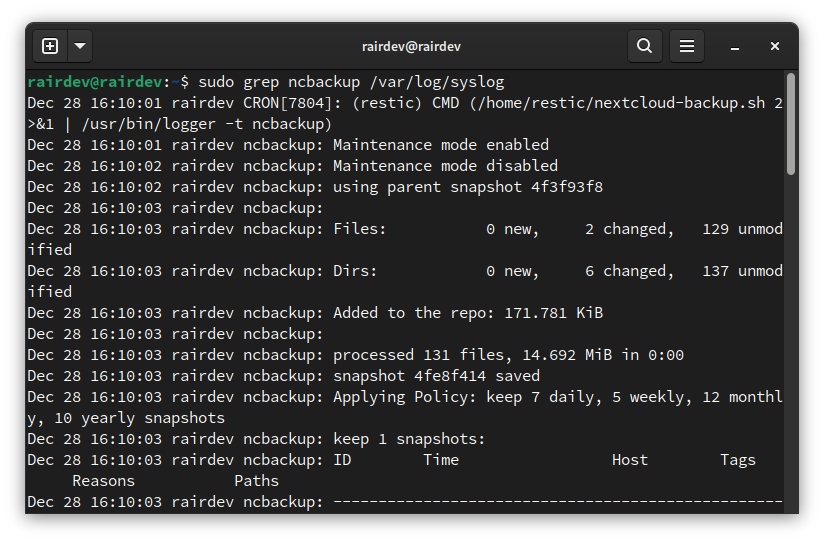
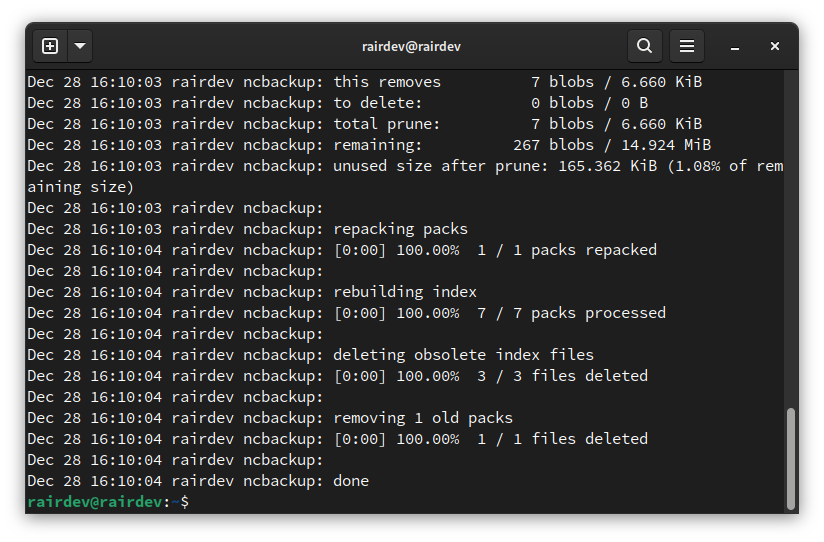
grep we can find the evidence of our script.
Conclusion
This has been a wild ride of a series for me. I hope you found some helpful tips along the way. If you are new to self-hosting or even Linux in general, I know how overwhelming this can all be. But don’t let this be the end!
Modify the Script
This series was written to give you a starting point. While it primarily focused on backing up a Nextcloud instance, the same can be used for really any self-hosted application. For a bit more complexity, you can see a script in my GitHub repo with the ability to backup multiple databases and aplications.
Verify Regularly
Restic has a nice built-in test feature to see if your data is still in good condition. But that won’t necessarily tell you if there was a problem created elsewhere. I recommend setting a calendar event to remind you to check your backups at least a couple times per year.
A few months back a friend asked for some old photos I had stored on my Nextcloud. To my surprise, the files weren’t loading. Upon further digging, I found the files at 0b each on the file system! I had no idea that I had lost some photos. Fortunately, I dug through my old backups and found the files in perfect condition from a backup made 8 months prior. Restoring the files took some time but reassured me that this process works.
If you see a mistake or have any questions, leave a comment below. I look forward to hearing from you and keep self-hosting!
Thank you for visiting my site and checking out this post! I hope you found it helpful. If you are feeling generous, please consider a small donation to help keep the server running.