
Nextcloud Backup pt. 2
Table of Contents
This article is the second part of a 3-part series on backups for Nextcloud. If you arrived straight here, please make sure to visit the first article in the series as I won’t be repeating the general process, but building upon the previous post.
Previously in this series:
Nextcloud Backup pt. 1

Thank you for visiting my site and checking out this post! I hope you find it helpful. You may have noticed I don’t have any advertisements running (I hate how invasive online advertising has become). This also means no passive income to keep the site running. Please consider donating a small amount to say thank you and help me cover the costs.
Overview
In the last article, we did a full Nextcloud backup to a local drive. This is a great place to start, but we can improve the backup in a number of ways. Namely:
- Use an s3 off-site bucket (Wasabi, Backblaze, Amazon, other) to adhere to the 3-2-1 backup rule.
- Use an environmental variable file to read in some repetitive variables for Restic.
- Using
--exclude-fileand--files-fromflags with theresticcommand to simplify backups and reduce their size. - Rotate our database and Restic backups.
Whew! That’s a lot to cover. Let’s get to it.
S3 Bucket
A wonderful feature of Restic, and most other backup solutions, is the ability to use purpose built, off-site storage. One instance of that is the S3 object storage that has become popular due to its ease-of-use, high availability, scalability, etc. Personally, I have been using Wasabi S3 object storage for the last 6 months and am quite happy. There are many choices available, choose the one you prefer.
For this article, I will actually be using a self-hosted Minio instance, but there are MANY ways you can take advantage of Restic’s off-site backup capabilities. No matter which you use, the main things we will need to do are:
- Create an S3-compatible ‘bucket’ to hold our Restic backups
- Create a user with
readwritepermissions to the ‘bucket’ - Copy the ‘Access Key’ and ‘Secret Key’
Create an S3 Bucket
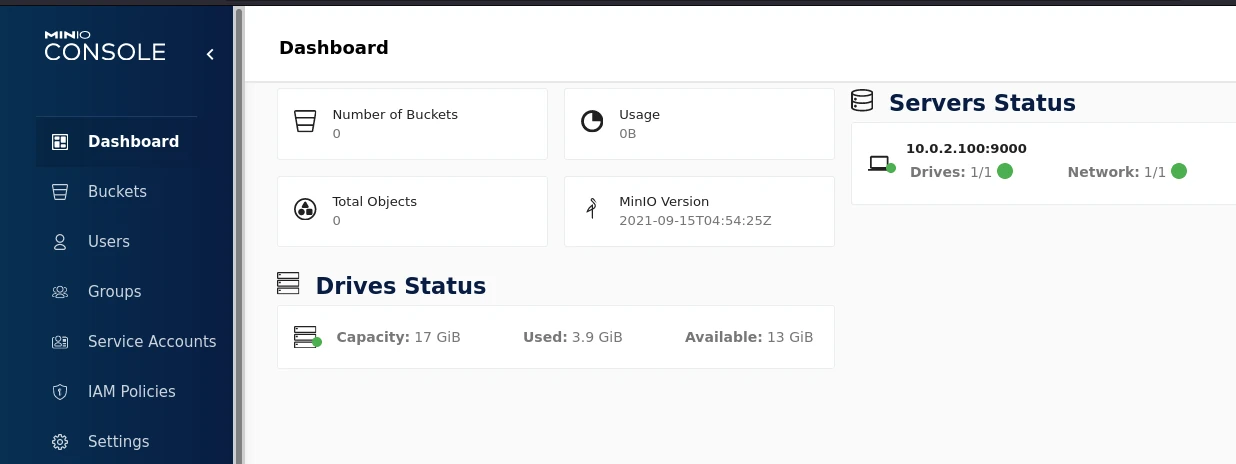
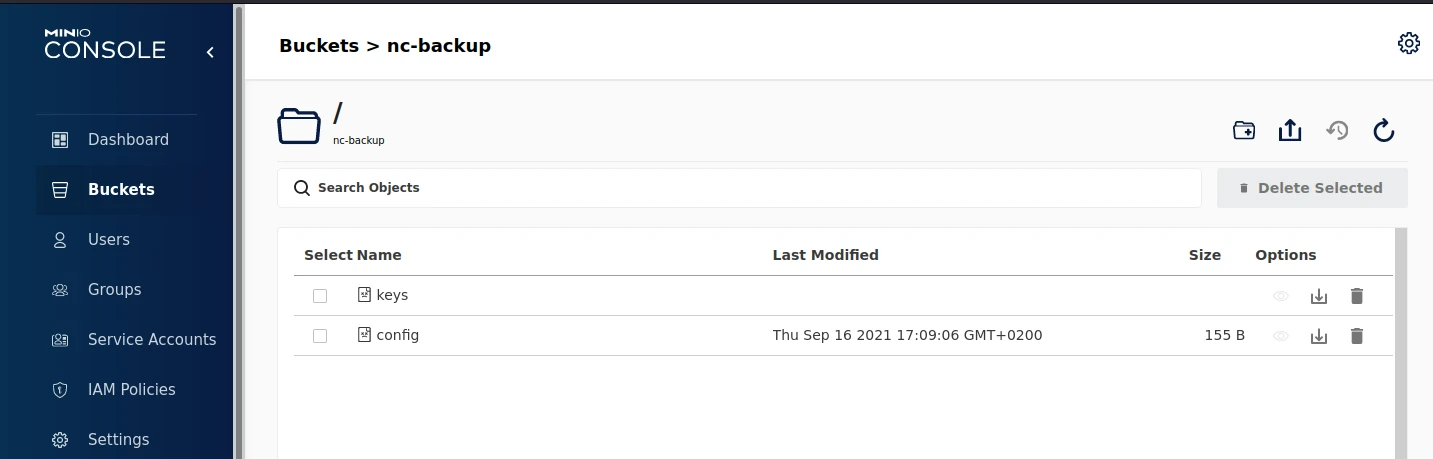
Login to your admin panel and go to the ‘Buckets’ section.
Fresh Minio ready to add a bucket!
Create a new bucket.
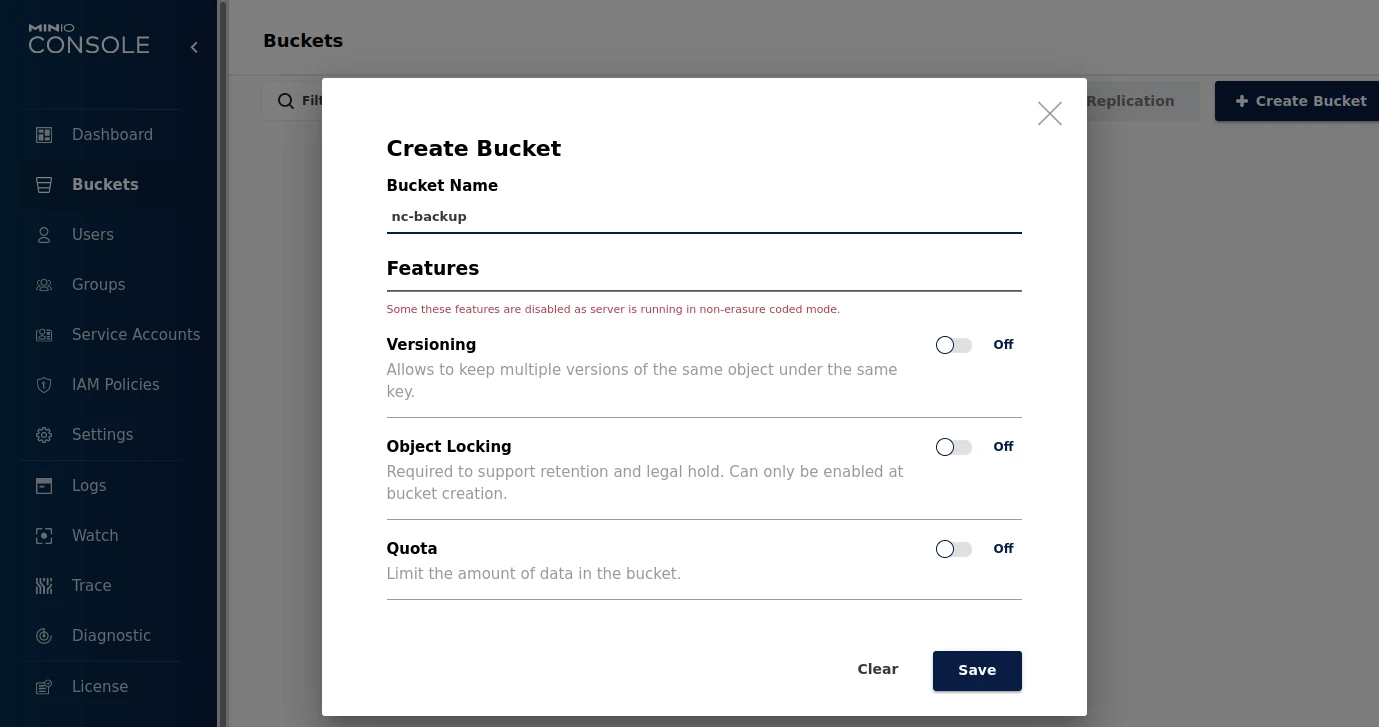
Create a new bucket named ’nc-backup'
Change the options to your liking and click ‘Save’.
Create an S3 User
To access the bucket we just created, we need to create a new user. This will be a bit different for each storage backend, but the two things we are looking for in the end are the ‘Access Key’ and ‘Secret Key’.

A user is required to create our Access and Secret Keys.
Create a new user.
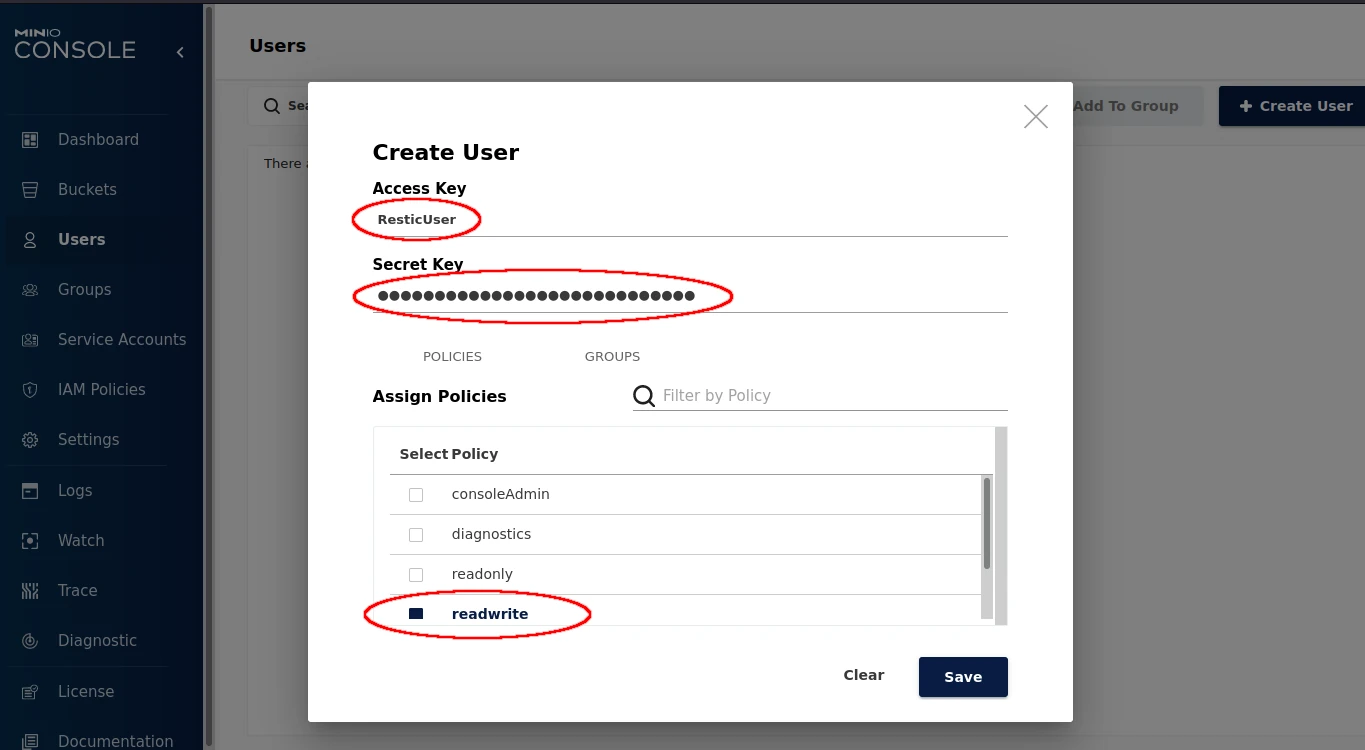
The 3 important pieces are the 2 Keys on top, and ensuring the user has Read/Write access to the bucket.
Important:
Create a strong password (Secret Key) if one is not generated for you. Store it in a password manager like KeePassXC or Vaultwarden for added security.
For Minio, the ‘Access Key’ is simply the User name which is not the case for other providers. Your user will need at the very least write access to the bucket. Read access is useful for trimming the repository and removing old snapshots.
Click ‘Save’. We now have everything we need. Let’s move back to the terminal on our Nextcloud machine.
Store Repository Info in Environmental Variables
To make it easier to access our bucket, we will be using environmental variables (variables we can read from the terminal) to store the long strings of data instead of typing them by hand each time. This will also help us for scripting in the future.
We will complete the rest of this section as the root user. To login as your root user, simply:
$ sudo -i
Create a Secure File
We want to begin by limiting access to this file to only our root user.
# umask 077
Note:
Theumaskcommand above removes permissions for ‘group’ and ‘other’ for any files we are about to create this session.
Next, we create a file using our favorite editor with the following basic format:
export AWS_ACCESS_KEY_ID=
export AWS_SECRET_ACCESS_KEY=
export RESTIC_PASSWORD=
export RESTIC_REPOSITORY=
Important:
- The
AWS_ACCESS_KEY_IDandAWS_SECRET_ACCESS_KEYare the two we set in the section above.- The
RESTIC_PASSWORDshould be a long and random password, ideally stored in your password maanger.- The
RESTIC_REPOSITORYis the link to where your s3 bucket is located. This link will differ depending on your service provider.I generally save the file as something hidden, but easy to recognize like
.restic.env

The finished file which we will read into our session only when needed.
To use our newly created file, we will use the source command which will temporarily export the above variables for Restic to read, but then remove them as soon as we logout.
# source .restic.env
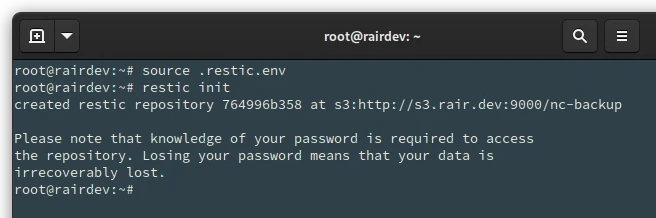
Initialize Restic Repository on s3
Since we put everything into environmental variables, and used the source command to read them into our session, initializing (creating) a Restic repository could not be easier.
# restic init
Yep! That’s it. Restic checks for the presence of specific environmental variables and uses them if you don’t specify them in your command. You will get some feedback on-screen showing the successful creation.
Environmental variables greatly simplify Restic and add a bit of security.
We can also see the skeleton of the repository created in the S3 bucket.
The very beginning of a Restic repo.
At this point you could easily continue from the last post and do as many full backups of your Nextcloud installation and data as you please. But we can improve on the process a bit more.
Restic Include/Exclude Files
According to the official Nextcloud documentation, there are only 4 directories that actually need to be backed up. This can save us a HUGE amount of space, especially as your Nextcloud grows. Things like thumbnail previews, app data, and additional resources take up a considerable amount of space and are easily replaced in a new Nextcloud installation.
When testing with a bare bones, fresh installation, my backups were reduced from ~500 Mb to ~40 Mb! You can imagine the savings once it is full of photos and other files.
Having a look at my current test Nextcloud, I have ~800 Mb of files between Nextcloud and the database.
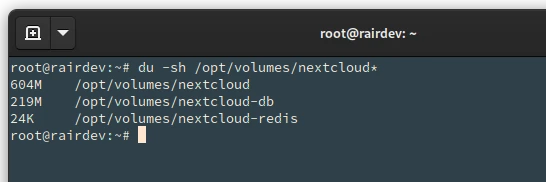
The test instance of Nextcloud with a few extra files weighs in at ~800 Mb.
Restic also has the ability to include and exclude specific directories and files in our backups. To simplify long lists of directory paths, we can create basic files listing includes/excludes.
Create a restic.include File
Following the above mentioned documentation, the 4 directories we need to backup are:
- The Nextcloud
configdirectory - The Nextcloud
datadirectory - The Nextcloud
themedirectory - The Database
Create a new file. I called mine restic.include:
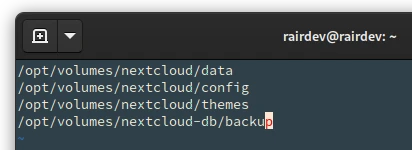
The only 4 Nextcloud directories we need to worry about.
Note:
As stated in the previous article, you will need to modify the paths shown in my screenshot above to match those of your Nextcloud installation.
Create a restic.exclude File
Similar to the above, we can exclude files that are not critical to us.
For example, I added ~95 Mb of files into a directory called Videos in my Nextcloud which are not critical to me and could easily be replaced or re-downloaded.
Create a new file. I called mine restic.exclude:
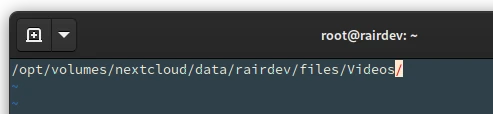
We can exclude directories with non-critical files. Especially those that use lots of space.
Note:
The ‘include’ and ’exclude’ files can be used much more dynamically by matching patterns and more. Have a look at the two links above for more details.
Restic Backup with Include/Exclude
Let’s run a backup with the new files to see how much data actually gets stored.
# restic backup --files-from restic.include --exclude-file restic.exclude
Note:
If you have started a new session, remember you will need to first run thesourcecommand to pick up the environmental variables.
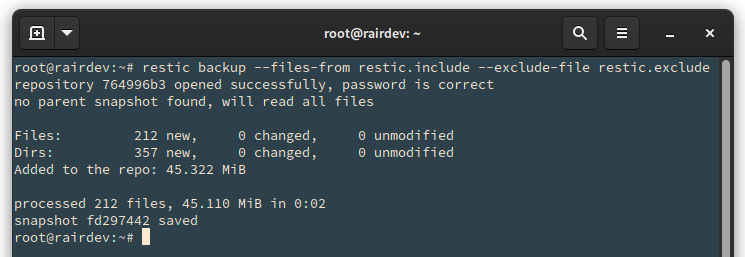
Huge space savings by correctly selecting the critical data and system files.
Wow! Using include/exclude reduced the backup’s total size to just 45.1 Mb! Of course, this is a contrived example. But it is useful to understand the concept and save space (especially for costly cloud storage).
Rotating Restic Backups
The final way to ensure we are using our backup space economically is to ‘rotate’ or ‘prune’ our backups. The Restic documentation on this topic is quite thorough so I will only briefly introduce the concept.
After a few months, you might start to gather a large number of backups and realize that some of the older ones are either repetitive or no longer useful. Fortunately, we can use a tool included with Restic to cleanup old snapshots (backups).
First, let’s have a look at the snapshots we have accumulated so far.
# restic snapshots
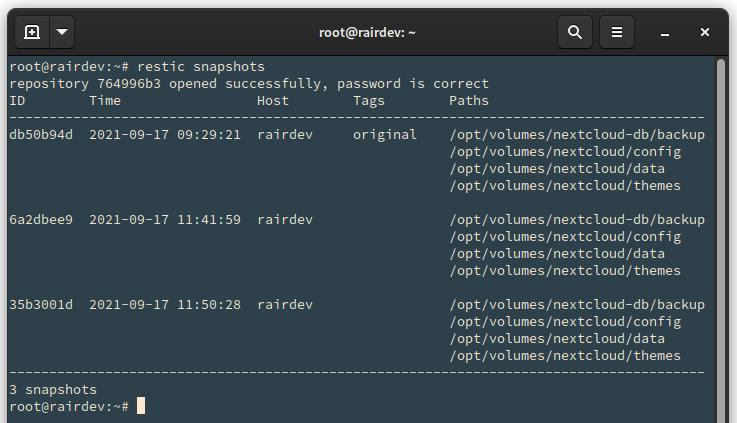
For this article, I have created 3 snapshots and tagged 1.
We have many options on how to deal with keeping/deleting backups.
Restic Forget
For the simplicity of this article, I have 3 snapshots. I will keep the most recent one, plus the oldest which I tagged with a label ‘original’ seen above.
# restic forget -l 1 --keep-tag original
Note:
If you want to see what would happen before running the command, use the--dry-runswitch. It will show you which snapshots would be saved or deleted and why.
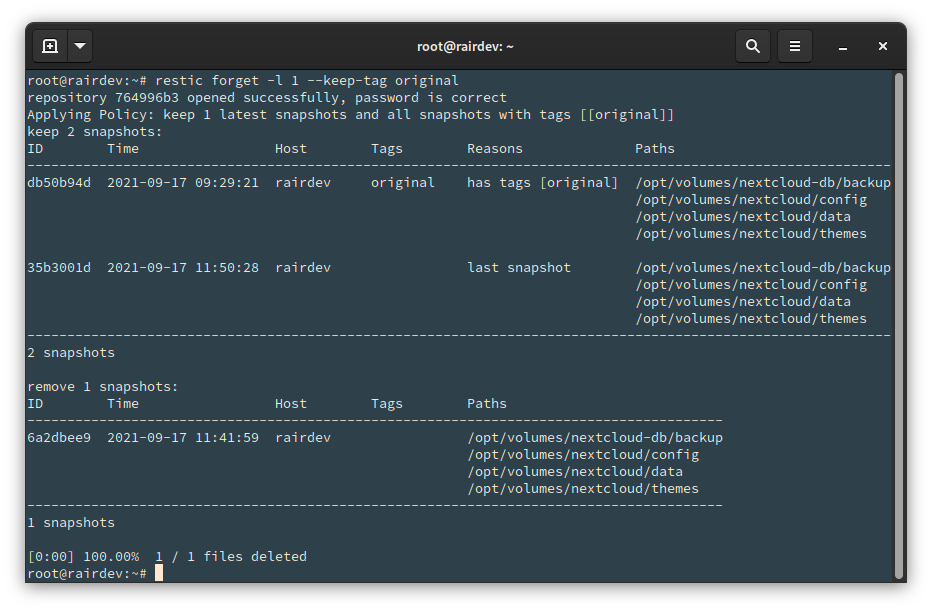
Restic saves the snapshots matching our filter, and deletes the rest.
Personally, I use something similar to the following:
# restic forget -d 7 -w 5 -m 12 -y 10
Note:
This will keep all but the last 7 daily, 4 weekly (since one is included in daily), 12 monthly, and 10 yearly snapshots.
Restic Prune
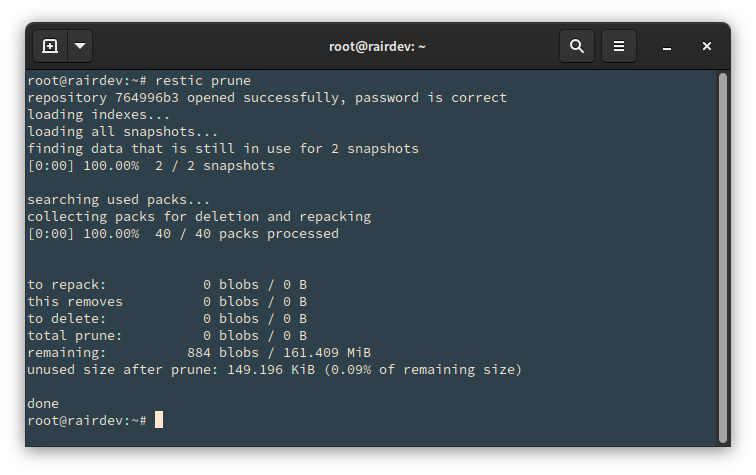
Now that the snapshot has been ‘forgotten’ (deleted), we might assume that any data associated with it would be removed as well. However, Restic only removes unused files. There are also some files that have partially used data blobs. Those will need to be ‘repacked’ to fit the remaining snapshots. More details on this topic can be found in the Restic link at the start of this section.
To clean up the repository, we will use the prune command.
Caution:
This process involves downloading the necessary ‘packs’ to repack and optimize the storage. This can incur huge charges if your storage provider charges you for how much you download from your object storage. Wasabi has no charge, which is one of the reasons I chose it as my S3 object storage provider.
# restic prune
Restic cleaning up and repacking data to save space.
Since I don’t have much in my repository and didn’t make many changes, Restic simply deleted a few unused packs.
Note:
This step can be combined with theforgetcommand above by adding the--pruneswitch to it
Concluding Thoughts
While most of this post could probably be figured out on ones own with the Restic documentation, I wanted to give a clear picture of how it can be used through the lens of Nextcloud backups. I thought about continuing the topic in this post, but already it’s grown a bit long. Thus you will have to move to part 3 where we will automate the entire process, using a non-root user!
Next Steps (preview of pt. 3 in the series)
This first part of the series was a simple start to make sure you have a good backup of your Nextcloud instance and know how to restore it properly. This article improved upon it. Here’s a quick preview of what I will cover in the next article:
- Create a non-root user to execute the backups
- Automate the database backup process with a script +
cron - Automate Restic backups with a script +
cron
Next in this series:
Nextcloud Backup pt. 3
Thank you for visiting my site and checking out this post! I hope you found it helpful. If you are feeling generous, please consider a small donation to help keep the server running.