
Home Assistant Bluetooth Error
Table of Contents
Home Assistant has been on my radar for quite some time, but only recently have I dived into the app that everyone is raving about. I have a handful of sensors setup, one of which is connected to Home Assistant through a Bluetooth integration. For the most part, all has been running seamlessly and mostly trouble-free. However, I have noticed that the Bluetooth sensor disconnects sporadically and Home Assistant isn’t able to reestablish the connection.
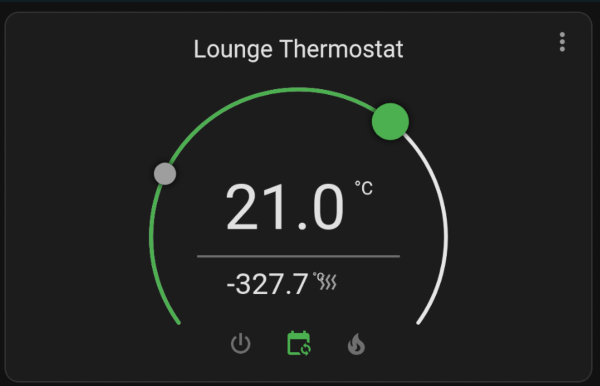
This is especially problematic during the winter/summer as my HVAC system uses temperature data from said Bluetooth sensor to determine when to run! For example: without a temperature sensor, the heater defaults to an ambient temperature of -327 °C! Technically, the heaters still run slightly, but they recognize there’s a problem and the house stays quite frigid!
Houston, we have a problem.
Fortunately, Home Assistant and Linux to the rescue!
Background
When I first noticed the issue, I tried restarting both the Bluetooth and sensor integrations in Home Assistant’s “Integrations” page. Unfortunately, neither solved the issue, and Bluetooth would remain constantly in a state of “trying to reconnect”.
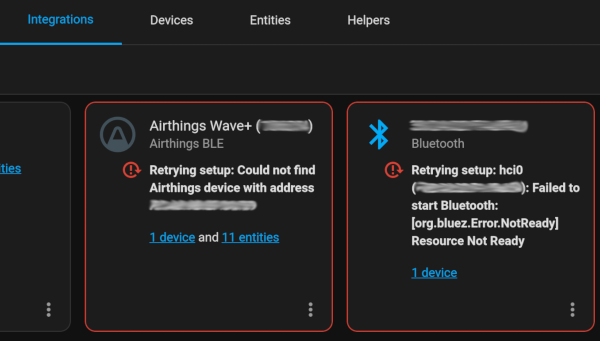
The Bluetooth sensor is unreachable and Home Assistant can’t restore the connection.
Thus, I went a step deeper. I found the only way to get the Bluetooth to reconnect was to SSH into the server, and restart the bluetooth.service Systemd unit.
Of course this requires a sudo user, which is all the more complicated due to my setup.
I am running a slightly unorthodox setup - Home Assistant in a rootless Podman container as a non-sudo user. This means that neither Home Assistant, nor the user running the Podman containers have access to the underlying system. Time to get a little creative…
To be fair, the sever is an old desktop with an ancient Intel 3165 WiFi card with Bluetooth 4.2 from 2014. This could be the underlying issue. I have a spare (newer) WiFi/Bluetooth card but haven’t bothered trying it yet. Maybe a simple USB Bluetooth stick will function better. Either way, this problem and following solution taught me more about Home Assistant and I’m happier for it!
Overview
While I may be using a fairly niche setup, I believe others might benefit from this type of fix for any system integration that might need a little more work than a simple “homeassistant.restart” automation. In this article, I will dive into a bit about Home Assistant and using Systemd’s Path unit file to restart my bluetooth service when an error arises.
Prerequisites
- Linux Server - most any distribution with
systemdshould work. I am using AlmaLinux 9 here. - Home Assistant - I’m running in a container (Podman), but any setup type should work similarly.
Plan
Whenever I begin a small project like this, I want to create a small plan to follow and refer back to as I discover more details. Here’s my basic outline:
Home Assistant Plan
- Create an automation in Home Assistant that will:
- Trigger based upon the Bluetooth sensor becoming “Unavailable”
- Run an Action that is “visible” on the host machine (and not only in the container)
System Plan
- Use the above event as a trigger to:
- Restart the Bluetooth service on the host
Pretty simple, right? Let’s break each step down.
Home Assistant
Home Assistant is full of features which I’m still discovering on a daily basis. I believe that in this scenario, I can use a simple automation with a “Trigger” and “Action”. Let’s start by creating a new Automation. Under Settings –> Automations and Scenes I will click the “+ Create Automation” button in the bottom right.
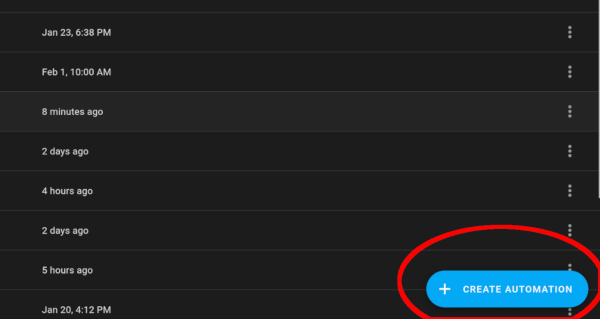
Create a new Automation from scratch.
The Trigger
This part is pretty simple. When my temperature sensor returns a reading of “Unavailable”, I want to trigger the Action. As there may be times when a temporary interruption occurs and Home Assistant is able to reestablish the connection on its own, I will add a 3 minute delay.
Click “+ Add Trigger” and select “State”
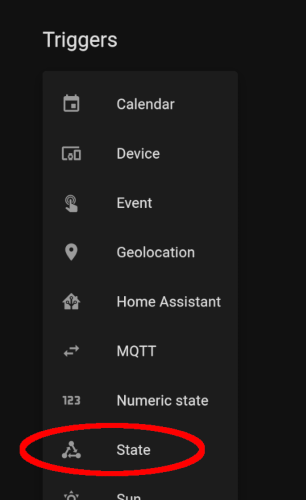
We want to monitor the ‘State’ of the sensor.
Next I will choose the temperature sensor as my entity to monitor. In truth, this device actually has 11 different measurements. Any will work as “Unavailable” is the “To” state we are looking to act upon.
At the bottom I will give it a 3 minute window to fix itself before triggering my restart.
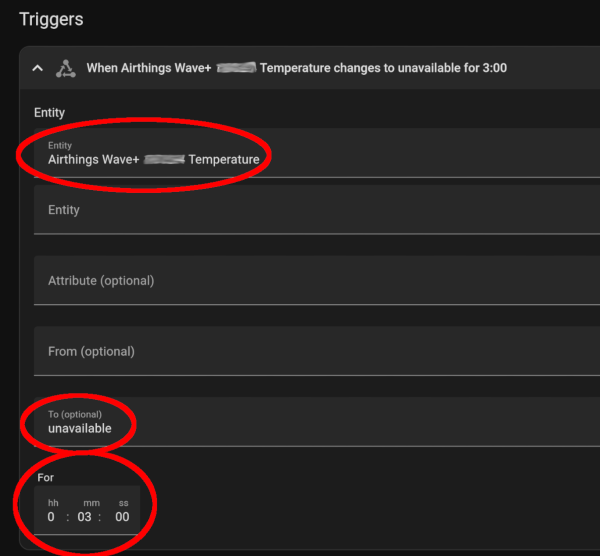
Three settings we need to change for the Trigger.
The Action
This part was a bit harder to figure out. I need an action that can be seen on the host machine itself. Since we are running in a container, nearly everything is confined within. The one way to move files in and out of a container is by bind mounting a directory from our host machine into our container. This also allows us to upgrade containers without losing valuable settings and files.
Fortunately, Home Assistant already has a bind mounted volume on my machine - the /config directory inside the container.

The Home Assistant config directory bound to a host directory.
So, if I can create or write to a file within the /config directory in the container, I can create another action on the host.
A simple search lead me to the file integration in Home Assistant.
File Notification
The part that interests me the most in the above link is the section detailing how a file can be used as a notification destination. This will allow us to write a notification line in a file in our Home Assistant’s default /config directory. We will call the file bluetooth_error. It will be created if it doesn’t already exist.
Open your Home Assistant configuration.yaml file and add the following:
notify:
  - name: bluetooth_error
    platform: file
    filename: bluetooth_error
Important!
Restart Home Assistant to activate the newly added notification service.
Call Service
Back to our automation.
We will use the “Call Service” action and select the “notify.bluetooth_error” which we created above:
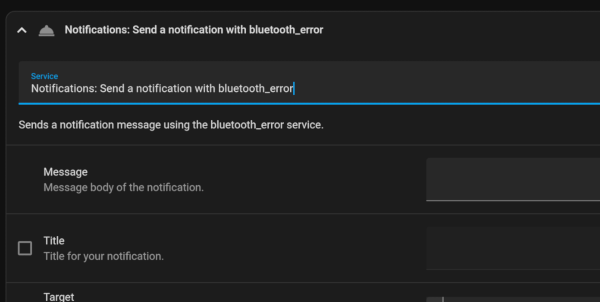
Select ‘Call Service’ and start typing ’notify’ to find our new service.
At this point, you can put in whatever message you’d like, it isn’t too critical for the rest of this to work correctly. But, if you’re anything like me, you are curious and would like it to also show us the time that the outage occurred - who knows, maybe there’s a correlation to be found.
In this case, I’m going to switch to YAML editing to use a template:
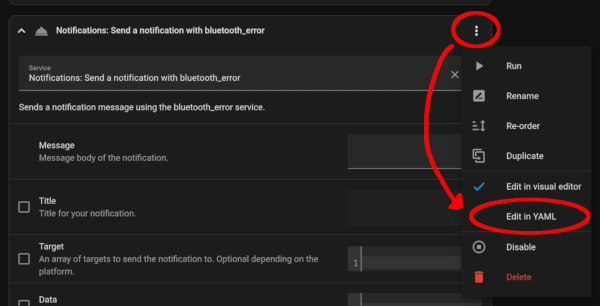
Templates aren’t supported in visual mode. It will also switch to YAML mode automatically if you start writing in template format.
There are many ways to add a timestamp, but for the lazy ones like me, we can simply use now(). So in the YAML editor I will put:
service: notify.bluetooth_error
data:
  message: "{{ now() }} - Bluetooth Unavailable!"
This basic formatting will create something of a log file as new notifications are appended to the end of the file. Note that I don’t have any checks in place to ensure the file size doesn’t grow enormous. Thus far the outage has occurred intermittently and I don’t expect the file to grow too large.
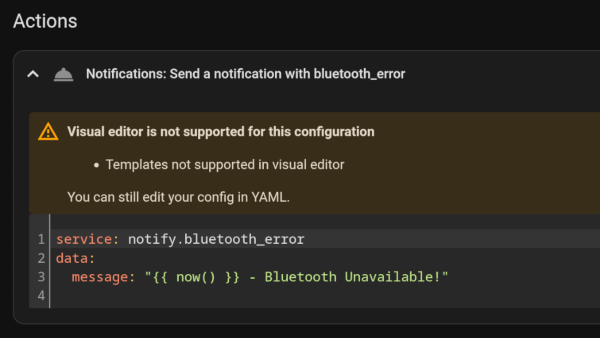
3 lines of code. Easy!
And that’s it for the Automation. Click the “Save” button in the bottom right, give it a memorable name and description. Onto the system itself.
System
On the system, we are going to use Systemd’s Path Unit file which works using inotify to act like a trigger when a file path has “changed”.
From there, we can create a simple “oneshot” service file to run a single command and then finish.
Systemd Unit files (on RHEL-like systems) live in the /etc/systemd/system directory. So we will create a set of new Unit files in this directory.
Create the Path Unit File
Create a new file:
sudo -e /etc/systemd/system/bluetooth-error.path
We are using the-eswitch withsudoto instantly edit a file as the root user.
Next, we need the basic components of a Path file:
[Unit]

[Path]

[Install]
These three components will allow us to create the Path file.
Unitis used to describe the unit and set any dependencies.Pathis used to define the path(s) to watch, and what do do after something has triggered on the pathInstallis used to “enable” the unit. Meaning that it will start at boot and be available.
Simple enough. Let’s fill in each component. Since this is a VERY basic scenario, we don’t need much:
[Unit]
Description=Watch for changes to the Home Assistant bluetooth_error file.

[Path]
PathModified=/home/poduser/volumes/homeassistant/bluetooth_error

[Install]
WantedBy=multi-user.target
I’ve filled in the bare minimum. There’s lots more detail that can be put in with a myriad of other settings.
- The description is self-explanatory
PathModifiedis used here to trigger the service anytime the file is modified. There are many other options that could be used here, but this seems to make the most sense to me. Be sure to use the full system file path, and of course replace the above with your correct path.WantedByis used to make sure this Unit is active on boot.multi-user.targetrefers to the default boot sequence.
That’s it! Save and close.
Create the Service Unit File
By default, when the Path unit file (above) is triggered, it will run the service file of the same name, but ending in .service. Let’s create that now.
sudo -e /etc/systemd/system/bluetooth-error.service
This one is even simpler. I will skip straight to the finished file:
[Unit]
Description=Restart bluetooth service triggered by HomeAssistant bluetooth failure.

[Service]
Type=oneshot
ExecStart=/usr/bin/systemctl restart bluetooth.service
Once again the description is pretty self explanatory.
Typein this case is used to tell Systemd that we just want this service to run once and then stop, not continue running in the background.ExecStartis simply the command we want executed. As stated at the beginning of the article, simply restarting the bluetooth service is sufficient to fix the error.
Save and exit.
Start and enable our Path Unit
Lastly, we just need to start and enable the Path file we created above.
sudo systemctl enable --now bluetooth-error.path
If everything went well, we should see that it was activated successfully. Time to test it out!
Test the system
As a simple test, I will run a notification Action in Home Assistant to write to the notification file as if there were a problem with the Bluetooth connection. From there, we should see that the Bluetooth service is restarted.
Note:
After writing this article, I realized that this might not be the best test of our setup. First, we are assuming that sensor will correctly report as “Unavailable” (although I’m 99% sure this is fine). Second, we are assuming that the automation will fire correctly. Not a huge deal, but two things to keep in mind if for some reason the automation fails after the following test. See my Troubleshooting section below for more.
Home Assistant Notification
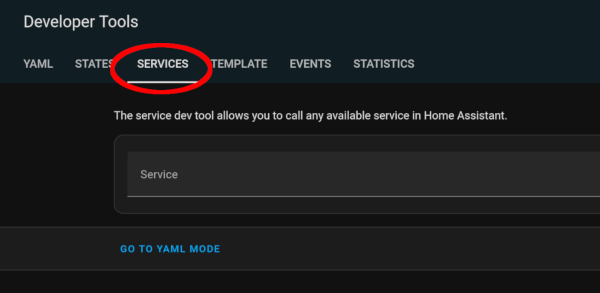
In Home Assistant, navigate to the Developer Tools –> Services tab.
Navigate to your Developer Tools to find the Services section.
Under the Service drop-down menu, type or select the “notify.bluetooth_error” service.
In the “Message” box, type something like “initial test” or whatever you want to show up in the file.
And lastly, click the blue “Call Service” button.
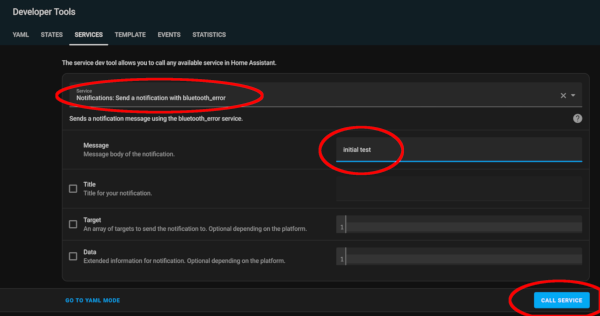
Mimicking the Automation’s ‘Action’ of calling the notification.
You should see the button change to a green check-mark. I didn’t have any other feedback on-screen at that point.
Host System File
Back to our console, we can first check the file itself, and then have a look to see if our Bluetooth service was correctly restarted.
sudo cat /home/poduser/volumes/homeassistant/bluetooth_error

A portion of my log file.
You’ll have to excuse the extra lines in the above file, I obviously set this up and tested it before writing this article, however, you can see on the last line, the message I just sent to it.
So the notification was written to the correct file, excellent.
Bluetooth Service
Now did it actually restart the Bluetooth service?
journalctl | grep bluetooth
This simple command allows us to look at the system journal, and filter for entries containing the word “bluetooth”.
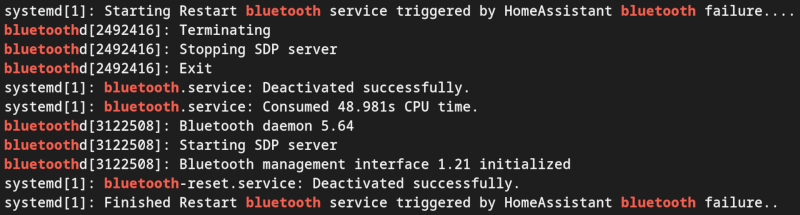
Bluetooth is successfully restarted.
You’ll notice I used slightly different descriptions and file names, but they are otherwise identical to this article.
As we can see in the first line, the “Restart” event was triggered by my Systemd service file. It doesn’t specifically note that the “Path” Unit is what started the event, but considering the Path Unit is the only thing that could trigger the restart service, I believe it’s working well. After, we see the bluetooth service restarting, and then my “bluetooth-reset.service” file completed.
After restarting the Bluetooth service, I watched the Bluetooth device within Home Assistant which changed after a minute or so from “Unable to find device” to its normal state.
My temperature sensor subsequently came back online
A Few Notes
SELinux
Depending on how you have setup Home Assistant, and the underlying OS, you may run into trouble with SELinux. Since I’m running in a Podman container, the files mounted into a container get relabeled with system_u:object_r:container_file_t. The root user has access to files with this label. This allows the Systemd Path Unit file to read modifications made.
However, while I was testing for this article in a VM, I instead just created a small file in my user’s home directory. This failed to work with the Systemd Path Unit file as the file had the unconfined_u:object_r:user_home_t tag. Depending on your scenario, you may have to use a different file location or relabel your notification file and set your SELinux policy accordingly!
No Error Checking
This is a pretty basic setup without any error checking involved. What would happen if there was really a trouble with my Bluetooth adapter? What if the rfkill command were used to stop Bluetooth from restarting correctly? What if the problem is with the sensor itself? Etc.
I would want to address these and any other potential issues that could cause our system to go into a loop and grow our notification file without a solution. Just something to keep in mind in a more “production” style environment.
Troubleshooting
Start at the end and work backwards
I won’t go through the entire process, but I generally find it’s best to start with the least moving parts, and verify along the way as we add more back in. The steps to take:
- Does
systemctl restart bluetooth.servicework correctly? Any errors shown when you look at thestatusof the service? - Call the
bluetooth-error.servicedirectly withsudo systemctl startand see if it correctly restarts Bluetooth. Check for errors or typos in your Service file. - Is the Path correct in your Path file? Is the service file name identical to the path file name (except for the ending)?
- Are there SELinux errors blocking the file from being read?
- Is the
configdirectory in your container correctly bind mounted to the host file system? - If you call the notification Service from Home Assistant, does it correctly write to the correct file?
- Is the Trigger using the correct sensor? Did you make sure you selected “Unavailable” in the “To” section and not the “From” section?
- If you manually change the State of the sensor in your “Trigger” section to “unavailable”, does the Trigger correctly fire?
- If you manually disable bluetooth using something like
rfkill block bluetooth, does the sensor report “Unavailable”?
These are a few suggestions off the top of my head for how I would begin troubleshooting the issue. Any other suggestions are welcome in the Comments section at the bottom of the page!
Conclusion
When I started self-hosting services, I was more than happy to stick my hands in everything and manually fix/restart/tinker with everything. Anyways, if something broke or was unavailable for a few hours I didn’t mind. Thankfully, my significant other was mostly patient with me and my constant tinkering.
But, as I’ve added services and my project has grown, I have learned the power and time savings of automating solutions. They are rarely perfect, but often take out the extra few minutes/hours of work I was doing on repetitive tasks.
When our heaters stopped working in the middle of winter, this became an urgent issue. Especially since my significant other is not in a position to SSH into our server, type out a command in the console, and check the status of the device. My goal for this year is to simplify everything, and give her some basic controls on our Home Assistant dashboard should an issue arise when I’m not available.
I hope you found this article helpful. Any comments, questions, or suggestions are welcome in the comment section below!